brad4639
Extreme
Ok, if anyone is still following this thread or is interested, I just pulled my nytro out of storage and have plans for quite a few changes this year. As done before I'll take photos of the progress. Not 100% sure what is all going to be done but here is my list so far of what I'm planning on building/doing to it.
My battery is dead so I'm going with the YTZ7S lightweight battery and making new brackets.
Removing the radiator and machining my own billet under tunnel cooler.
Making a new re-designed tunnel extension
I got a light weight hood that I'm putting on and deleting my headlight. adding LED lights. Anyone know whats good to use?
I'm going to try and build a set of A-Arms for it to move the spindles forward. possibly doing billet alum arms... not sure yet
I might be pulling the engine out and putting in a head shim and arp head studs.
Adding a fuel injector inline so I can run more boost. ( I have to try and get ahold of Ken from Push Turbo)
Might be installing a bigger fuel pump and pressure regulator.
If there's money and time left over, I am going to build my own Meth injection kit.
Anyone have feedback or input on any of this?
How about any ideas for me on what to build next?
Thanks guys, pics to follow


moab11
Lifetime Member
- Joined
- Feb 4, 2010
- Messages
- 424
- Location
- Thunder Bay, Ontario
- Country
- Canada
- Snowmobile
- 2016 SKS 155
Awesome! Can't wait for the updates!!!
zx4ever
VIP Member
- Joined
- Apr 14, 2011
- Messages
- 317
- Location
- Northern BC canada
- Country
- Canada
- Snowmobile
- 08 nytro ty4stroke customized
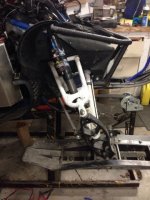
Love the build keep modding that thing. If you run out of time to make new a arms, I would just modify your existing I did this a year ago and it was fairly easy and moved them 3" ahead and ended up with a narrower stance to boot I put 1200 km on them and they worked well and cost me nill.
Attachments
brad4639
Extreme
Did you just cut the arm off and reweld them at a forward angle? I don't have the stock arms anymore and I'd rather not chop up by timbersleds but we will see... I feel like I have plenty of time right now, but once it starts getting cold, I'm sure I'll start panicking and feel way behind.Love the build keep modding that thing. If you run out of time to make new a arms, I would just modify your existing I did this a year ago and it was fairly easy and moved them 3" ahead and ended up with a narrower stance to boot I put 1200 km on them and they worked well and cost me nill.
zx4ever
VIP Member
- Joined
- Apr 14, 2011
- Messages
- 317
- Location
- Northern BC canada
- Country
- Canada
- Snowmobile
- 08 nytro ty4stroke customized
Ya I would probably not want to do it with timbersled arms either, lol. Yes I just cut off around a inch or so off the front of arms and changed the back angle to fit. Layed it out on plywood so each side would match. 3" is max with the stock steering arms. And spherical bearings are needed
brad4639
Extreme
Problem 1: I don't have a Yamaha clutch puller.
Problem 2: I don't want to order one online and wait for it to get here.
Problem 3: I refuse to pay dealer prices for one.
Solution: Google dimensions and whip one up quick.


finished

Problem 2: I don't want to order one online and wait for it to get here.
Problem 3: I refuse to pay dealer prices for one.
Solution: Google dimensions and whip one up quick.


finished

BOOM nice work
MNnytroturbo
Newbie
- Joined
- Nov 5, 2013
- Messages
- 10
- Location
- Iron Range, MN
- Country
- USA
- Snowmobile
- 2011 yamaha nytro xtx 162"x2.5" , push turbo, mountaintech full skid plate,OFT roll over valve with tether, OFT steering relocater, Avid drivers, Rox 3" riser, timbersled front bumper, mtn air skid, roest dash vent, koso x2 guage, Scmidtt brothers clutching, homemade manual fan control for cooling underwood temps and more I can't remember
Beautiful work on this sled! Any chance your offer is still open to do that brake rotor mod? And how much would you want to do it? Thanks, Lucas
brad4639
Extreme
Thanks! Yeah I've done a couple now and it does make a difference. $40 if you get me yours to modify or I can buy a used one and get it to you for $100+shipping.Beautiful work on this sled! Any chance your offer is still open to do that brake rotor mod? And how much would you want to do it? Thanks, Lucas
MNnytroturbo
Newbie
- Joined
- Nov 5, 2013
- Messages
- 10
- Location
- Iron Range, MN
- Country
- USA
- Snowmobile
- 2011 yamaha nytro xtx 162"x2.5" , push turbo, mountaintech full skid plate,OFT roll over valve with tether, OFT steering relocater, Avid drivers, Rox 3" riser, timbersled front bumper, mtn air skid, roest dash vent, koso x2 guage, Scmidtt brothers clutching, homemade manual fan control for cooling underwood temps and more I can't remember
I just ordered a good used one before I read your reply. When I get it I'll ship it out to you, pm me with an address, and thanks again, Lucas Maish
brad4639
Extreme
Last week I spent a couple hours at Kens shop (the owner of Push Turbo), he's a great guy that really knows his stuff about anything boost related. He hooked me up with a headshim, ARP studs and a few other odds and ends. I also have on order a new fuel control box and an extra plug in injector. I'm planning on running 15-17psi this year on pump gas!
Got the heart of the beast pulled out last night and made a makeshift workbench that actually holds the engine pretty well. I've been reading all the threads I can find about adjusting the timing but I'm still feeling pretty lost on the subject. I do have a cam timing jig to use but I don't really know where to start. If anyone has some insight on this it would be greatly appreciated!


Got the heart of the beast pulled out last night and made a makeshift workbench that actually holds the engine pretty well. I've been reading all the threads I can find about adjusting the timing but I'm still feeling pretty lost on the subject. I do have a cam timing jig to use but I don't really know where to start. If anyone has some insight on this it would be greatly appreciated!


brad4639
Extreme
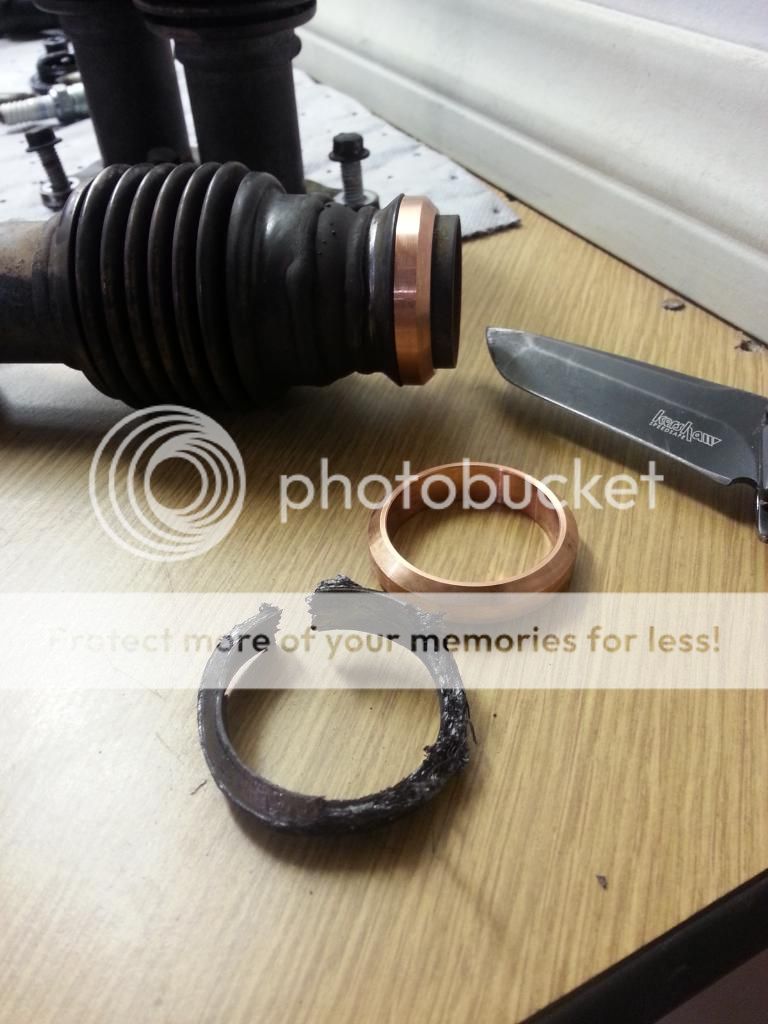
Turbo guys, if you haven't checked lately, your exhaust gaskets are probably shot! I only had 1 left that was partially intact and I only put a few hundred boosted miles on it. Ordered a set of copper ones that should do the trick.

brad4639
Extreme
Head shim and setting the timing.
I was pretty nervous about doing this. I've had plenty of 2 strokes apart and a couple small block chevys but never an over head cam 4 stroke. I was a little over cautious and spent more time on it than I had to but its all done and together now.
first step was to find TDC, I put together a dial indicator and a mag base, made a plunger extension out of brass to drop into the spark plug hole. I later found out this step wasn't necessary as you can just line up the timing marks in the sight hole.

When you are at TDC the horizontal lines on the cam gears will be matched up fairly closely like this.

Then check your valve clearance with feeler gauges. The service manual has the specs.

Once thats done, pull out your cam chain tensioner and then pull the cam caps. Loosen the bolts progressively in a small X to large X pattern to avoid cam damage.

Now you can pull the head studs. Get yourself a big #*$&@ breaker bar as these do not come out easily. Once again loosen all the bolts progressively and use a small X big X pattern, starting from the inside working your way out. Once the studs are all out, its very important to put the cams back in, that way you don't have any valve shims fall out when you flip the head to clean gasket material off. Carb cleaner and a rag works better than scraping, just try not to let any of the gunk fall into the water passages.
Clean the surface of the block and install the new ARP studs with locktite. Bottom out the 6 studs that are on the left side of the picture just hand tight. The stud that goes over the water pump (right side of picture closest to you) cannot be installed all the way down, It hits the water pump and locks up the engine. Don't ask how I know this for sure! That stud needs to be sticking out about 3.25 inches from the block. The stud that is behind that will be sticking up about 3 inches and the rest somewhere around 2.75 inches. After installed, I let them sit overnight so the locktite would dry.

Keep the chain zip tied to something so that it doesn't fall into the case. Now install the headshim (mine was .100 thick over all) and torque to 35lb ft, then 45, then 55 twice.
Pull the intake cam gear off the cam and I used a die grinder with a diamond bit to slot the 2 bolt holes. You will have to pull it off and regrind several times before you get it right. Make sure you are still at TDC. Put the cam gear back on and install the intake cam only with the chain on it. This is where the cam jig makes life easier. Now slide the jig over the cam gear bolt, it should slide over easily, if its way off, you probably need to move the chain one tooth over, which will require you to unbolt the cam. Try again and it if the jig almost slides over the bolt then you'll have to grind more out of the gear. Repeat the process until until it fits nicely. Once thats done, zip tie the chain to the cam gear through one of the holes on the top side of the cam. If you dont do this, the chain will skip and you'll have to pull the cam and do it all over again, trust me I found out the hard way. Then throw the exhaust cam in. This may take a few tries as well to get the right tooth. I do not have a picture but there are two holes on the cam shaft right behind the first cam cap that need to be facing up get this correct. Once the cam jig slides over both intake and exhaust cam gear bolts freely, these two holes in the cam will be facing up but slightly inward towards each other.
This picture shows the exhaust gear is 1 tooth off. Put your cam chain tensioner back in after you've reset it. To do that you need to squeeze the spring and push it back in. Theres a small clip that just locks over a small pin. Hard to explain but its quite easy to do when you see it.

Once you are satisfied that the timing is correct and the jig slides on nicely, rotate the engine over a few times and recheck it, it slides back over then torque down the cam caps to 17 ft lbs (I think). Check your valve shim clearance one more time. and throw the valve cover on. Put the exhaust headers back on and your ready to install the engine!

brad4639
Extreme
Its been a while since I updated on here. I installed the engine, got it to fire and shut if off right away since I don't have coolant in it yet.
I dumped the old fuel controller and went with Push Turbo's new version of the DynoJet Power Commander PC5 paired up with Deatschwerks 450cc big injectors. Its set up with 6 different maps that change every 2000ft. in elevation automatically so once its tuned, I'll never have to make fuel adjustments again!

I dumped the old fuel controller and went with Push Turbo's new version of the DynoJet Power Commander PC5 paired up with Deatschwerks 450cc big injectors. Its set up with 6 different maps that change every 2000ft. in elevation automatically so once its tuned, I'll never have to make fuel adjustments again!

MNnytroturbo
Newbie
- Joined
- Nov 5, 2013
- Messages
- 10
- Location
- Iron Range, MN
- Country
- USA
- Snowmobile
- 2011 yamaha nytro xtx 162"x2.5" , push turbo, mountaintech full skid plate,OFT roll over valve with tether, OFT steering relocater, Avid drivers, Rox 3" riser, timbersled front bumper, mtn air skid, roest dash vent, koso x2 guage, Scmidtt brothers clutching, homemade manual fan control for cooling underwood temps and more I can't remember
How much is that fueling system cost, and what's included?
Similar threads
- Replies
- 4
- Views
- 4K
-
This site uses cookies to help personalise content, tailor your experience and to keep you logged in if you register.
By continuing to use this site, you are consenting to our use of cookies.