This is a cut & paste from the tech pages of TY.com. So many people were asking about posting it. Posting the link straight to that page there does not work so here it is. The pictures are not in order but you will be able to put one with what is being said here.
"Darting and a cure"
First off I need to give credit where credit is due, this idea comes from Scott Bergstrom at Bergstrom Skegs, and VmaxJohn from Totallyamaha.com Forums, Please follow the the photos and directions to accomplish this task.
This install will lift the front edge of the carbide off the snow/ice (or turning surface) to help "cut" a turning groove for the skis to follow instead of pushing a turning groove "hunting" for a place to turn. Also this will help eliminate darting in most (not all) conditions.
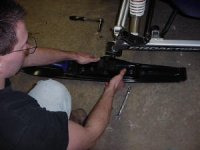
Take the skis off the sled by removing the
spindle bolt through the ski mount. Remove the ski
bumper (large rubber spacer under skis) and take it to
the work bench.
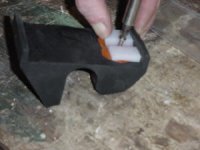
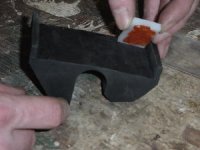
With a piece of material (preferably hard material, hyfax, or part of aold belt
etc...) approx. 1"x2" and 1/8-1/4" thick (Bergstrom adds this in for free when you purchase their carbides but dont forget to ask. Or just buy the spacers precut from them, great people to work with).
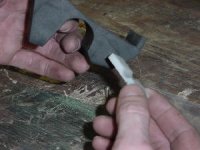
Attach this to the bottom of the ski bumper with Permatex and a brass or stainless screw. A Alum or steel screws will corrode and fail off down the road (or trail which ever the case may be).
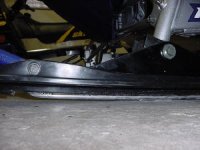
Reinstall the ski and bumper and check to make sure the front edge of the carbide is up off the cement (used for viewing purposes) The front edge should be up about 1/8"-1/4" any more or less and you'll need a different spacer thickness to achieve proper balance.
Too much height up front can lead to different steering problems so experiment with different
thickness spacers and front carbide heights to achieve the ride you are seeking. Enjoy your more behaved front end.
Ski
Totallyamaha is not responsible for any damages that these modifications may cause to your vehicle; any modifications are your responsibility if you choose to do so. We are providing information ONLY. Some of these modifications may VOID your warranty and that is your responsibility to look into. The Totallyamaha users have passed along most of the information found on this site. If you have any questions or concerns about anything on this site talk to your dealer before using any of the information. Totallyamaha will not be liable for any damages or personal injury from any modification performed from this site.
"Darting and a cure"
First off I need to give credit where credit is due, this idea comes from Scott Bergstrom at Bergstrom Skegs, and VmaxJohn from Totallyamaha.com Forums, Please follow the the photos and directions to accomplish this task.
This install will lift the front edge of the carbide off the snow/ice (or turning surface) to help "cut" a turning groove for the skis to follow instead of pushing a turning groove "hunting" for a place to turn. Also this will help eliminate darting in most (not all) conditions.
Take the skis off the sled by removing the
spindle bolt through the ski mount. Remove the ski
bumper (large rubber spacer under skis) and take it to
the work bench.
With a piece of material (preferably hard material, hyfax, or part of aold belt
etc...) approx. 1"x2" and 1/8-1/4" thick (Bergstrom adds this in for free when you purchase their carbides but dont forget to ask. Or just buy the spacers precut from them, great people to work with).
Attach this to the bottom of the ski bumper with Permatex and a brass or stainless screw. A Alum or steel screws will corrode and fail off down the road (or trail which ever the case may be).
Reinstall the ski and bumper and check to make sure the front edge of the carbide is up off the cement (used for viewing purposes) The front edge should be up about 1/8"-1/4" any more or less and you'll need a different spacer thickness to achieve proper balance.
Too much height up front can lead to different steering problems so experiment with different
thickness spacers and front carbide heights to achieve the ride you are seeking. Enjoy your more behaved front end.
Ski
Totallyamaha is not responsible for any damages that these modifications may cause to your vehicle; any modifications are your responsibility if you choose to do so. We are providing information ONLY. Some of these modifications may VOID your warranty and that is your responsibility to look into. The Totallyamaha users have passed along most of the information found on this site. If you have any questions or concerns about anything on this site talk to your dealer before using any of the information. Totallyamaha will not be liable for any damages or personal injury from any modification performed from this site.
Attachments
-
 DSC00016_small.jpg12.8 KB · Views: 1,394
 -
 DSC00019_small.jpg13.2 KB · Views: 1,469
 -
 DSC00012_small.jpg7.7 KB · Views: 7,513
 -
 DSC00011_small.jpg8.7 KB · Views: 7,503
 -
 DSC00010_small.jpg11.6 KB · Views: 7,469
 -
 DSC00009_small.jpg12.2 KB · Views: 1,315
 -
 DSC00006_small.jpg13.6 KB · Views: 1,311
 -
 DSC00004_small.jpg11.8 KB · Views: 1,362
would this work on an 05 rx as well?


jminor1 said:would this work on an 05 rx as well?
You can SHIM ANY SKI
1/8" TO 1/4"
Snorover
Expert
- Joined
- Apr 15, 2003
- Messages
- 366
- Age
- 87
- Location
- Kittery/Fayette,Maine
- Country
- USA
- Snowmobile
- 2017 Viper
Mr. Bergstrom told me about a plumber who uses a wedge that is used for leveling fixtures. I picked a package of them up at Home Depot for less than $2.
They are called: Plastic toilet shims.
They look like the real deal for shiming the ski's.
They are called: Plastic toilet shims.
They look like the real deal for shiming the ski's.