SNOWDATE LOG jan 4th
Well, I finally started building my new sled for the year, a second time. I first started with a 06 venture, 05 rx1 seat, m10, ice attack 144in track, bark buster front end, ohlins all around but before finshing I picked up a deal on a apex so I'm now using that as the base sled with all the obove parts minus seat(seat will be custom from apex). I hit a snafu with the front end, the company makes the spindles for mountain guys and the trail is negative. This would make the sled be all over the place so I'll have to make new ones. I'll still be using their A frames though.
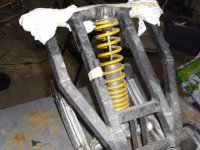
Rear skid is a metric m10 121in with ohlins shocks. I have modified it so it has a stronger front arm that wont twist, custom adjustable front limter slide, all pivots now have bushings that are very tight(not like the standard shafts they come with) and a 136 extension. I used this last year in my superventure and WOW, what a ride. I may be able to use the same skid this year with the 144x1in ice attack track I have because I will also be using skidoo extroverts, 10 tooth and 8in rear idlers. To use the 10 tooth extroverts with that skid I will have to use atleast 1in of setback in the skid. This added to the extra length needed to wrap the track around the bigger rear wheels should end up about right. If I do need to have extensions longer I'll have them made with a tiped up style. I love how this works on the xtx sleds.
Tunnel will be off the 06 venture. Rear rack is off a apex mountain. Exhaust is from a rx1. Skis will be Arrows by Kimpex. Rear heat exchanger from a srx.
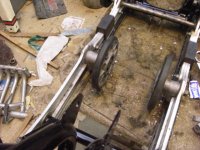
More to come with pictures. Mocking up the rear skid today on a tunnel template.
Well, I finally started building my new sled for the year, a second time. I first started with a 06 venture, 05 rx1 seat, m10, ice attack 144in track, bark buster front end, ohlins all around but before finshing I picked up a deal on a apex so I'm now using that as the base sled with all the obove parts minus seat(seat will be custom from apex). I hit a snafu with the front end, the company makes the spindles for mountain guys and the trail is negative. This would make the sled be all over the place so I'll have to make new ones. I'll still be using their A frames though.
Rear skid is a metric m10 121in with ohlins shocks. I have modified it so it has a stronger front arm that wont twist, custom adjustable front limter slide, all pivots now have bushings that are very tight(not like the standard shafts they come with) and a 136 extension. I used this last year in my superventure and WOW, what a ride. I may be able to use the same skid this year with the 144x1in ice attack track I have because I will also be using skidoo extroverts, 10 tooth and 8in rear idlers. To use the 10 tooth extroverts with that skid I will have to use atleast 1in of setback in the skid. This added to the extra length needed to wrap the track around the bigger rear wheels should end up about right. If I do need to have extensions longer I'll have them made with a tiped up style. I love how this works on the xtx sleds.
Tunnel will be off the 06 venture. Rear rack is off a apex mountain. Exhaust is from a rx1. Skis will be Arrows by Kimpex. Rear heat exchanger from a srx.
More to come with pictures. Mocking up the rear skid today on a tunnel template.
SNOWDATE LOG january 10th(ish)
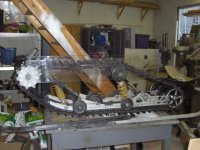
well, mocked up the rear skid, ended up going 3/4 setback and ordered a tipped up rail, 9 3/8 extension for 8in wheels. The 136 extenion I had would not quite make it. Track was just starting to tighten up with adjuster all the way back. I ordered the extensions from CB performance. I am still waiting for them.
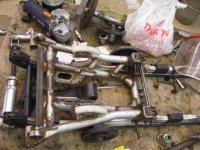
I tore down some of the apex I'll be using for the motor and plastic mostly. The exhaust, front suspension and rear skid were shot. 15,000 mls of no mantainence. I'll salvage and sell off all the stuff I don't use.
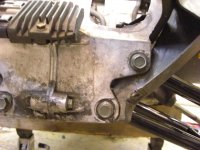
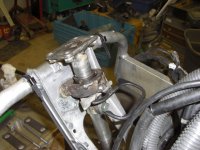
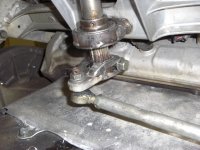
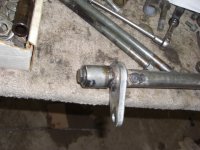
All Rx1/apex style sleds have a problem with stearing pole bushings wearing out. They are made from hard plastic. The lower one sits a few inches over the exhaust and it keeps it very warm and drys out the plastic and any grease that is in it. The upper one sees alot of water and doesnt stay lubed very well either. Both are very hard to get to for lubrication on a regular basis. I removed the bushings and made up pillow block style bearing holders to mount in their place. Because the bearings can not be split in half, I had to make a new stearing shaft that could be slide into the bearings. A jack shaft with the splined end pointed down works great. A new top plate was welded on to bolt the handle bars to. Withe the shaft installed, the spline down, a new mount was made for the tie rod end that connects the pole to the stearing linkage. This was made from a couple spindle bell cranks from the front of a srx. These cranks have the same spline as the jack shaft. This allows the end to be removed so the shaft can be remove if needed. This stearing shaft is the stiffest stearing I have ever felt on a sled. I can think of no situation where this shaft will ever bend and there is now 0 movement in the handle bars.
Next project will be to install bearings on the shaft that runs along the side of the frame. This shaft suffers from similar problems as the stearing shaft. The bushings dry out, wear out and drag. I am going for a fully rollerized stearing system with no slop and less effort.
well, mocked up the rear skid, ended up going 3/4 setback and ordered a tipped up rail, 9 3/8 extension for 8in wheels. The 136 extenion I had would not quite make it. Track was just starting to tighten up with adjuster all the way back. I ordered the extensions from CB performance. I am still waiting for them.
I tore down some of the apex I'll be using for the motor and plastic mostly. The exhaust, front suspension and rear skid were shot. 15,000 mls of no mantainence. I'll salvage and sell off all the stuff I don't use.
All Rx1/apex style sleds have a problem with stearing pole bushings wearing out. They are made from hard plastic. The lower one sits a few inches over the exhaust and it keeps it very warm and drys out the plastic and any grease that is in it. The upper one sees alot of water and doesnt stay lubed very well either. Both are very hard to get to for lubrication on a regular basis. I removed the bushings and made up pillow block style bearing holders to mount in their place. Because the bearings can not be split in half, I had to make a new stearing shaft that could be slide into the bearings. A jack shaft with the splined end pointed down works great. A new top plate was welded on to bolt the handle bars to. Withe the shaft installed, the spline down, a new mount was made for the tie rod end that connects the pole to the stearing linkage. This was made from a couple spindle bell cranks from the front of a srx. These cranks have the same spline as the jack shaft. This allows the end to be removed so the shaft can be remove if needed. This stearing shaft is the stiffest stearing I have ever felt on a sled. I can think of no situation where this shaft will ever bend and there is now 0 movement in the handle bars.
Next project will be to install bearings on the shaft that runs along the side of the frame. This shaft suffers from similar problems as the stearing shaft. The bushings dry out, wear out and drag. I am going for a fully rollerized stearing system with no slop and less effort.
Attachments
SNOWDATE LOG jan 17th
Well after deciding I better not waite for my extensions to get this sled so I can ride it. I figured I will want to fix the skid to resell later, this way I can ride It and when I remove the skid, it will be ready for sale.
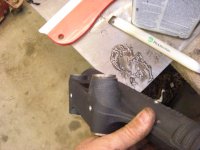
What a mess. I had to rebuild a front W arm in the mono skid. I remade it with alot of extra gussets so it wont break again. I made the trip to Mcguires for a bag of goodies to tighten the thing up, there were no salvagable bushings left in the skid.
Tomorrow I should have the skid back together, installed and the exhaust put back in. I'm using rx1 exhaust so I wont be swearing again in 3000mls.
Will be putting the Timbersled front end on tomorrow as well. I still need to make one more spindle. Paint might be a little wet when the bolts go in.
Well after deciding I better not waite for my extensions to get this sled so I can ride it. I figured I will want to fix the skid to resell later, this way I can ride It and when I remove the skid, it will be ready for sale.
What a mess. I had to rebuild a front W arm in the mono skid. I remade it with alot of extra gussets so it wont break again. I made the trip to Mcguires for a bag of goodies to tighten the thing up, there were no salvagable bushings left in the skid.
Tomorrow I should have the skid back together, installed and the exhaust put back in. I'm using rx1 exhaust so I wont be swearing again in 3000mls.
Will be putting the Timbersled front end on tomorrow as well. I still need to make one more spindle. Paint might be a little wet when the bolts go in.


VX1R
Lifetime Member
- Joined
- Sep 19, 2004
- Messages
- 2,287
- Location
- Inver Grove Heights, MN
- Country
- USA
- Snowmobile
- Ordered: 2025 SW LTX-LE Final Edition
Current Riders:
2018 SW LTX-LE
2002 SRX Custom
Rough Trail: 2023 Lynx Xterrian 900TurboR
Vintage Riders:
1980 Enticer 300 Twin
1986 Inviter
1998 Phazer Mt. Lite
1996 Phazer Mt. Lite Mod
Scott,
This new project of yours sounds great. Here's what really has me intrigued: "Next project will be to install bearings on the shaft that runs along the side of the frame. This shaft suffers from similar problems as the stearing shaft. The bushings dry out, wear out and drag. I am going for a fully rollerized stearing system with no slop and less effort."
Please keep us posted on your progress. You have identified some parts of the sleds the could use improvement over the years, and your improvements are spot on.
There's no doubt that the steering system could use some improvement on the 4-stroke sleds to keep everything nice and tight for those riders that care about keeping their sleds handling like they should as the miles add up.
SNOWDATE LOG Jan. 18th
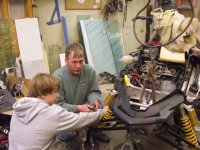
Well, today I had alot of help. Hugh and his father Steve came in and tore the front end off the sled while I finished up the rear skid.
The front end was allowed to get a little loose and the lower shafts wore through the bushings and into the bulkhead. Steve cleaned up the sharp edges and Installed Ulmer bushings with JB weld to take up the small gaps on a couple of the holes. Ulmers bushing kits are great, very tight.
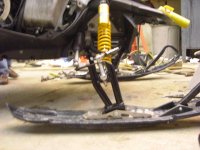
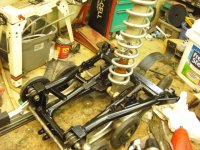
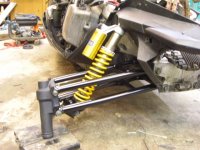
We installed the Ohlins shocks and the Timbersled front end. Amazing how tight everything is.
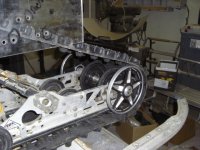
I assembled the rear skid, shimmed everything tight and used new bushings. Again, like with the pro action, this skid needs to be shimmed alot, very loose bushings. Another modification that needs to be done is the lower transfer rod needs to have grease fittings installed in both ends. The bearings almost sit in water and dry out, then wear out. The skid had a couple mounts loosen up for the wheels. I fixed the front ones and used old ones in the rear that hold alot better. Being lighter isnt always better. I installed older style wheels and chucked the yamaha ones. I used old style wheels for the inners because of clearence issues.
Well, today I had alot of help. Hugh and his father Steve came in and tore the front end off the sled while I finished up the rear skid.
The front end was allowed to get a little loose and the lower shafts wore through the bushings and into the bulkhead. Steve cleaned up the sharp edges and Installed Ulmer bushings with JB weld to take up the small gaps on a couple of the holes. Ulmers bushing kits are great, very tight.
We installed the Ohlins shocks and the Timbersled front end. Amazing how tight everything is.
I assembled the rear skid, shimmed everything tight and used new bushings. Again, like with the pro action, this skid needs to be shimmed alot, very loose bushings. Another modification that needs to be done is the lower transfer rod needs to have grease fittings installed in both ends. The bearings almost sit in water and dry out, then wear out. The skid had a couple mounts loosen up for the wheels. I fixed the front ones and used old ones in the rear that hold alot better. Being lighter isnt always better. I installed older style wheels and chucked the yamaha ones. I used old style wheels for the inners because of clearence issues.
Attachments
DaveyBoy
TY 4 Stroke Guru
Sorry scott I didnt know how bad that thing was hope it all works out 
Dave, again, I didn't think I was buying a cream puff and the guy gave me a fair price on it. Stop worrying about it. When you coming up?
strangeland2
Extreme
DaveyBoy said:Sorry scott I didnt know how bad that thing was hope it all works out
It could have been brand new he probably still would have tore it apart.

Kahlua
Newbie
strangeland2 said:DaveyBoy said:Sorry scott I didnt know how bad that thing was hope it all works out
It could have been brand new he probably still would have tore it apart.
That just goes without saying, if it's one of Scott's sleds... it's some form of Hybrid...
!")
SNOWDATE LOG Jan, 23rd
Tonight after work, I pulled a long nighter.
I am taking the Timber sled front end out before I turn it from a new kit to a used one.
My arms, bushings, spindles etc were shot.
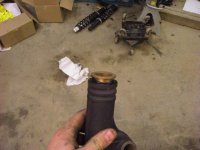
First I cut and rewelded the ends on the lower A frames. The ends were twisted just enough so a straight bolt wouldn't slide through. I then sanded and painted them. Nothing fancy, I'm on a snow is on the ground scedule. Used a spray bomb and baked them in the heater vent for a few hours.
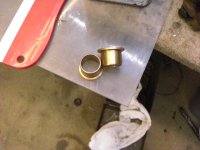
Since I will not be using the Barkbuster front end, I installed the rest of the Ulmer front end bushing kit in my spindles and A frames. What a great product. Thanks Allen. I also installed spindle bushings that I had left over from an easystear kit from a pro action front end. I later found out that he now includes these with his kits. I added grease fittings at all pivots on the spindles and A frames.
One spindle was wore so bad that I had to JB weld a bushing in.
While I was waiting for the paint to dry, I installed the muffler and covers. Steve was in earlier and installed the head pipes and y pipes for me while I rescued a wounded srx. Thanks again Steve for the help. All the exhaust was RX1. I do not want to screw around with Apex exhaust and I like the looks of the covers and tips better.
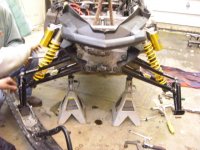
After the exhaust was done I installed the stock suspension. Still waiting on rail extensions to lengthen the sled out so I'll focus on having a running sled first. The skid Is very tight and feels silky smooth when it goes up and down. I shimmed everything tight, used a steel upper shaft so it wont wear out. I also installed stronger idler mounts on the inside and used larger wheels.
Tonight after work, I pulled a long nighter.
I am taking the Timber sled front end out before I turn it from a new kit to a used one.
My arms, bushings, spindles etc were shot.
First I cut and rewelded the ends on the lower A frames. The ends were twisted just enough so a straight bolt wouldn't slide through. I then sanded and painted them. Nothing fancy, I'm on a snow is on the ground scedule. Used a spray bomb and baked them in the heater vent for a few hours.
Since I will not be using the Barkbuster front end, I installed the rest of the Ulmer front end bushing kit in my spindles and A frames. What a great product. Thanks Allen. I also installed spindle bushings that I had left over from an easystear kit from a pro action front end. I later found out that he now includes these with his kits. I added grease fittings at all pivots on the spindles and A frames.
One spindle was wore so bad that I had to JB weld a bushing in.
While I was waiting for the paint to dry, I installed the muffler and covers. Steve was in earlier and installed the head pipes and y pipes for me while I rescued a wounded srx. Thanks again Steve for the help. All the exhaust was RX1. I do not want to screw around with Apex exhaust and I like the looks of the covers and tips better.
After the exhaust was done I installed the stock suspension. Still waiting on rail extensions to lengthen the sled out so I'll focus on having a running sled first. The skid Is very tight and feels silky smooth when it goes up and down. I shimmed everything tight, used a steel upper shaft so it wont wear out. I also installed stronger idler mounts on the inside and used larger wheels.
Attachments
SNOWDATE January 25
Well, today was a short one, Steve came to help out for a while, thanks again Steve.
I started by finishing up the roller stearing. Well, kinda finishing it up. I will have to order 1 bearing to finish it up. Do to its design, I do not have room to use a roller bearing and I didnt have a large enough needle bearing in my junk. So, what I have is, roller bearings on the handle bar pole and a set of two needle bearings on the rear end of the horizontal stearing shaft. The front of this shaft I left with the stock plastic bushing. I shaved the spacers down so I could tighten it up and added drilled holes and a grease fitting.
Steve had installed all newer lower rack system on another night so everything inside would be tight. There is still a little bit of play on some of the rod ends that amounts to about 1/2in of play in the bars. The bars are now so strong and tight to the frame, you could tow with them. Rock solid and the stearing is silky smooth with everything either a bearing or brass bushing.
While I was messing around with that, Steve installed all the best outer tie rod ends and the spindles. He drilled the spindles from the top(long end) into the lower tube. This is for grease to go into the lower pivot for the ski and keep the water out. Gravity greases this pivot. Fill the tube and gravity will do the rest. He installed new lower bushings and collars.
Last thing I did tonight was to put on a set of USI railer skis. I let Hugh use the Arrows while I test other skis. Shold start it up tomorrow.
I am amazed at how tight the front end is now with Ulmers front end bushings. Anyone who gives a crap about handling, you need one of these kits.
Attachments
kinger
VIP Member
BETHEVIPER said:While I was waiting for the paint to dry, I installed the muffler and covers. Steve was in earlier and installed the head pipes and y pipes for me while I rescued a wounded srx. Thanks again Steve for the help. All the exhaust was RX1. I do not want to screw around with Apex exhaust and I like the looks of the covers and tips better.
What is the exact difference on a apex exhaust vs the RX? ie if I bought a aftermarket apex exhaust kit what would a guy need to do to make it work with my RX head pipes and headers? I already have the apex seat with RX tail light
I love the steering system!
kinger
VIP Member
Any chance you could list out the parts you used for that steering system, or make me one ")
kinger said:BETHEVIPER said:While I was waiting for the paint to dry, I installed the muffler and covers. Steve was in earlier and installed the head pipes and y pipes for me while I rescued a wounded srx. Thanks again Steve for the help. All the exhaust was RX1. I do not want to screw around with Apex exhaust and I like the looks of the covers and tips better.
What is the exact difference on a apex exhaust vs the RX? ie if I bought a aftermarket apex exhaust kit what would a guy need to do to make it work with my RX head pipes and headers? I already have the apex seat with RX tail light
I love the steering system!
The Rx exhaust y pipes are 1 1/2inches shorter. The rx1 muffler has two inlets instead of 1 oval like the apex. on the exhaust tip side, you can modify the rx1 tips to fit with the apex covers and taillight cover.
if you want to use the apex tips on the rx
ill finsh this later, my wifes contractions are 8min
Bingo, we just had a baby. 7lb 9oz baby girl, name is still pending. mama is doing good, coming home on wednesday.
Similar threads
-
This site uses cookies to help personalise content, tailor your experience and to keep you logged in if you register.
By continuing to use this site, you are consenting to our use of cookies.