347strokin
Expert
Hey guys,
You'll need to log in to view pics.
Well it took me about 2 years to finally decide to tackle this project. I did lots of reading and studying other posts that guys wrote doing their own under tunnel. I went a little different route with mine by extending the exhaust further down the tunnel to reduce noise and underseat heat. I started off locating a MIG carbon fiber full length exhaust can from a Yamaha R6 race bike. Carbon fiber is nice because it wont heat up! And all this was done in a garage with a dremel tool, reciprocating saw, tin snips, and miscellaneous hand tools...nothing special.
I removed all the factory exhaust from the 2 into 1 y pipe back towards the rear. I then cut the 2 into 1 y pipe and had a muffler shop weld the y pipe to my can with a 7" extension. I had also purchased an 02 sensor bung and had it drilled/welded at the shop. The shop did a decent job I thought.
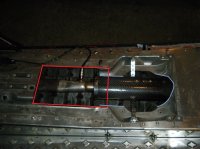
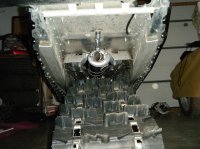
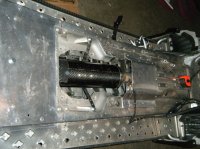
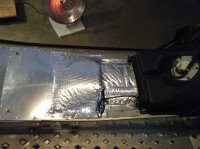
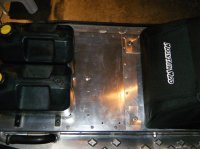
Here's a pic showing the new exhaust with galvanized metal strapping partially supporting the front of the can. I used bolts, washers and existing threaded holes that were already in the tunnel pan. There is another support at the rear of the can I will show in another pic. The red lines in the pic show where I cut the tunnel to access the y pipe. I DID NOT NEED TO DO THIS! The blue lines show where I had to cut on the tunnel pan to allow the can to fit and extend under the tunnel. I used a dremel for all this cutting. It took awhile and a ton of wheels but it worked. I then used a drill and grinding stone to clean things up.
I was really nervous about cutting into the tunnel pan as it is a strong piece and provides a lot of strength to the tunnel. But by the time the tunnel was covered back up with aluminum sheet and rivetted it was strengthened back up. And yes, the tunnel has a ton of fingerprints all over!
You'll need to log in to view pics.
Well it took me about 2 years to finally decide to tackle this project. I did lots of reading and studying other posts that guys wrote doing their own under tunnel. I went a little different route with mine by extending the exhaust further down the tunnel to reduce noise and underseat heat. I started off locating a MIG carbon fiber full length exhaust can from a Yamaha R6 race bike. Carbon fiber is nice because it wont heat up! And all this was done in a garage with a dremel tool, reciprocating saw, tin snips, and miscellaneous hand tools...nothing special.
I removed all the factory exhaust from the 2 into 1 y pipe back towards the rear. I then cut the 2 into 1 y pipe and had a muffler shop weld the y pipe to my can with a 7" extension. I had also purchased an 02 sensor bung and had it drilled/welded at the shop. The shop did a decent job I thought.
Here's a pic showing the new exhaust with galvanized metal strapping partially supporting the front of the can. I used bolts, washers and existing threaded holes that were already in the tunnel pan. There is another support at the rear of the can I will show in another pic. The red lines in the pic show where I cut the tunnel to access the y pipe. I DID NOT NEED TO DO THIS!
The blue lines show where I had to cut on the tunnel pan to allow the can to fit and extend under the tunnel. I used a dremel for all this cutting. It took awhile and a ton of wheels but it worked. I then used a drill and grinding stone to clean things up.I was really nervous about cutting into the tunnel pan as it is a strong piece and provides a lot of strength to the tunnel. But by the time the tunnel was covered back up with aluminum sheet and rivetted it was strengthened back up. And yes, the tunnel has a ton of fingerprints all over!
Attachments
347strokin
Expert
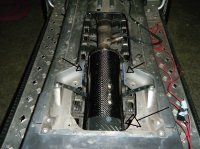
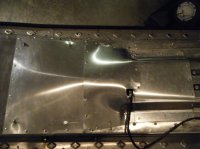
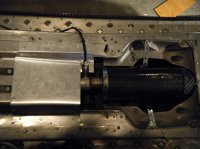
This pic shows where I used some rubber floor mat to protect the top of the can from the sharp edge of the cut tunnel pan. Not really necessary but I put it there anyways. The pic also shows again where I had cut the sides of the tunnel pan to allow the can to fit between. It also shows the metal strapping used and where I bolted it to.
Attachments
347strokin
Expert
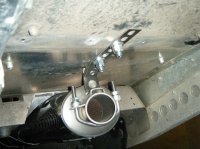
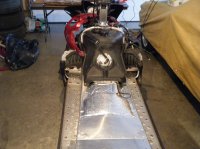
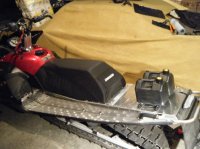
I mounted the rear of the exhaust can using a universal style muffler hanger that I found at Canadian Tire. It was bendable yet sturdy. I just drilled a couple holes through the top of the tunnel and bolted the hanger there using washers. I then clamped the exhaust tip outlet to the exhaust hanger. With the metal strapping and the exhaust tip mounted the exhaust is not going anywhere. And the top of the tunnel is not stressed either. It actually worked out very well and couldn't have been easier.
Attachments
347strokin
Expert
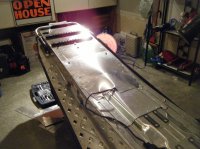
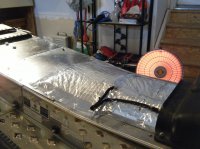
Next up was starting to cover up the tunnel again. My dad ended up hanging out and helping me with this. I used a fairly thick aluminum sheeting. It was definitely thicker than factory but was still bendable as required. I picked it up from my local welding shop. We just used wood, a vise, hammer and whatever was available to bend the panels into place. The first piece was a fluke as it turned out very well. We used backing washers on the rivetting when possible to add strength. We did the front piece first, then the back piece, then completed it with the middle piece. It wasn't quite as pretty because we had to work around the 02 sensor.
Attachments
347strokin
Expert
347strokin
Expert
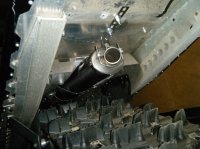
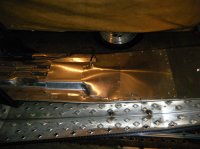
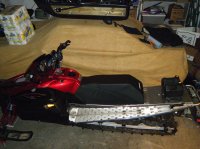
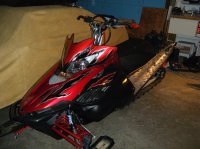
The finished product! I also added a Mountain Mod seat. The seat does not quite sit flush on the tunnel now because my exhaust is a little higher than the factory one but it's not too bad.
There is about 1 1/2" clearance from the lowest part of the exhaust to the track tips. Even when fully suspended the track will not hit the exhaust.
I will get a video clip of it tomorrow. It is much louder at idle now and has a very deep, barky tone. Sounds great and not obnoxiously loud. Definitley better than the stock exhaust which was gutted before but was far too raspy. Next project...a snorkel!
Attachments
347strokin
Expert
Anyone know how I can post a sound clip? I think my file is too large for the site.
SXMTX
Newbie
Put it on you tube I would love to hear it.
347strokin
Expert
Alright I finally posted a YouTube video. First time for everything. I'll post a better vid when I can get this beast outdoors. And yes my rear bumper is in rough shape. There's a Van Amburg on the way. And the garage needed a good cleanup...lol
http://www.youtube.com/watch?v=qFDW29FLfWg

http://www.youtube.com/watch?v=qFDW29FLfWg
jaegerc
Newbie
Sounds very close to stock, might actually help to pass sound checks around here.
347strokin
Expert
The handheld camera doesn't do it justice. It's much louder at idle but its so deep and throaty. I havent got the rpms over 5000 yet because my damn track stand doesnt reach high enough to lift the back of the sled. So I'm not sure how much louder it will be. And we don't have enough snow to go for a burn yet. But next week I plan on doing some tuning in the field and running my new Hero GoPro HD so I will have better clips!
99669apex
Extreme
Nice job! What are the benefits of going with a tunnel dump exhaust? I think the twin pipes coming off the back of the Apex look pretty cool. How much weight are you actually saving by going this route?
adrenaline junkey
Expert
looks and sounds great !")


Looks good.I should have mine done monday.I'm using a stock 05 r1 exhaust to keep the noise levels down around stock.Its titanium so its light too.
347strokin
Expert
99669apex said:Nice job! What are the benefits of going with a tunnel dump exhaust? I think the twin pipes coming off the back of the Apex look pretty cool. How much weight are you actually saving by going this route?
There is a bit of weight savings for sure. I mostly did it to get a different sound and have a bit more room on the tunnel.
Similar threads
- Replies
- 0
- Views
- 561
-
This site uses cookies to help personalise content, tailor your experience and to keep you logged in if you register.
By continuing to use this site, you are consenting to our use of cookies.