brad4639
Extreme
Hey guys, so I spent the last 6 months or so building my Nytro from the ground up. Thought I'd share my Nytro project with you.
Background: Im a 26 y/o CNC machinist and I also dabble a bit in fabricating and welding. Last year I traded my Pro RMK for a beat up nytro plus enough cash to make the deal worth it.
It was originally a short track that someone else converted (poorly). It had an early model skinz seat that when they were first made the tabs were too small.. resulting in a caved in, dented stock tunnel. Still a little upset with skinz who stopped returning my emails regarding this! I also dont really like the way extensions look.
Any ways, long story short, I decided to try to design and build my own tunnel. Took a few pics along the way.
How it looked when I got it.

This is where the seat sat on the tunnel. Not terrible but I didn't like it.

I put 2 miles on it before tearing it apart.

Took a saturday afternoon with a few buddies and a case of beer to get here.

brad4639
Extreme
Heres the design I came up with after countless hours of measuring and redesiging with the help of a drafter I work with. Everything was done on SolidWorks.
I was thinking (at the time) that maybe I should have a company name in case I ever wanted to sell one. So i came up with Rider Designs. Doubt i'll ever go down that road though.

I broke my phone most of the machining detail pictures so you'll get the short version of what I did.
I used a HAAS CNC router to cut the tunnel out of .100 sheet Alum. Before I ran the program to drill all the holes and cut the shape, I first made a program to "polish" the material with a 2" 3M buffing bad spinning about 10k RPM.

These are rear the tunnel supports

The first set I made were out of 1/4 thick 6061 Alum. Which I found out does not like to bend..

Second time around I made them out of 3/16 5052 Alum and they bent just fine.

yooper1
Expert
Outstanding work! Please keep this pictures coming and I truly look forward to what you come up with. Real talent right here son!
yamaha1973
TY 4 Stroke Master
- Joined
- Nov 27, 2011
- Messages
- 1,288
- Location
- St. Peter Minnesota
- Country
- USA
- Snowmobile
- 2014 Viper XTX SE
yooper1 said:Outstanding work! Please keep this pictures coming and I truly look forward to what you come up with. Real talent right here son!
X2!
RIKMAN
Expert
X3!!!yamaha1973 said:yooper1 said:Outstanding work! Please keep this pictures coming and I truly look forward to what you come up with. Real talent right here son!
X2!
brad4639
Extreme
subframe gussets
I spent a ton of time on the forums searching what things need to be done/upgraded to these sleds and found some really great info. Gusseting your subframe seemed like a must do so heres what I did.
Front and top side gussets

Bottom gussets, all hand cut and welded in.

Everyone said that a steering post relocator is an absolute must so I designed my own simple version and added a grease zerk.

Here it is installed along with the custom bar risers I made. Notice there's a jaunt back in the risers, I stood on the sled held the bars in the most comfortable position possible for sitting and standing and thats how I had to build them. The handlebars are MTN bike bars and the challenge with them is the clamping area is quite a bit narrower than dirtbike and sled bars. I had to offset the inside of the risers. Needless to say, theres more time in measuring and designing than it looks like.


brad4639
Extreme
Brake Rotor
Earlier this year I took my car to Brainerd International Raceway for the first time and found out that stock brakes do NOT like going into turn 1 at 140 mph. I saw some pretty cool rotors on a dodge viper that kind of looked like some you'd see on a dirtbike or crotch rocket. I bought a set of upgraded stock rotors, machined slots and the outside diameter for better cooling.

I saw a thread about removing the cooling fins to save weight and rotating mass but just doing that made me nervous about the brakes getting hot so I took what I learned with my car rotors and did the same to the nytro.

Fixture for machining.

Finished plus painted. As far as I know there is no real aftermarket upgrade for these so If anyone wants this done let me know.


brad4639
Extreme
If you guys haven't noticed yet, I'd rather spend a bunch of time figuring out how to make something than spend my precious little money on aftermarket ")
I didnt have any material that would've worked to make billet upper idler wheels so I just took my stock plastic ones and machined them out to mimic by alum. rear wheels.

Billet throttle block I made to get rid of the gawdy stock plastic one. At this point I took and deleted the TPS too. Both my old viper and sx r had those act up on me.

Tacked up a front bumper with my brothers spool gun then brought it to work and TIG'd it.

Finished and powdercoated gloss white.


brad4639
Extreme
It was time to bring it home and test fit and drill all the rest of the holes needed before powdercoat. I basically had to build the entire thing and then disassemble it again. The hole pattern yamaha uses to mount the tunnel to the bulk head makes no sense whatsoever so I decided instead of trying to measure them out and cut them in my machine I would instead just mount the tunnel and drill the holes in then which worked out pretty well.

One of the main differences of my tunnel vs. stock is that I changed the running board angle to a much steeper 10 degrees to get the rear end up out of the snow.

I saw a post about installing airframe running boards. That opened my eyes to clecos!!! Couldn't have done this project without them.


One of the main differences of my tunnel vs. stock is that I changed the running board angle to a much steeper 10 degrees to get the rear end up out of the snow.

I saw a post about installing airframe running boards. That opened my eyes to clecos!!! Couldn't have done this project without them.


brad4639
Extreme
Running Boards
I didn't have anything drawn up for the running boards so I just started cutting tubes and making it fit together as I went.

I clamped it all down but still ended up with a little bit of heat warp.

All welded up. I used 1" OD aluminum tubing for the outside rail and the insides are 3/4" tube.

I didn't have anything drawn up for the running boards so I just started cutting tubes and making it fit together as I went.

I clamped it all down but still ended up with a little bit of heat warp.

All welded up. I used 1" OD aluminum tubing for the outside rail and the insides are 3/4" tube.


moab11
Lifetime Member
- Joined
- Feb 4, 2010
- Messages
- 424
- Location
- Thunder Bay, Ontario
- Country
- Canada
- Snowmobile
- 2016 SKS 155
WOW, Very interesting build!
Can't wait to see more!!!!
Can't wait to see more!!!!
brad4639
Extreme
tunnel powder
Time for powdercoat! I used a transparent smoke black powder so you could still see the polish marks under it.


Time for powdercoat! I used a transparent smoke black powder so you could still see the polish marks under it.


sorenson1610
TY 4 Stroke God
- Joined
- Dec 11, 2007
- Messages
- 1,746
- Location
- Rothschild,WI
- Website
- www.contrx.com
- Country
- USA
- Snowmobile
- 2016
 nice fab work!
brad4639
Extreme
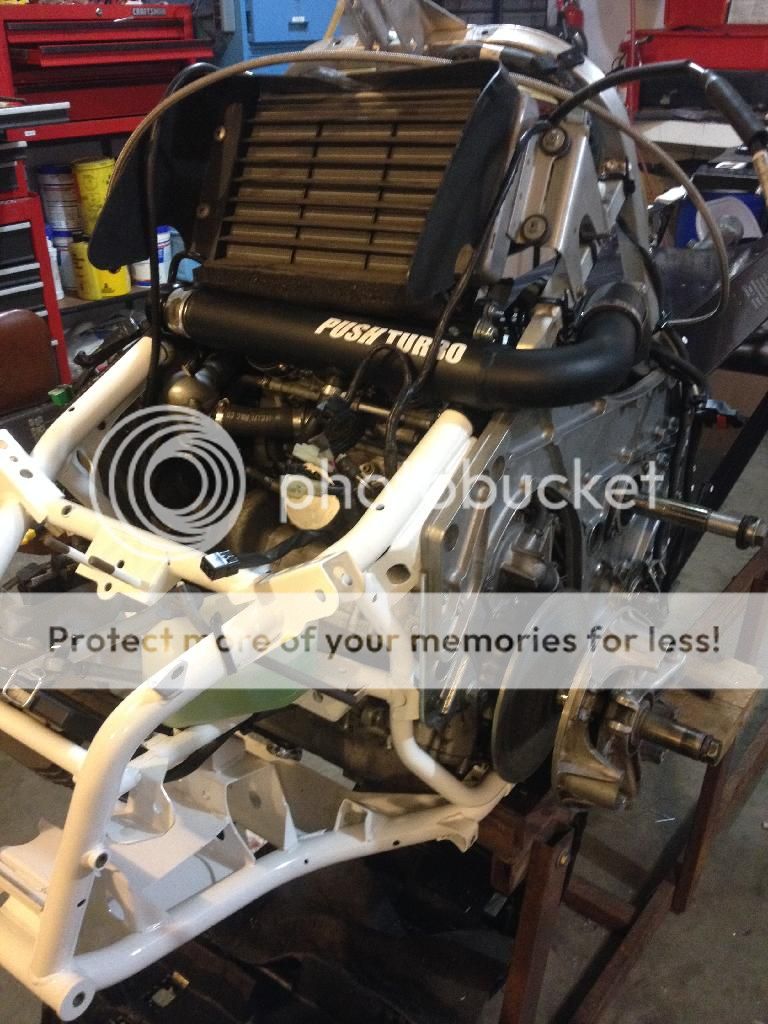
Turbo kit
I had the whole summer to look for parts and learn as much info as I could. I turbo everything that I can and usually do all my own work, (mainly because I'm too cheap and always broke!) but I found a used 200 hp Push Turbo kit for $1800 that I couldn't pass up. It only had 10 hours on it. The stock turbo bracket that comes with the push turbo doesn't work with my skinz seat so I had to design my own that fits perfectly hidden under the tunnel and looks really clean.
I think next year I will be doing a fuel pump upgrade and making an intercooler for it.


Last edited:
brad4639
Extreme
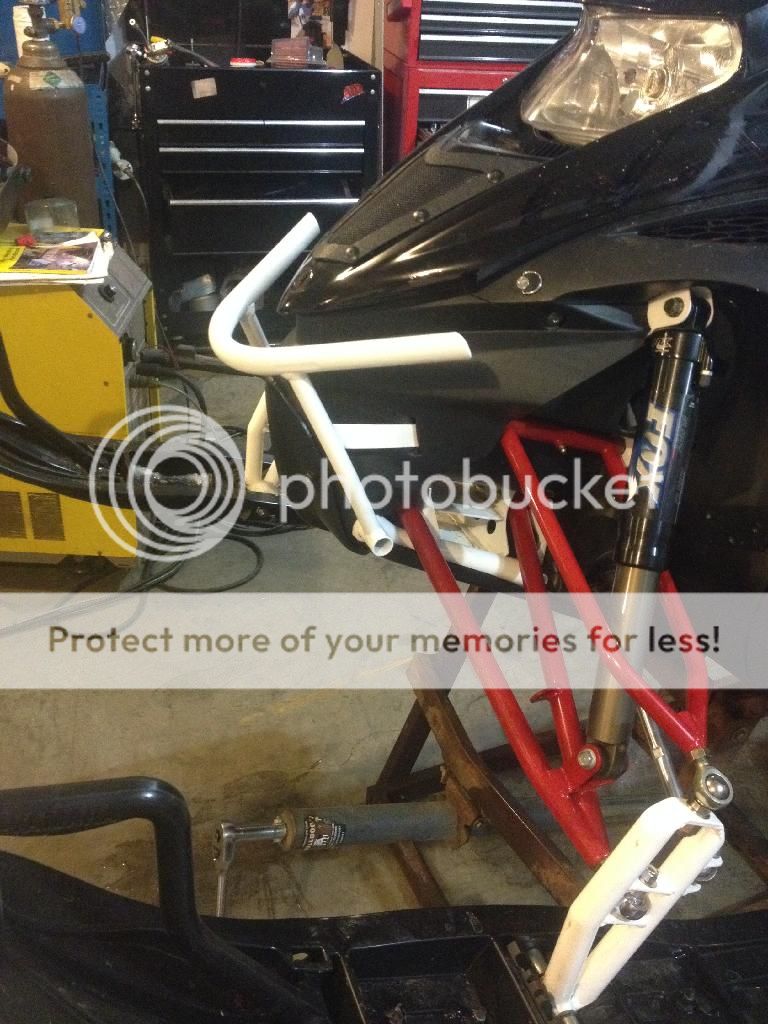
Turbo installed with the seat in place.

Running boards in place without the traction screws

Timbersled MTN Tamer skid with ice age rails and its finally on the ground!

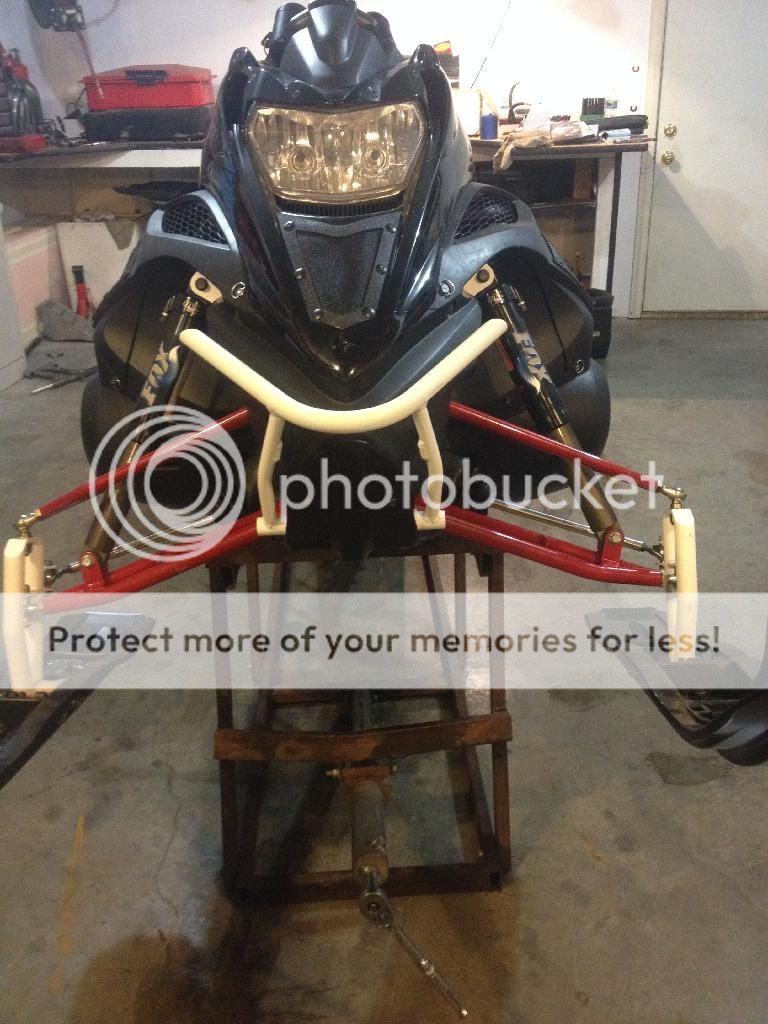
Bark buster 39" front end installed. When I got this sled it had a stock worn out 42" front. I was looking for skinz conceptz but found these barkbusters for $400

ALMOST DONE!


Running boards in place without the traction screws

Timbersled MTN Tamer skid with ice age rails and its finally on the ground!

Bark buster 39" front end installed. When I got this sled it had a stock worn out 42" front. I was looking for skinz conceptz but found these barkbusters for $400

ALMOST DONE!

Similar threads
- Replies
- 4
- Views
- 4K
-
This site uses cookies to help personalise content, tailor your experience and to keep you logged in if you register.
By continuing to use this site, you are consenting to our use of cookies.