Omega_5
Extreme
I thought I'd just start a thread to document some of the little upgrades I've been doing to our family of 4 strokes.
A bit about the sleds first.
Mine;
2010 Nytro XTX.
Some of you may remember that last season was a custom turbo build. That went well, but as I've mentioned before, the power doesn't really suit my type of riding, so that's gone this year.
Currently it's mod list sits at;
- Simmons Gen 2 Skis
- Shockwave Helix
- OFT Steering Relocator
- 4" PowerMadd Riser
- Lefty Throttle
- tucked brake light wires
- RapidBikeRacing module, custom tuned by me.
Wifes;
2009 Phazer RTX
We picked it up last January. It was a trade in, and needed some good polish.
Ski's were buggered, one lower panel was broken, had a bad straight pipe exhaust, needed slides, track was almost whooped, terrible sticker job, rear flap ripped off, steering was in need of some major love and a fair few chips on the steel parts. And I found more this year. But, the price as right, and ran like a champ.
Got it home, peeled the stickers immediately. I sourced an OEM R6 exhaust to replace the horrible straight pipe. Put the OEM Nytro skis on it, and repaired the broken lower panel.
We put a few km on it during what winter we did have, and made a list of issues to address this season.
That leads us to this fall.
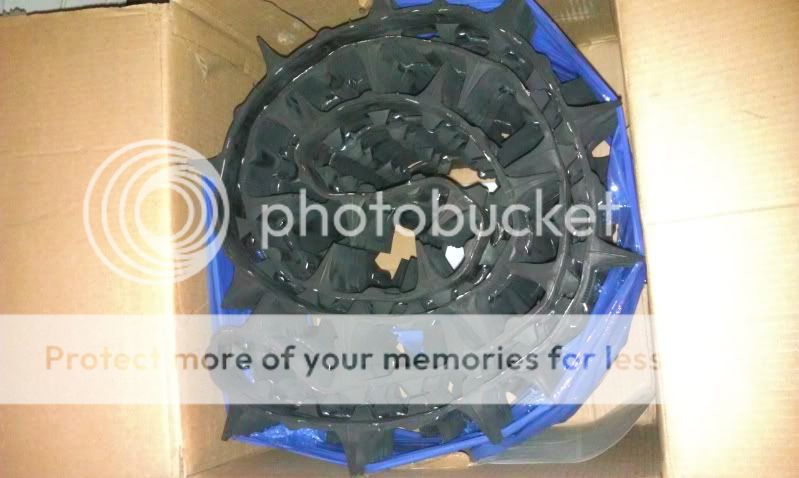
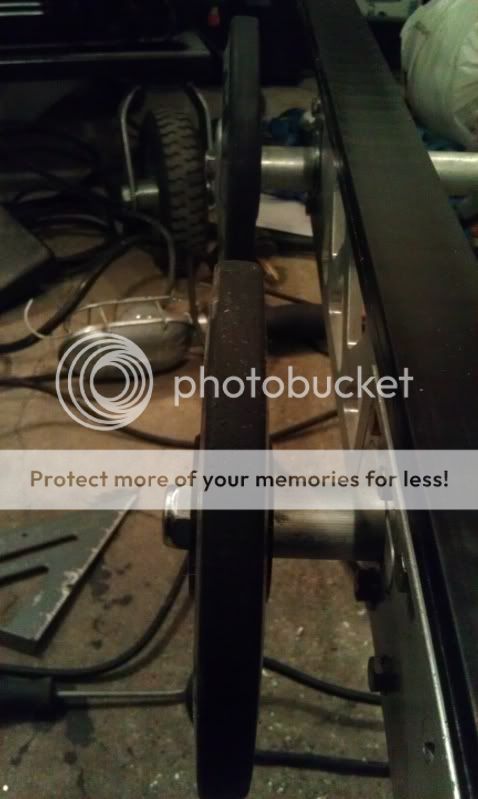
I decided that this season called for new tracks. My Nytro would move up to a Challenger 2", and my wife's Phazer would get the hand-me-down Ripsaw 1.25", along with being extended to a 144".
First thing; get the parts.
New Challenger and rail extensions from Track Canada. Big thanks to Curt!
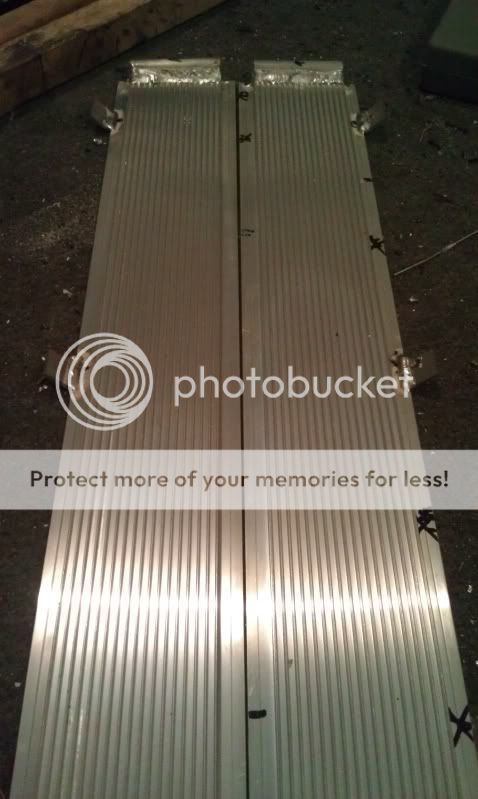
Since the Phazer is narrower, I knew I'd have to trim down the Ripsaw. Lots of guys use tables saws, but I've never had good luck with that.
I opted to make use of the built 'track roller', and build a cut jig right on the Nytro out of some scrap steel. Two power-lock grinders worked great to trim the track, and seal the ends off.

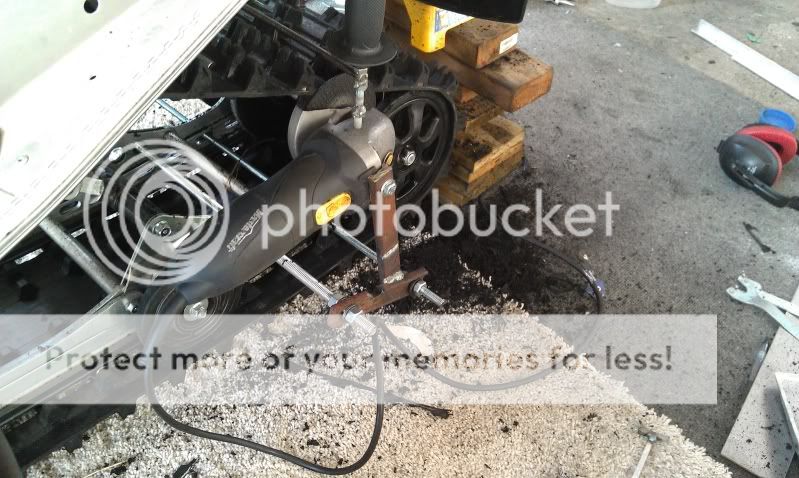
The process was a bit smokey and stinky, so respirators are a must.
The final width was 14-5/8" with a total run out of no more than 1/32". I'm quite impressed at how good of a job the cheap grinder jig did.
Unfortunately I forgot to take pictures of the Nytro track swap. Probably cause there wasn't much to see. I made good use of the guide by Srxspec. While everything was apart, I added a set of extroverts and geared it down (+1 bottom, -1 top).
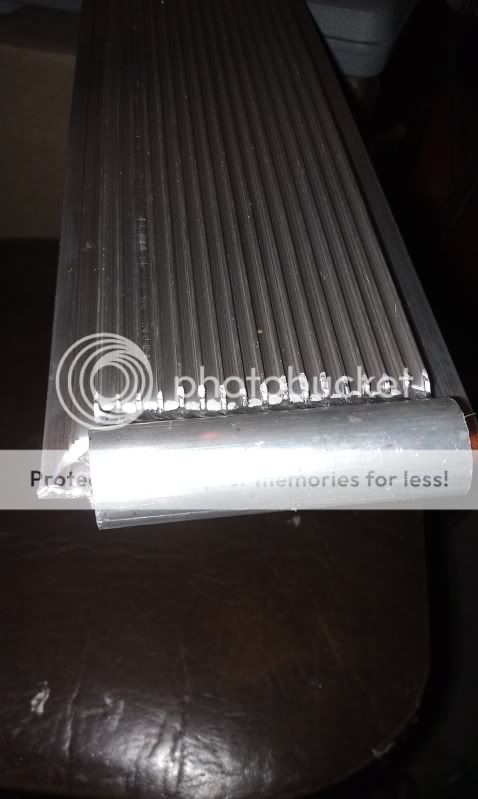
With the Nytro out of the shop for a while, I began to tear down the Phazer.
I pulled the skid out, and yanked what was left of the stock track.
Flipped the ski over, remove the slides to find this.

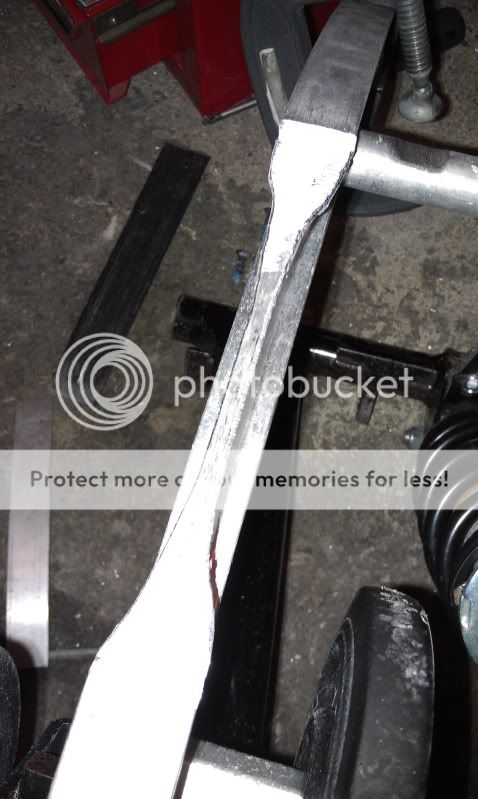
I guess a some point the slides got neglected and covered up.
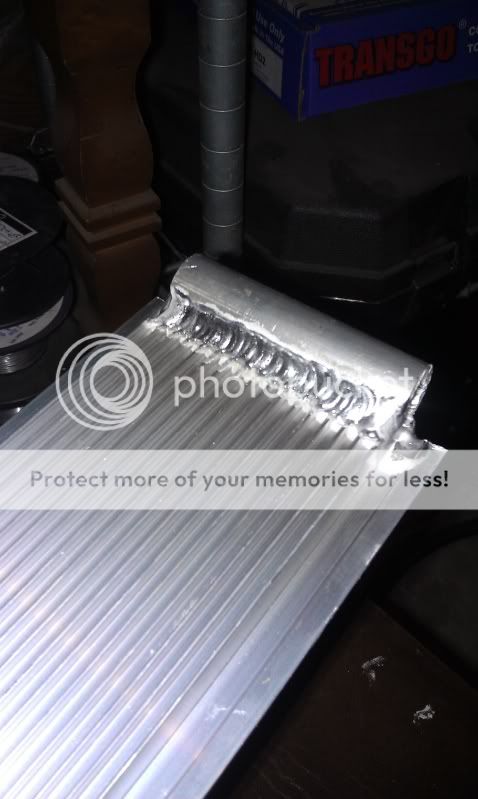
I wasn't planning to do a repair job on a the rails, but hey.... I've got time and a tig welder.
One fixed.

Two fixed.
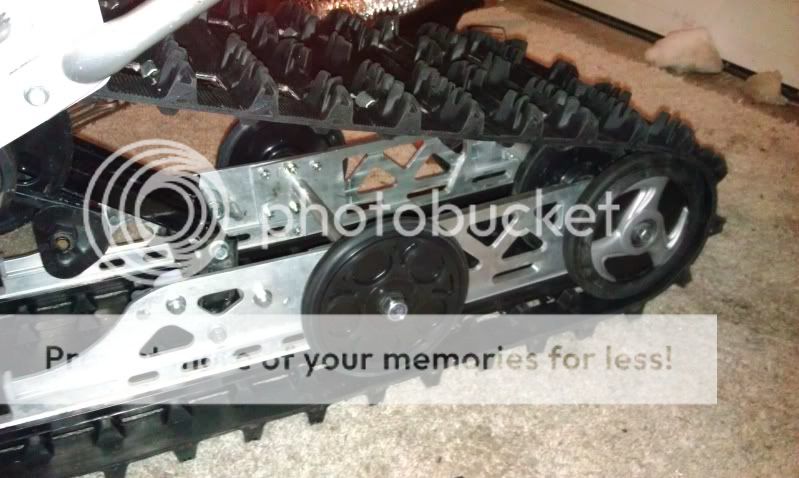
Going into this extension project, I knew I should add a set of wheels at the kick-up, like the Nytro.
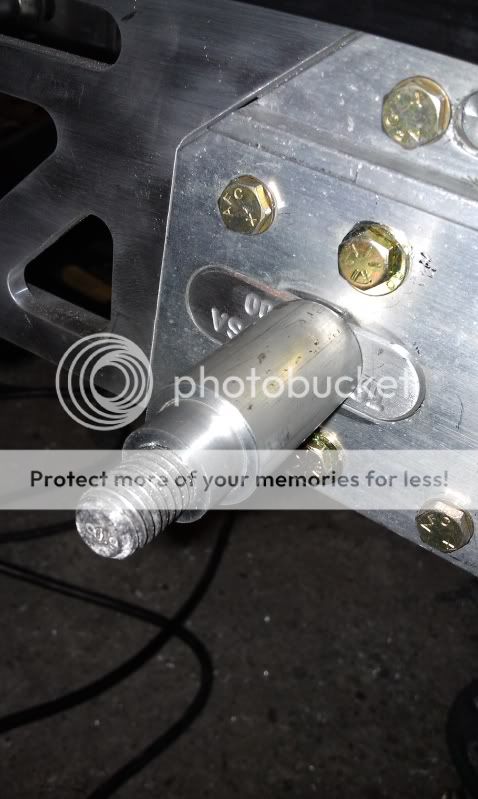
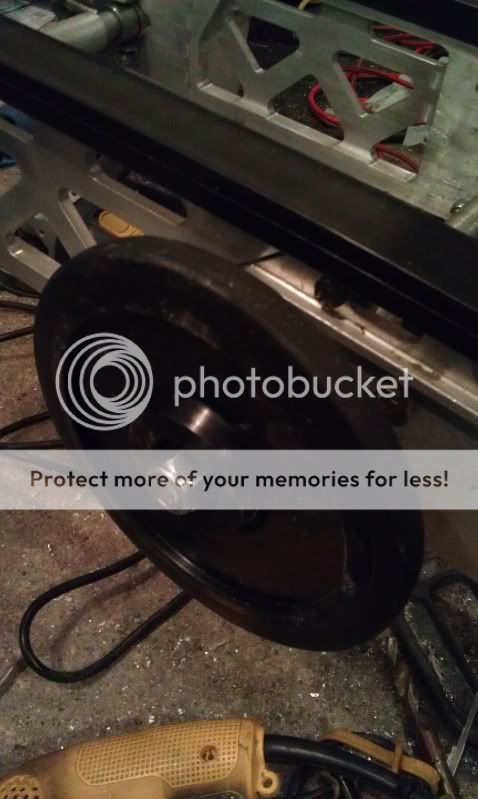
I purchased a set of OEM wheels, and set to build an axle.
I started by attaching the extensions, then drilling a 14mm hole where the old wheels sat. I cut a stand off to put between the rails, and used a 14mm threaded rod as the axle core.
Then I jumped on the lathe to build a set of carriers for the two outside wheels. FYI, 1/2" pipe is perfect for the internal carrier. And co-incidentally, OEM Yamaha axles spacers are just 3/4" Sch40 pipe.... exactly.
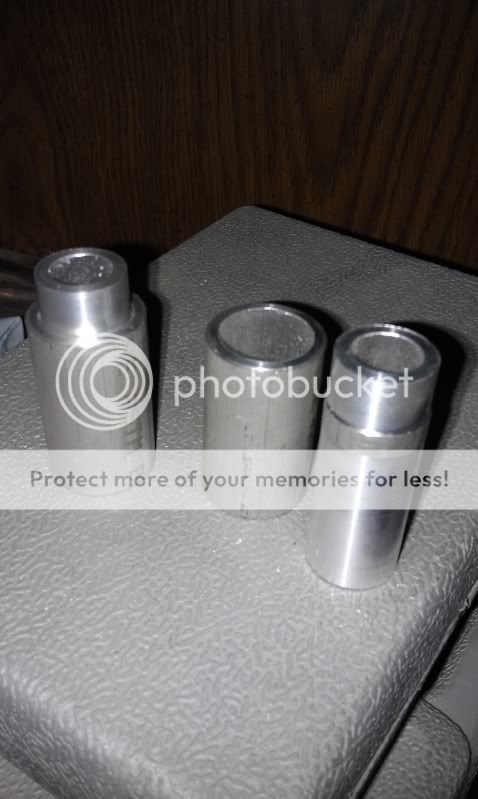
I build the carrier by cutting and facing the 3/4" pipe spacer to match the OEM one. Them took the 1/2" pipe, and machined the body to fit inside the spacer, and machined the end to fit inside the bearing of the wheel. I then faced it 0.05" short of the wheel face so the nut on the outside properly traps it.
Test fit.
All together.
I battled with the track and skid for a couple of hours before getting my wife to help.
With the sled on it's side, and two of us on the skid, we finally wiggled it in.
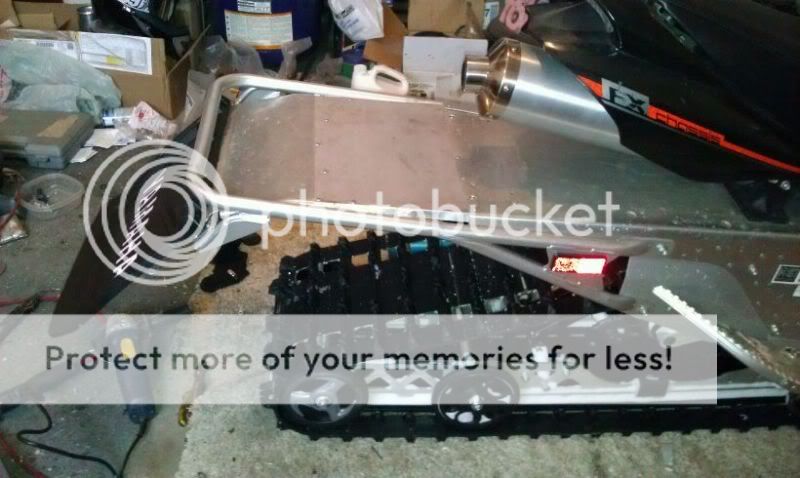
Still needs a tunnel extension though.
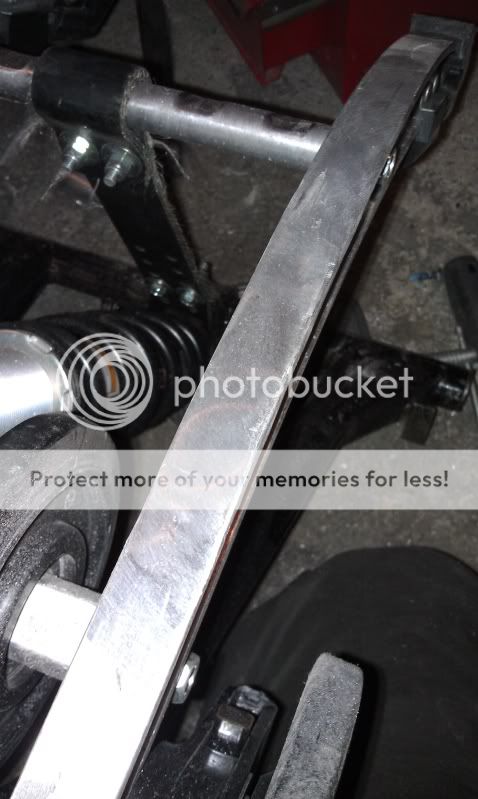
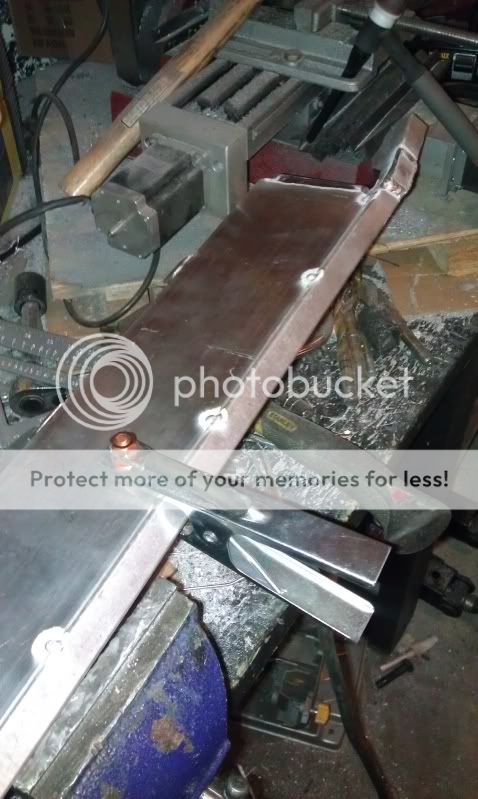
The next day I pulled the rear bar and flap mount off.
For some reason, no one out in my area stocks 1" DOM round tube, so I had to make due with 3/4" pipe (0.05" bigger). I built two 10" long bars with internal sleeves (made from machined 1/2" pipe) on each end for alignment and strength. I cut the OEM bar right after the support, and tacked the two extensions in place. After making sure everything was square, I tig'd them both in place, and ground the welds flush. Added a bit of paint, and it looks brand new.
I bolted and riveted the bar back in place, and used a piece of aluminum sheet to fill the gap. Also, I replaced the missing snow flap.
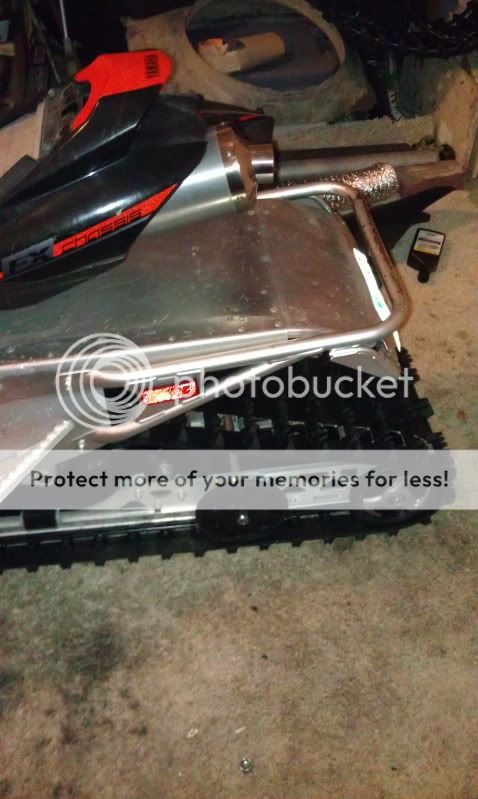
All finished and ready to ride.
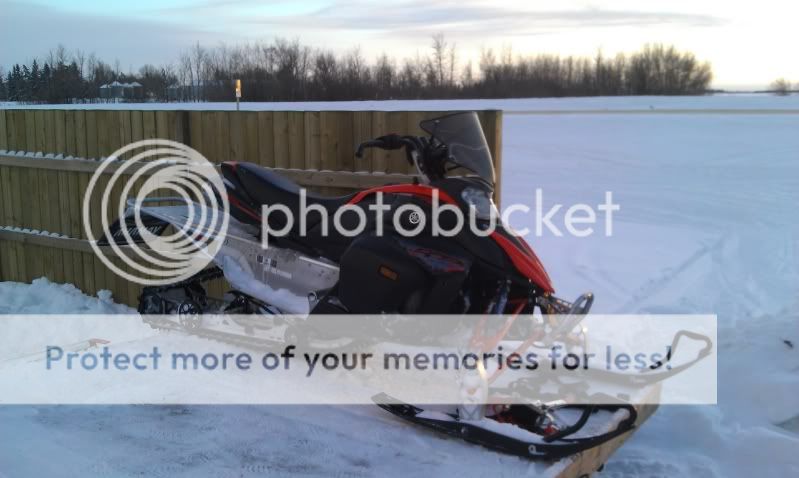
(Ignore the cracked windshield. I had an oops with testing the new track )
)
More to come in the next few weeks.
A bit about the sleds first.
Mine;
2010 Nytro XTX.
Some of you may remember that last season was a custom turbo build. That went well, but as I've mentioned before, the power doesn't really suit my type of riding, so that's gone this year.
Currently it's mod list sits at;
- Simmons Gen 2 Skis
- Shockwave Helix
- OFT Steering Relocator
- 4" PowerMadd Riser
- Lefty Throttle
- tucked brake light wires
- RapidBikeRacing module, custom tuned by me.
Wifes;
2009 Phazer RTX
We picked it up last January. It was a trade in, and needed some good polish.
Ski's were buggered, one lower panel was broken, had a bad straight pipe exhaust, needed slides, track was almost whooped, terrible sticker job, rear flap ripped off, steering was in need of some major love and a fair few chips on the steel parts. And I found more this year. But, the price as right, and ran like a champ.
Got it home, peeled the stickers immediately. I sourced an OEM R6 exhaust to replace the horrible straight pipe. Put the OEM Nytro skis on it, and repaired the broken lower panel.
We put a few km on it during what winter we did have, and made a list of issues to address this season.
That leads us to this fall.
I decided that this season called for new tracks. My Nytro would move up to a Challenger 2", and my wife's Phazer would get the hand-me-down Ripsaw 1.25", along with being extended to a 144".
First thing; get the parts.
New Challenger and rail extensions from Track Canada. Big thanks to Curt!
Since the Phazer is narrower, I knew I'd have to trim down the Ripsaw. Lots of guys use tables saws, but I've never had good luck with that.
I opted to make use of the built 'track roller', and build a cut jig right on the Nytro out of some scrap steel. Two power-lock grinders worked great to trim the track, and seal the ends off.
The process was a bit smokey and stinky, so respirators are a must.
The final width was 14-5/8" with a total run out of no more than 1/32". I'm quite impressed at how good of a job the cheap grinder jig did.
Unfortunately I forgot to take pictures of the Nytro track swap. Probably cause there wasn't much to see. I made good use of the guide by Srxspec. While everything was apart, I added a set of extroverts and geared it down (+1 bottom, -1 top).
With the Nytro out of the shop for a while, I began to tear down the Phazer.
I pulled the skid out, and yanked what was left of the stock track.
Flipped the ski over, remove the slides to find this.
I guess a some point the slides got neglected and covered up.
I wasn't planning to do a repair job on a the rails, but hey.... I've got time and a tig welder.
One fixed.
Two fixed.
Going into this extension project, I knew I should add a set of wheels at the kick-up, like the Nytro.
I purchased a set of OEM wheels, and set to build an axle.
I started by attaching the extensions, then drilling a 14mm hole where the old wheels sat. I cut a stand off to put between the rails, and used a 14mm threaded rod as the axle core.
Then I jumped on the lathe to build a set of carriers for the two outside wheels. FYI, 1/2" pipe is perfect for the internal carrier. And co-incidentally, OEM Yamaha axles spacers are just 3/4" Sch40 pipe.... exactly.
I build the carrier by cutting and facing the 3/4" pipe spacer to match the OEM one. Them took the 1/2" pipe, and machined the body to fit inside the spacer, and machined the end to fit inside the bearing of the wheel. I then faced it 0.05" short of the wheel face so the nut on the outside properly traps it.
Test fit.
All together.
I battled with the track and skid for a couple of hours before getting my wife to help.
With the sled on it's side, and two of us on the skid, we finally wiggled it in.
Still needs a tunnel extension though.
The next day I pulled the rear bar and flap mount off.
For some reason, no one out in my area stocks 1" DOM round tube, so I had to make due with 3/4" pipe (0.05" bigger). I built two 10" long bars with internal sleeves (made from machined 1/2" pipe) on each end for alignment and strength. I cut the OEM bar right after the support, and tacked the two extensions in place. After making sure everything was square, I tig'd them both in place, and ground the welds flush. Added a bit of paint, and it looks brand new.
I bolted and riveted the bar back in place, and used a piece of aluminum sheet to fill the gap. Also, I replaced the missing snow flap.
All finished and ready to ride.
(Ignore the cracked windshield. I had an oops with testing the new track
)More to come in the next few weeks.

Nice work!!
Be careful with the 14 5/8 track. On the last one I cut down that is what I went and the tips of the outer lugs got broke off all the way around. That was a 1 1/2 lug track though. So maybe you will not have a problem.
Lee
Be careful with the 14 5/8 track. On the last one I cut down that is what I went and the tips of the outer lugs got broke off all the way around. That was a 1 1/2 lug track though. So maybe you will not have a problem.
Lee
Omega_5
Extreme
I've seen that happen quite a bit on aggressive tracks. Lots of guys out here with Firecats have that problem, since they cut a fair amount off.
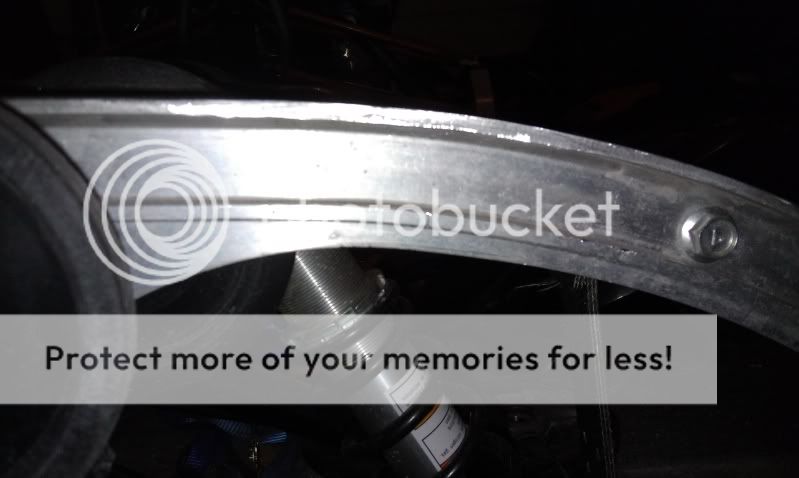
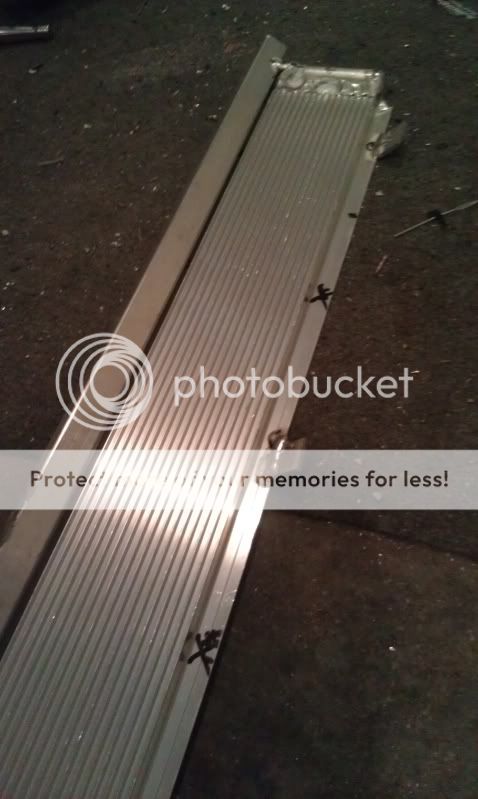
That's the exact reason I only cut it down to 14-5/8 instead of 14" even, like stock. The Ripsaw has a little bit of a taper on they edge of the lug that I wanted to keep. I'm hoping it stops it from ripping the edges off.
Here is the approximate location of where I cut, and the taper that I left on the track.
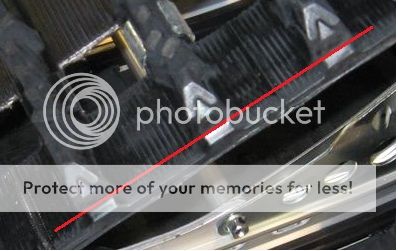
Omega_5
Extreme
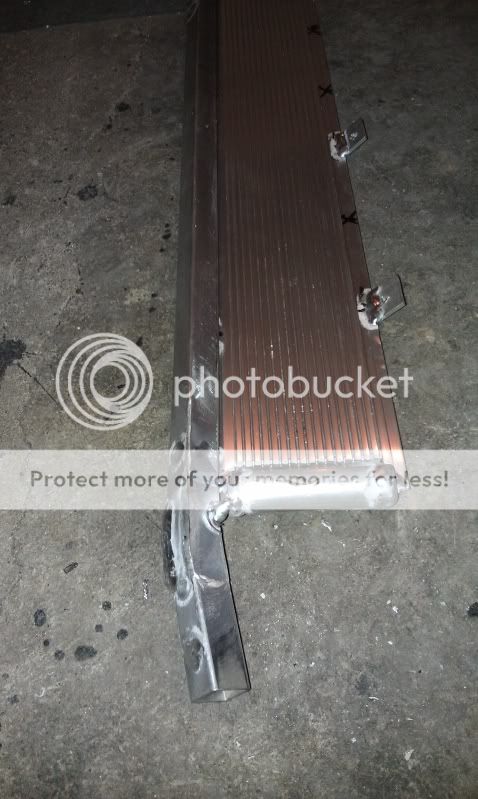
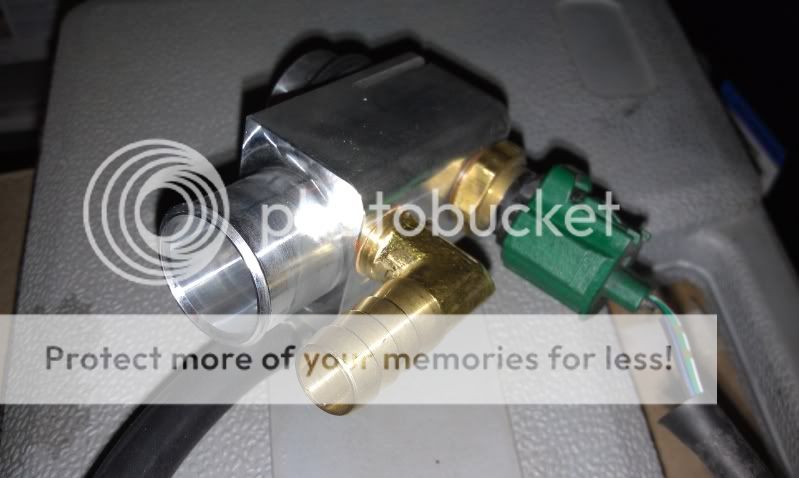
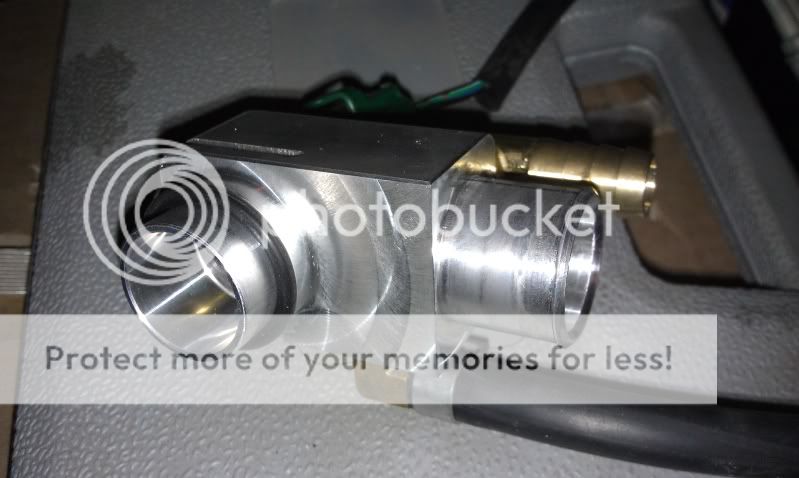
While I had the skid out of the Nytro, I decided to do some custom fab work.
I had the MTX tunnel cooler installed last year, however, I was less than impressed with it. It seemed to make almost zero difference as far as cooling.
I decided it was time to build some real tunnel coolers.
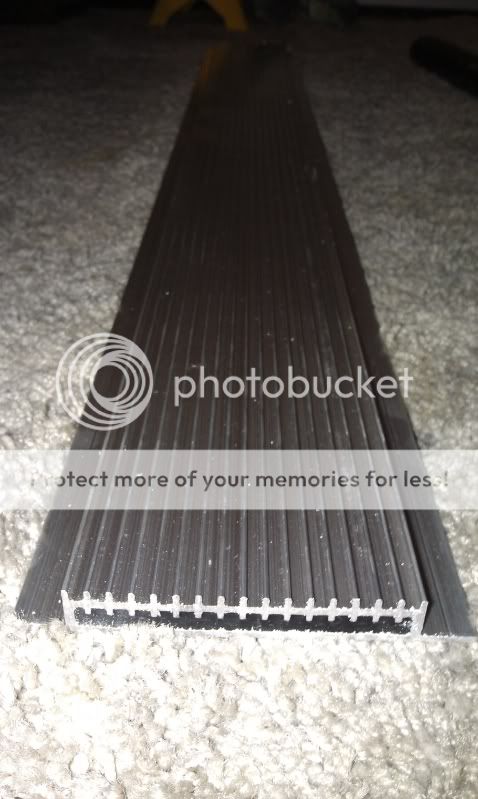
I started off with a cooler extrusion from CR Racing.
I used 3/4" pipe to build a set of end tanks on each extrusion.
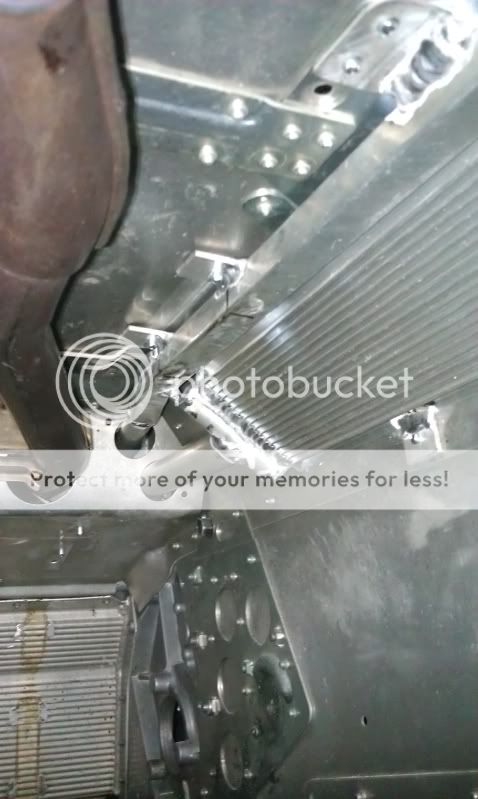
For mounting, I chose to utilize the same holes that the OEM cooler used, as well as a few others at the back (of course).
I ended up using the tunnel seam as a height guide, so the cooler flange could nicely rest on the top of the drop bracket.
The mounting tabs were built of 1/8" plate.
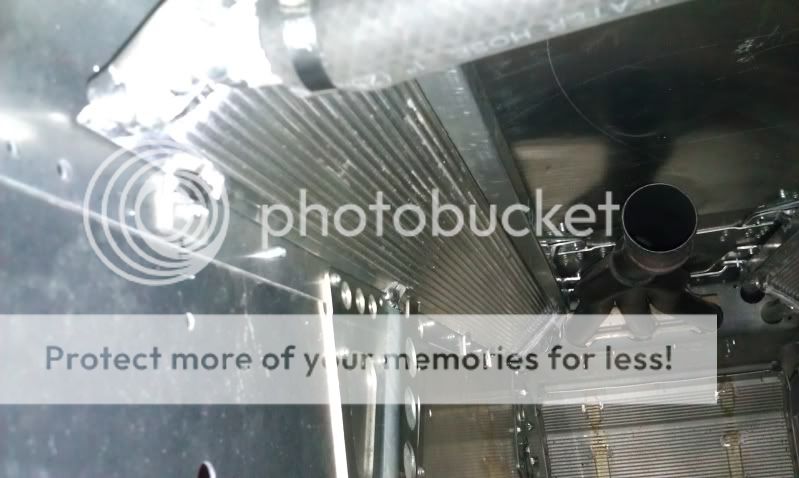
I wanted a second cooling loop built in (I'll explain why at a later date), so I ended up using the stock tunnel protectors for the top mount. Note I had to build a protection pad to protect the cooler from the exhaust mount plate (which is steel).
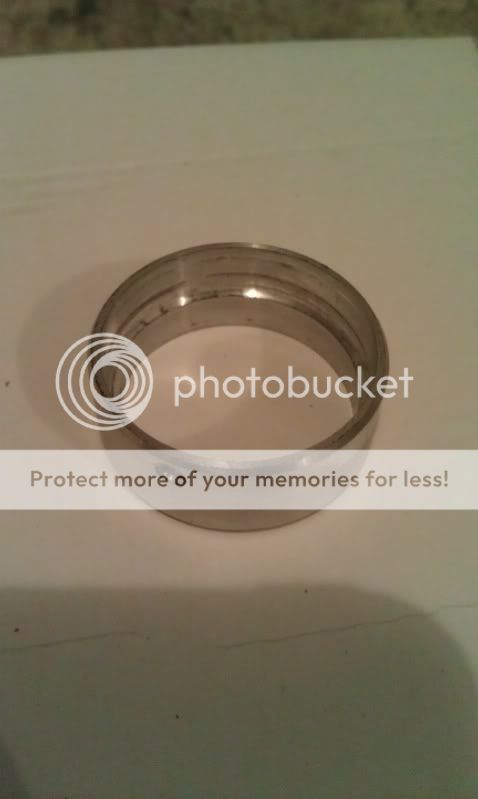
For hose connections, I ended up using (again) 3/4" pipe for the main cooler, and 1/2" for the secondary. I just had to machine it down to a proper hose barb.
Co-incidentally, pipe happens to be the same major diameter as common hose barbs. 3/4" pipe = 1" hose (1.05"), 1/2" pipe = 3/4" hose (0.84").
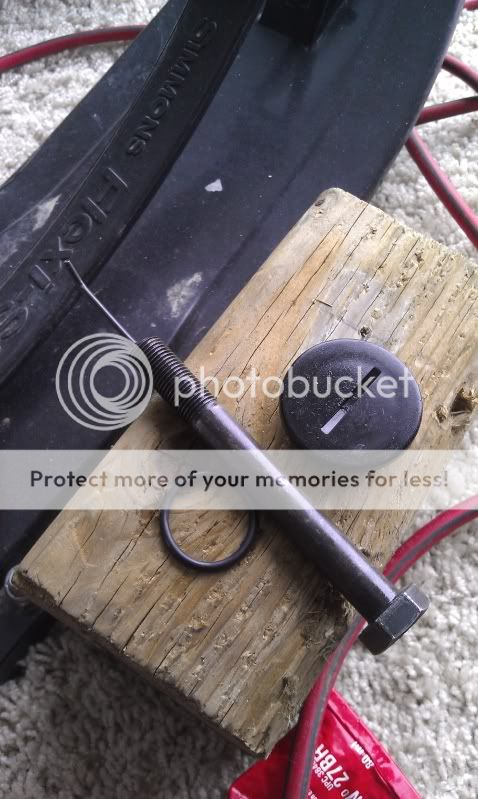
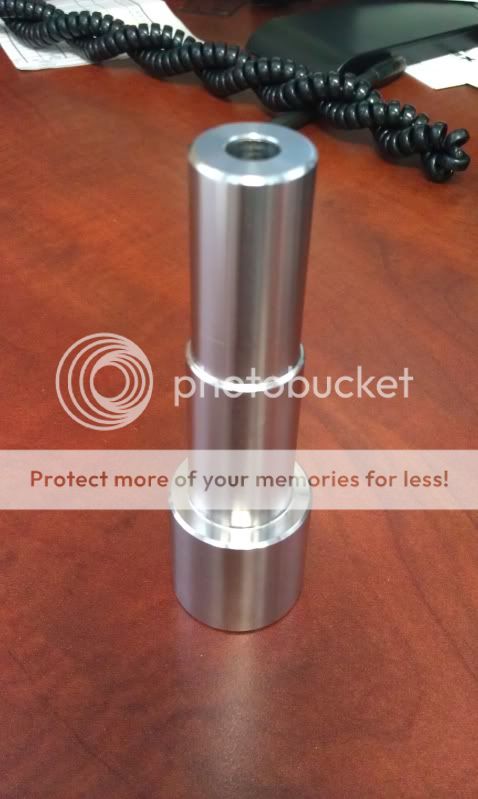
Here are the rear hose barbs.
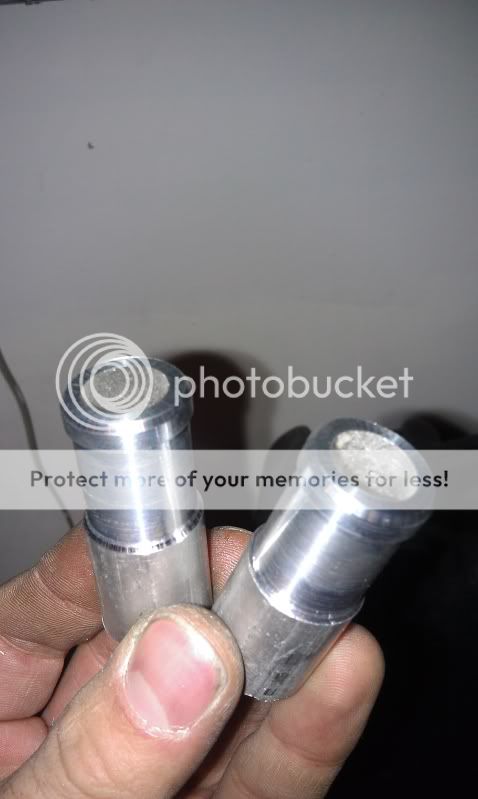
To build them, I simply chucked up the pipe in my lathe;
Marked out 0.25" back, and 1" back;
Turned the inside down to ~0.02 less than hose ID;
And chamfered the end so it was easy to get the hose on;
I marked out the end tanks, and drilled the required hole, then welded the barbs in place.
The hardest part was the front, where I had to fit the tig torch in to a tight spot, while feeding the filler, and keeping the hose connection aligned to the OEM holes.... just to get a good tack weld.
Once I was finished, I filled it with water, capped the ends, and pressured it up to 20psi. After 1 hour I had no measurable pressure drop, and no signs of fluid.... so I took that as a test passed.
In the sled it went. Hose connections on, and hit it with the rivet gun.
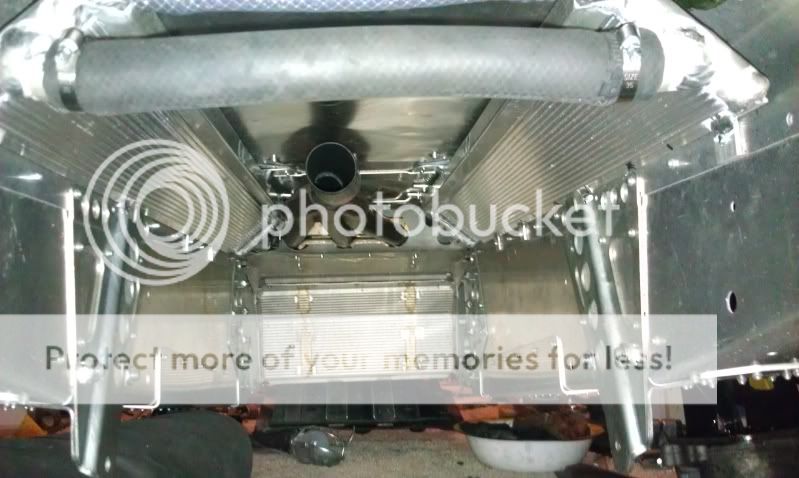
While I was in there, I rotated the exhaust outlet to stay under the tunnel. I also blocked off the hole with the same aluminum plate I used for the tunnel extension on the Phazer.
I'm hoping this nearly cures the icy tunnel problem.
I had the MTX tunnel cooler installed last year, however, I was less than impressed with it. It seemed to make almost zero difference as far as cooling.
I decided it was time to build some real tunnel coolers.
I started off with a cooler extrusion from CR Racing.
I used 3/4" pipe to build a set of end tanks on each extrusion.
For mounting, I chose to utilize the same holes that the OEM cooler used, as well as a few others at the back (of course).
I ended up using the tunnel seam as a height guide, so the cooler flange could nicely rest on the top of the drop bracket.
The mounting tabs were built of 1/8" plate.
I wanted a second cooling loop built in (I'll explain why at a later date), so I ended up using the stock tunnel protectors for the top mount. Note I had to build a protection pad to protect the cooler from the exhaust mount plate (which is steel).
For hose connections, I ended up using (again) 3/4" pipe for the main cooler, and 1/2" for the secondary. I just had to machine it down to a proper hose barb.
Co-incidentally, pipe happens to be the same major diameter as common hose barbs. 3/4" pipe = 1" hose (1.05"), 1/2" pipe = 3/4" hose (0.84").
Here are the rear hose barbs.
To build them, I simply chucked up the pipe in my lathe;
Marked out 0.25" back, and 1" back;
Turned the inside down to ~0.02 less than hose ID;
And chamfered the end so it was easy to get the hose on;
I marked out the end tanks, and drilled the required hole, then welded the barbs in place.
The hardest part was the front, where I had to fit the tig torch in to a tight spot, while feeding the filler, and keeping the hose connection aligned to the OEM holes.... just to get a good tack weld.
Once I was finished, I filled it with water, capped the ends, and pressured it up to 20psi. After 1 hour I had no measurable pressure drop, and no signs of fluid.... so I took that as a test passed.
In the sled it went. Hose connections on, and hit it with the rivet gun.
While I was in there, I rotated the exhaust outlet to stay under the tunnel. I also blocked off the hole with the same aluminum plate I used for the tunnel extension on the Phazer.
I'm hoping this nearly cures the icy tunnel problem.
raginyamaha
TY 4 Stroke Master
nice fab work. should really help icing i would think
Omega_5
Extreme
Thanks for the complements. After a few rides, I can say it's far better.
The most ice I saw was a bit of build up below the tailight, which was easily removed with a bump on the tunnel.
Last Friday I received a package I'd been waiting a while for.
New ZBroz 40" 3+ arms!
Again, I didn't take any in progress pictures... but there isn't really much anyways.
I did snap a few comparison photos. Sorry for the very messy and snowy shop.


Thinking back, I wish I'd have taken a picture of the arms stacked.
The most ice I saw was a bit of build up below the tailight, which was easily removed with a bump on the tunnel.
Last Friday I received a package I'd been waiting a while for.
New ZBroz 40" 3+ arms!
Again, I didn't take any in progress pictures... but there isn't really much anyways.
I did snap a few comparison photos. Sorry for the very messy and snowy shop.
Thinking back, I wish I'd have taken a picture of the arms stacked.
Omega_5
Extreme
On and off though the season, I've been working on a new project.
I sold the turbo kit I built last year in search of something a bit more 'rideable' with some real low end to it.
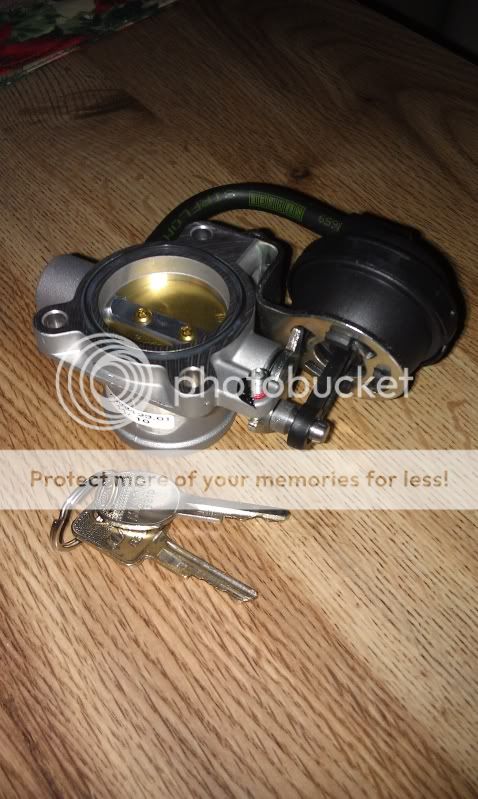
I knew there was only one solution; supercharge it. I looked into an MPI kit, but felt it was more my style to bolt something unconventional.
As I've stated in other threads, I love superchargers. In particular, roots or screw blowers. Most of the vehicle in my driveway have some type of blower on them. With that in mind, I've acquired a lot of specialty tools to remove, modify and service Eaton products.
To start, I wasn't even going to try to deal with the PTO shaft. I called up the local MPI dealer and had them order me the PTO assembly. It's a very well engineered and built piece. For the price, I doubt I could have had one machined out in the oil field for less... much less the design time.
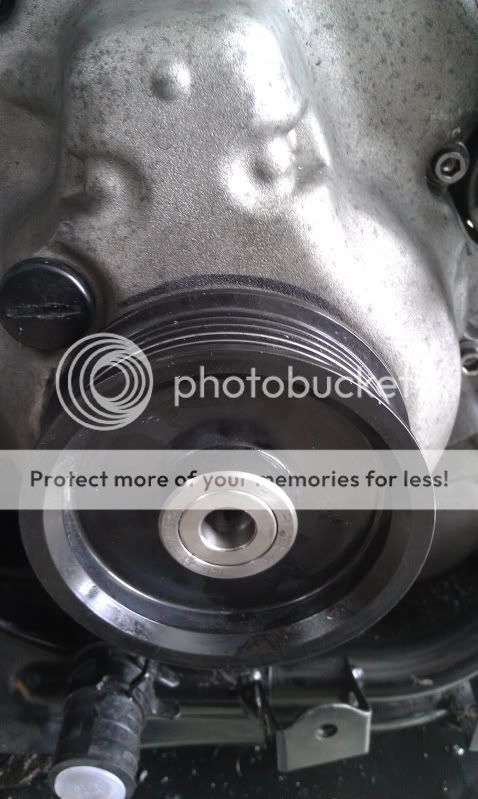
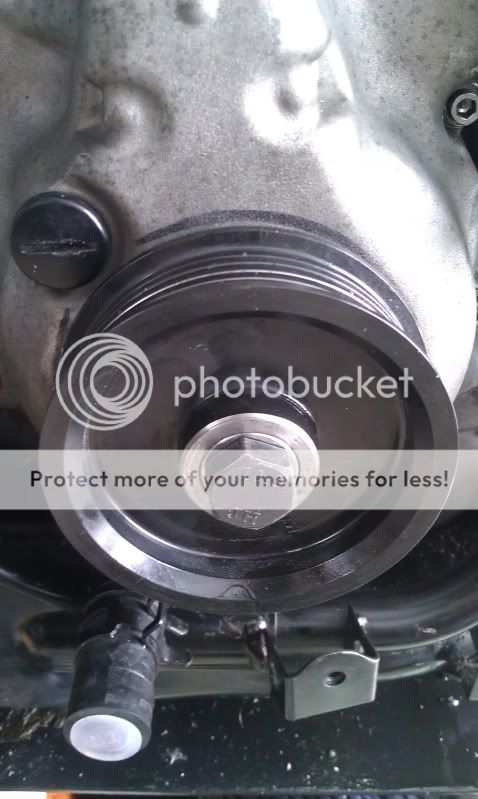
I did a lot of debating on what belt to use, as I had to decide on a pulley. A lot of companies are using taper-locks and Gates Poly-chain products. Maybe it's my automotive past, but I prefer to use automotive parts in automotive applications, and industrial parts in industrial applications. Poly-chain was out.
I opted to go for a 6-rib serpentine drive. For one, I have about 20 5-bolt pulley hubs in my cabinet. Second, they can take a real beating, and deal with slip very well. Third... cheap, cheap, cheap. A poly-chain was going to run me nearly $100. A poly-v... $35.
This lead to me trying to find a drive pulley. I almost abandoned the poly-v idea, as no one made a pulley that would fit on the MPI shaft. I thought about a custom machined taper-lock with a poly-v adapter, but that was pricey. Maybe it was time to re-evaluate my position.
A few days later, I was cleaning out a cabinet of old car parts, when I found the stock supercharger pulley from my Cobalt SS. It wasn't the right bore, but that could be fixed easily. I called up the local machine shop, and had them precision bore the hole out to proper press-on specs.
Great success!
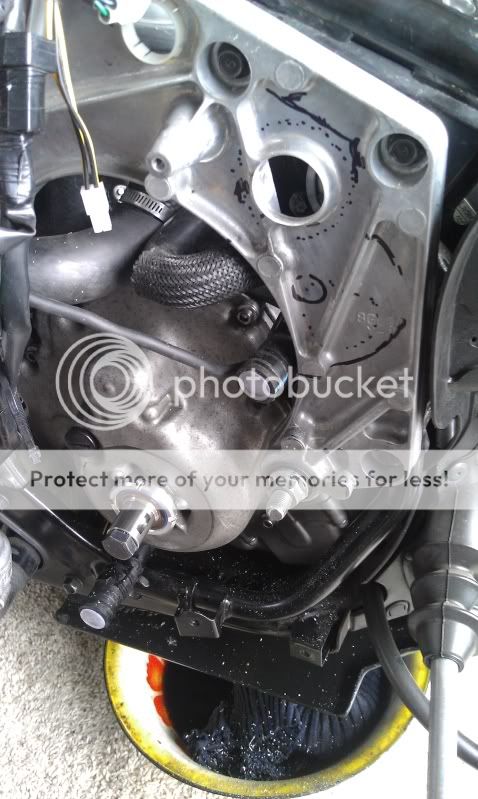
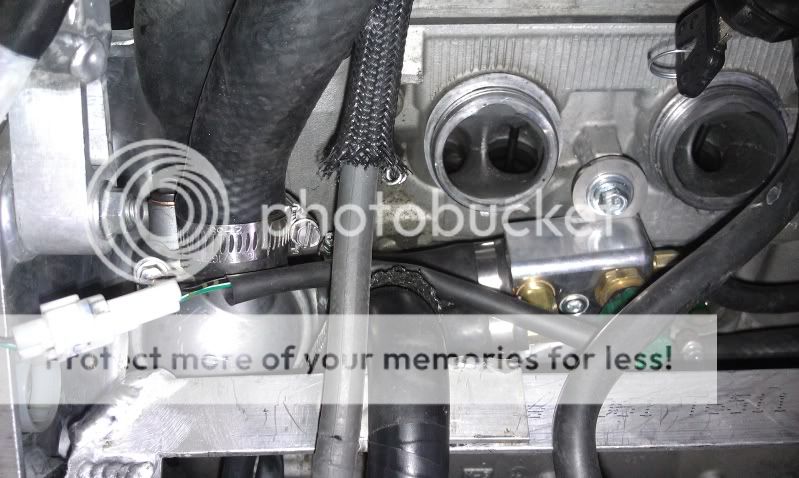
The next issue I ran it to is the coolant elbow. I can see why MPI uses their billet unit.
I didn't even bother to mess with it. I called the dealer again and ordered the MPI elbow and fittings.
Again... a very nice piece.
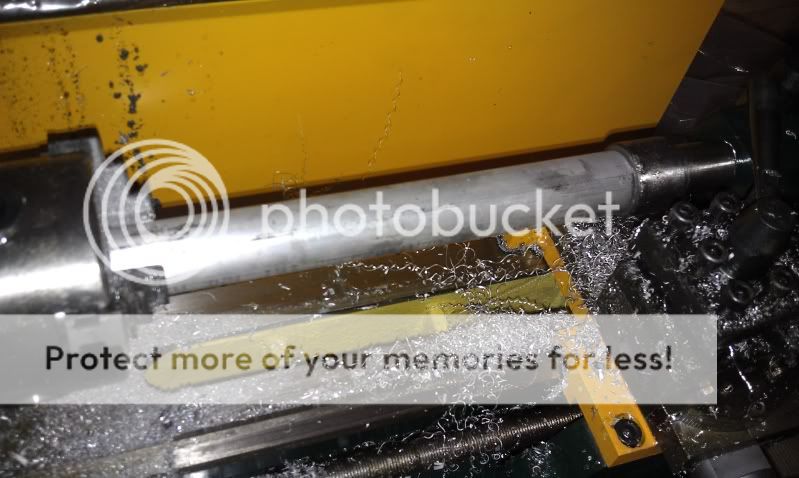
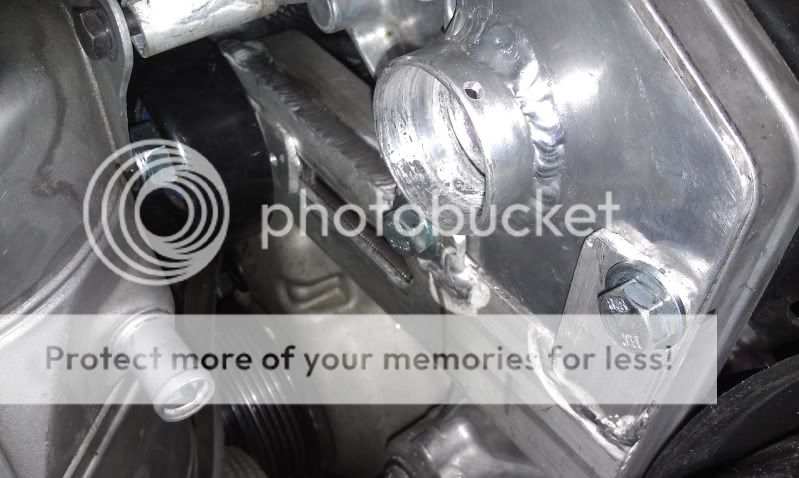
With the coolant elbow out of the way, I could test fit the blower. I knew I either had to hog a giant hole out of the main frame, or build an extension shaft. Again, the local machinist did very nice work.
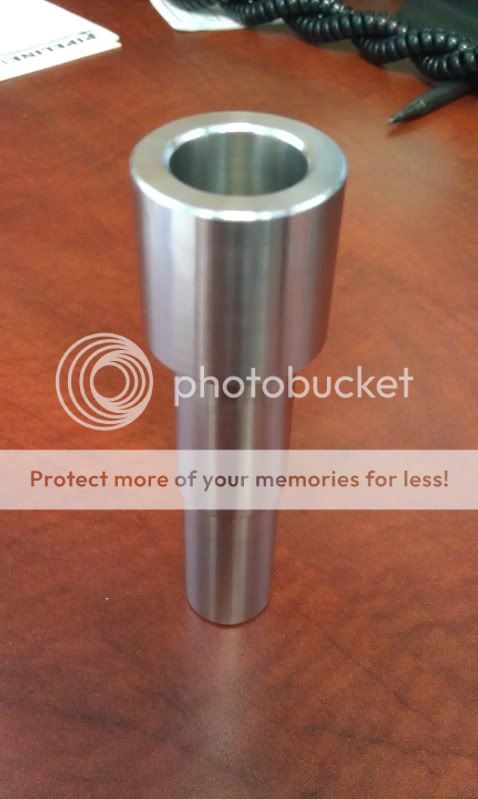
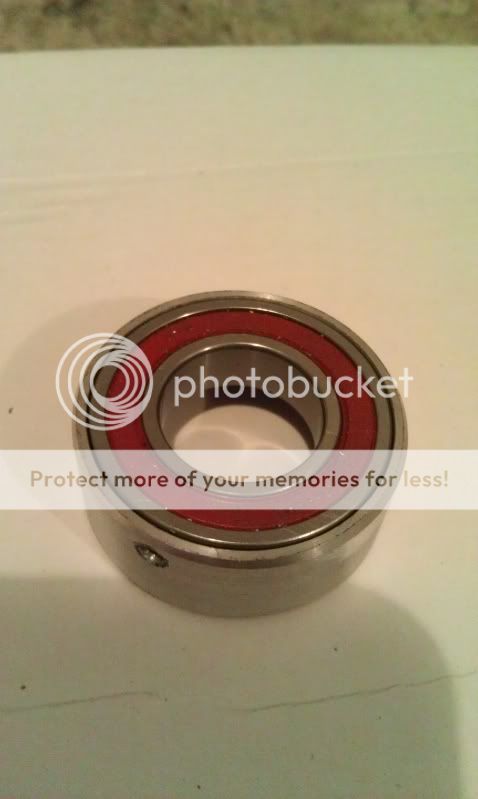
Next, I had to build a bearing carrier, to support the carrier bearing for the extension.
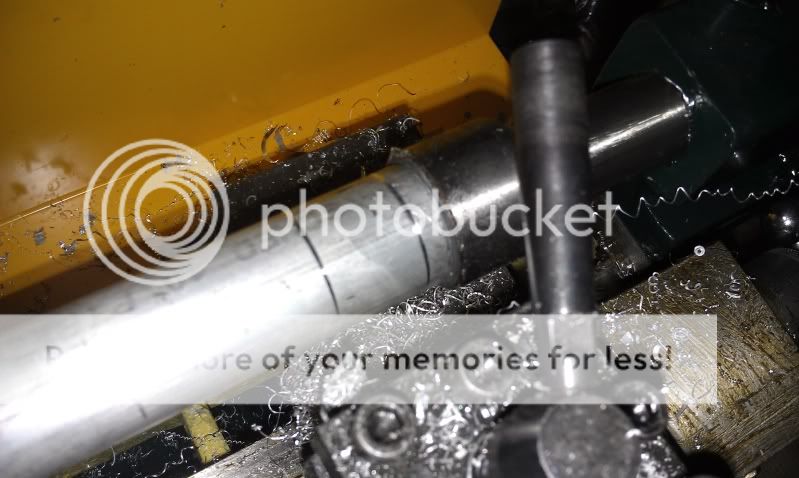
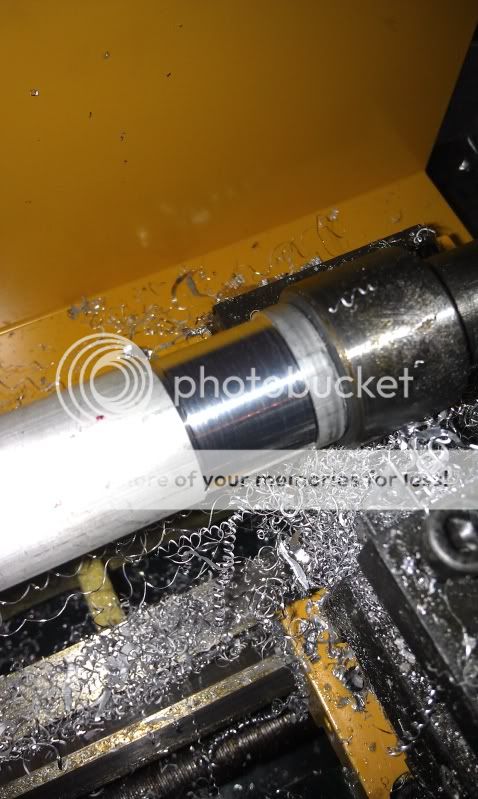
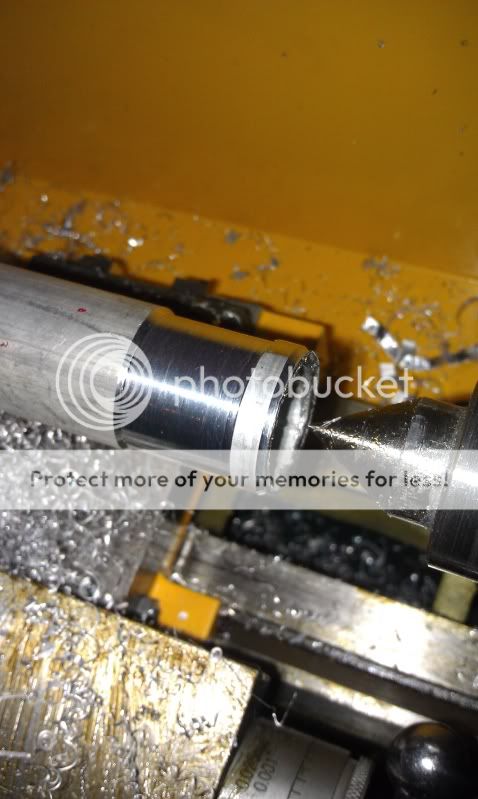
I took some 1" pipe, chucked it in the lather, and bored it to suit. A fairly simple job.
Once finished, I built a mounting flange, and tig'd the carrier to the flange.

On the way still;
Mounting the blower, the intercooler, bypass, tensioner, intake.
Then actually making it run... lots of tuning.
I sold the turbo kit I built last year in search of something a bit more 'rideable' with some real low end to it.
I knew there was only one solution; supercharge it. I looked into an MPI kit, but felt it was more my style to bolt something unconventional.
As I've stated in other threads, I love superchargers. In particular, roots or screw blowers. Most of the vehicle in my driveway have some type of blower on them. With that in mind, I've acquired a lot of specialty tools to remove, modify and service Eaton products.
To start, I wasn't even going to try to deal with the PTO shaft. I called up the local MPI dealer and had them order me the PTO assembly. It's a very well engineered and built piece. For the price, I doubt I could have had one machined out in the oil field for less... much less the design time.
I did a lot of debating on what belt to use, as I had to decide on a pulley. A lot of companies are using taper-locks and Gates Poly-chain products. Maybe it's my automotive past, but I prefer to use automotive parts in automotive applications, and industrial parts in industrial applications. Poly-chain was out.
I opted to go for a 6-rib serpentine drive. For one, I have about 20 5-bolt pulley hubs in my cabinet. Second, they can take a real beating, and deal with slip very well. Third... cheap, cheap, cheap. A poly-chain was going to run me nearly $100. A poly-v... $35.
This lead to me trying to find a drive pulley. I almost abandoned the poly-v idea, as no one made a pulley that would fit on the MPI shaft. I thought about a custom machined taper-lock with a poly-v adapter, but that was pricey. Maybe it was time to re-evaluate my position.
A few days later, I was cleaning out a cabinet of old car parts, when I found the stock supercharger pulley from my Cobalt SS. It wasn't the right bore, but that could be fixed easily. I called up the local machine shop, and had them precision bore the hole out to proper press-on specs.
Great success!
The next issue I ran it to is the coolant elbow. I can see why MPI uses their billet unit.
I didn't even bother to mess with it. I called the dealer again and ordered the MPI elbow and fittings.
Again... a very nice piece.
With the coolant elbow out of the way, I could test fit the blower. I knew I either had to hog a giant hole out of the main frame, or build an extension shaft. Again, the local machinist did very nice work.
Next, I had to build a bearing carrier, to support the carrier bearing for the extension.
I took some 1" pipe, chucked it in the lather, and bored it to suit. A fairly simple job.
Once finished, I built a mounting flange, and tig'd the carrier to the flange.
On the way still;
Mounting the blower, the intercooler, bypass, tensioner, intake.
Then actually making it run... lots of tuning.
kennyspec
Expert
Awesome progress!!!
Irv
TY 4 Stroke God
- Joined
- Mar 23, 2005
- Messages
- 3,778
- Age
- 59
- Location
- ONT. Canada
- Country
- Canada
- Snowmobile
- 2008 40th Anniversary Vector.
1995 XLT SP (Son's)
Wow, I wish I had half your talent and skill Omega!
That is some great work you do.!")
That is some great work you do.
Omega_5
Extreme
Thanks guys.
I'm really excited to be doing something off the beaten path.
I'm really excited to be doing something off the beaten path.
Omega_5
Extreme
More progress.
I finished up the mounting cage for the supercharger.
The top attaches to the frame in the same place as the subframe. I simply used extended bolts, and lock nuts.
For the bottom, I used the factory holes. The one side uses the hole to hold the relay pack. I forget what the other hole was for.

Of course, the coolant bottle is gone from it's stock place. That would be a product of last years turbo build.
Another picture of the MPI coolant block, and the fabulous mess of coolant hoses. It's pretty tight back there.
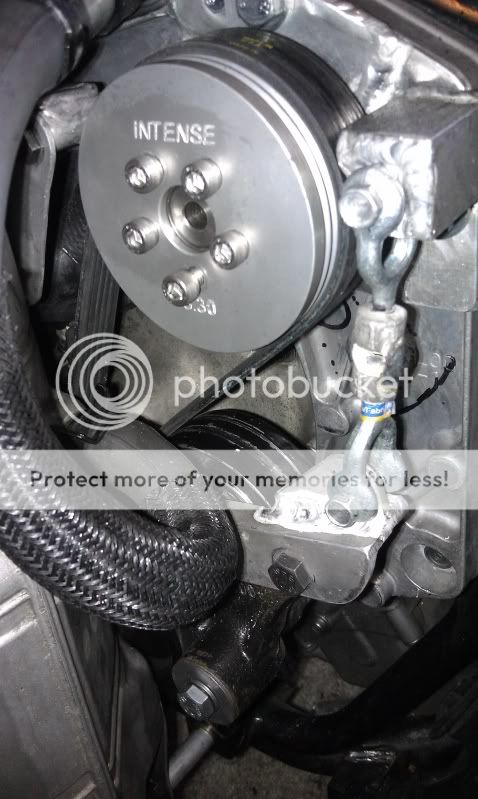
Managed to build a belt tensioner. The idler is just a generic unit from NAPA.
I also received a key piece of hardware. The bypass valve.
This will allow the supercharger to bleed boost at idle and low load. Bleeding the boost means less load, which means better economy on the trail.
And finally... the unit that will be making the power. An Eaton M45.
I've shown it here with the flange I had laser cut, so I can begin constructing the intercooler.
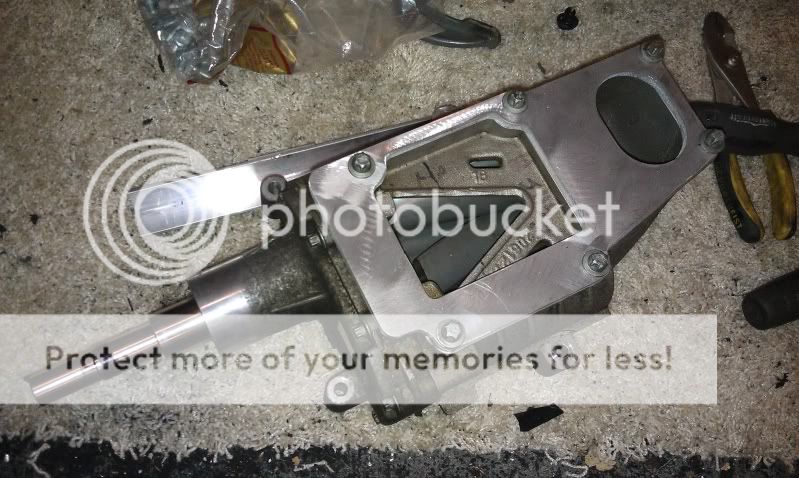
I finished up the mounting cage for the supercharger.
The top attaches to the frame in the same place as the subframe. I simply used extended bolts, and lock nuts.
For the bottom, I used the factory holes. The one side uses the hole to hold the relay pack. I forget what the other hole was for.
Of course, the coolant bottle is gone from it's stock place. That would be a product of last years turbo build.
Another picture of the MPI coolant block, and the fabulous mess of coolant hoses. It's pretty tight back there.
Managed to build a belt tensioner. The idler is just a generic unit from NAPA.
I also received a key piece of hardware. The bypass valve.
This will allow the supercharger to bleed boost at idle and low load. Bleeding the boost means less load, which means better economy on the trail.
And finally... the unit that will be making the power. An Eaton M45.
I've shown it here with the flange I had laser cut, so I can begin constructing the intercooler.
Omega_5
Extreme
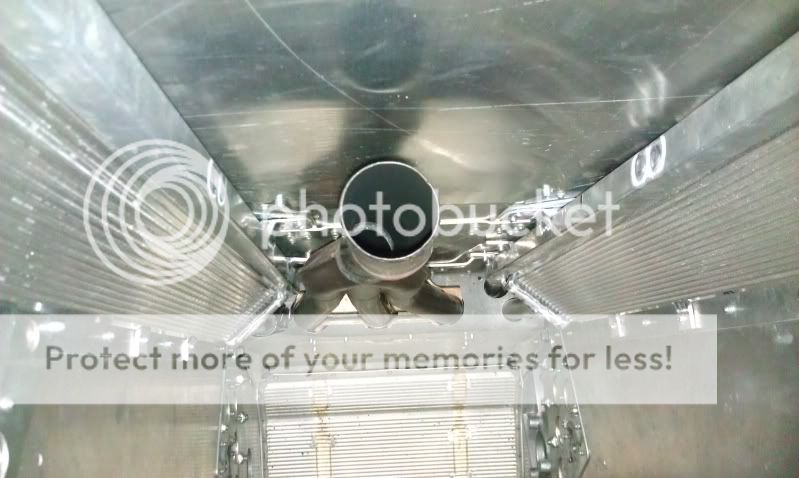
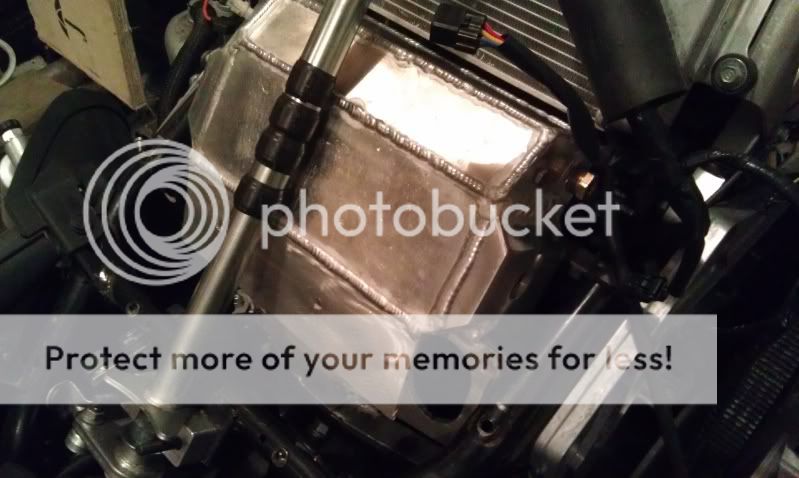
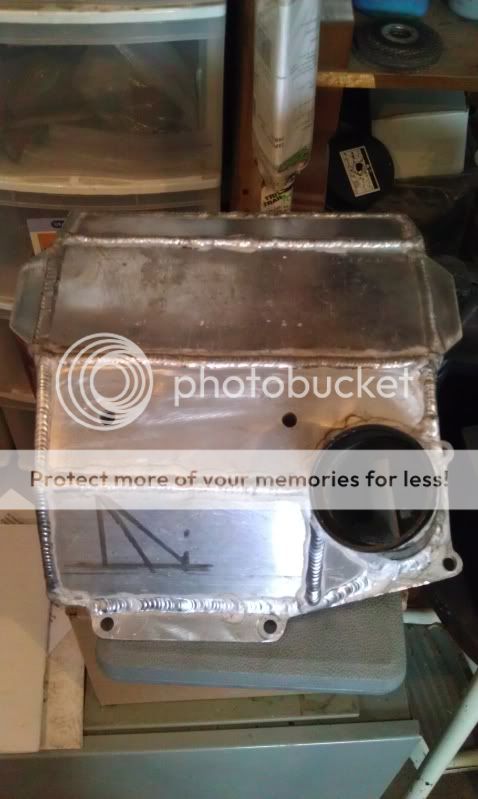
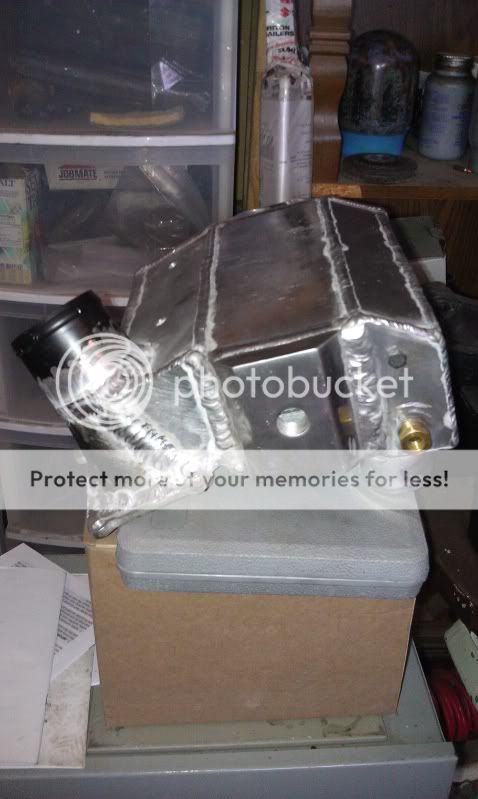
This past week I was building the intercooler.
I started by mounting the supercharger in place, and bolting on the flange.
A back plate had to be welded on first, as the interooler is wider than the flange.
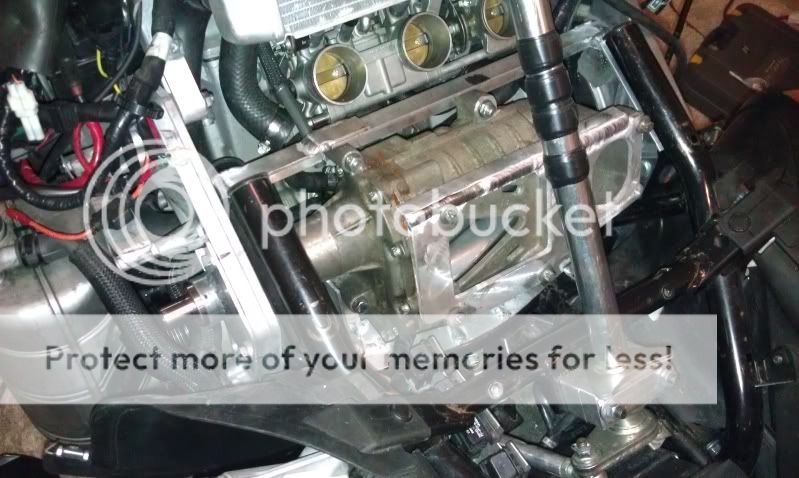
Once the lower flange was placed, I started to work on the top. I tacked the three output tubes on to the intercooler body. Once tacked, I was able to tack on the rest of the top tank body.
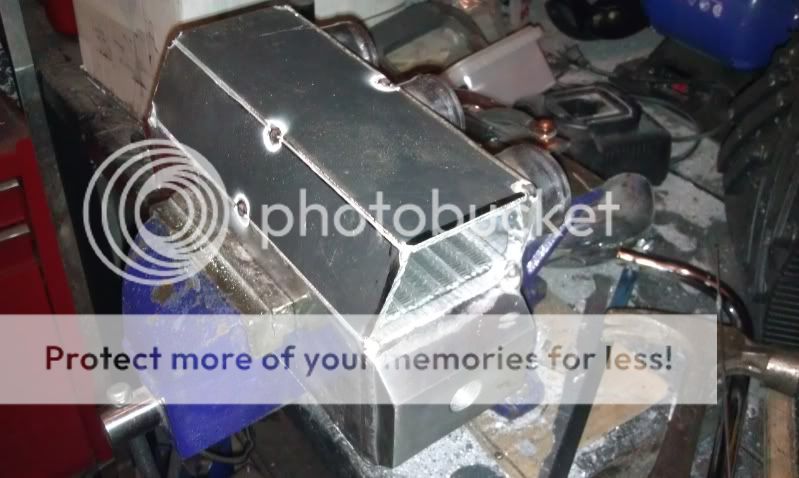
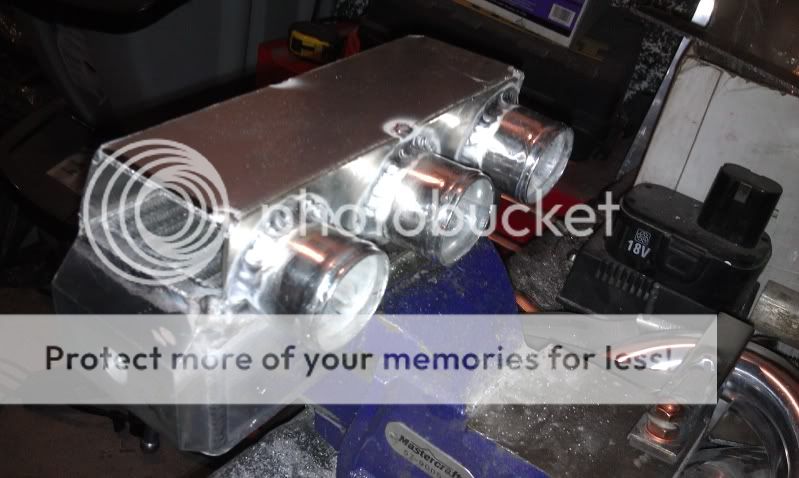
All welded up.
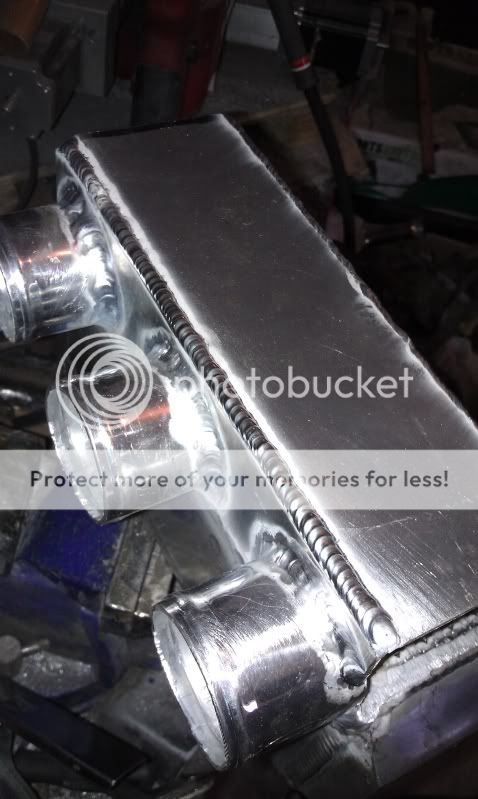
When the top was all closed off, I began work on the bottom.
I decided to switch over to stainless the other day for a bit.
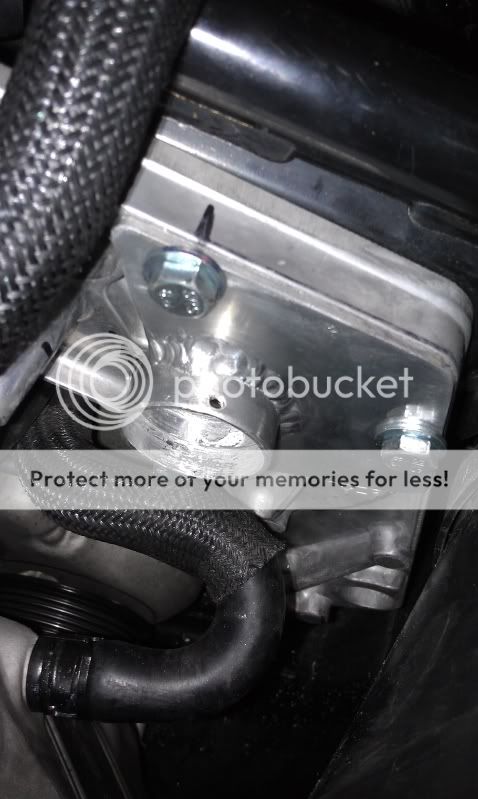
Welded an O2 bung into the exhaust.
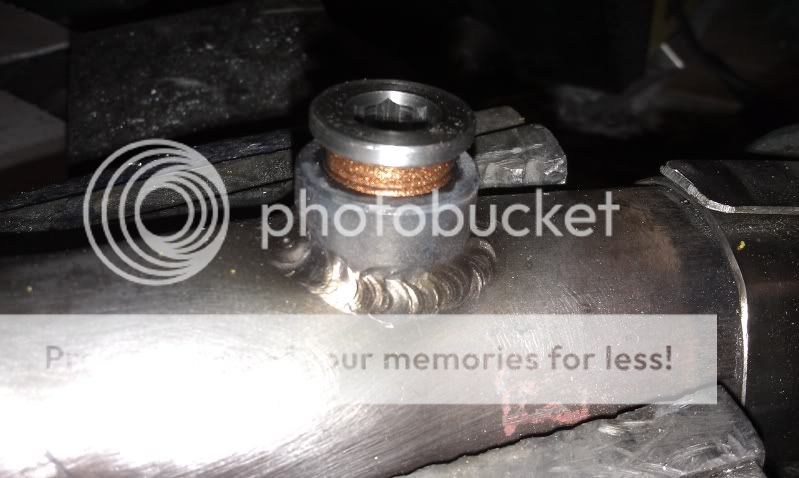
With the tunnel block off, I was able to position the sensor in the vertical position. This will allow for easy sensor replacement or calibration.
For reference, where I marked the 'R' next to the rivet on the block off, is where the factory muffler mount is. I routed the cord through the front factory hole in the heat shield (had to remove the rubber plug). This worked out perfect, as I have a tunnel bag that sits behind the muffler bracket... the front was just wasted space.
This weekend should see some more progress.
I started by mounting the supercharger in place, and bolting on the flange.
A back plate had to be welded on first, as the interooler is wider than the flange.
Once the lower flange was placed, I started to work on the top. I tacked the three output tubes on to the intercooler body. Once tacked, I was able to tack on the rest of the top tank body.
All welded up.
When the top was all closed off, I began work on the bottom.
I decided to switch over to stainless the other day for a bit.
Welded an O2 bung into the exhaust.
With the tunnel block off, I was able to position the sensor in the vertical position. This will allow for easy sensor replacement or calibration.
For reference, where I marked the 'R' next to the rivet on the block off, is where the factory muffler mount is. I routed the cord through the front factory hole in the heat shield (had to remove the rubber plug). This worked out perfect, as I have a tunnel bag that sits behind the muffler bracket... the front was just wasted space.
This weekend should see some more progress.
Omega_5
Extreme
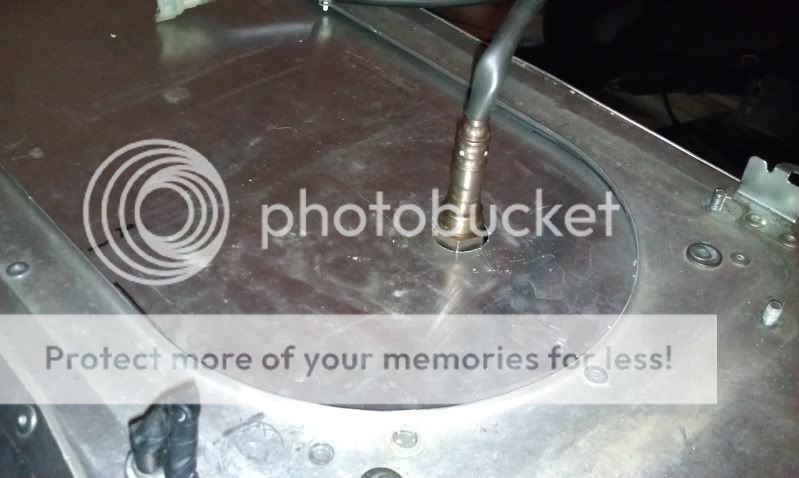
Managed to close off and pressure test the intercooler.
I ended up integrating the air intake into the body of the lower tank.
Cut in the take-off for the bypass valve.

Almost ready for the first test run.
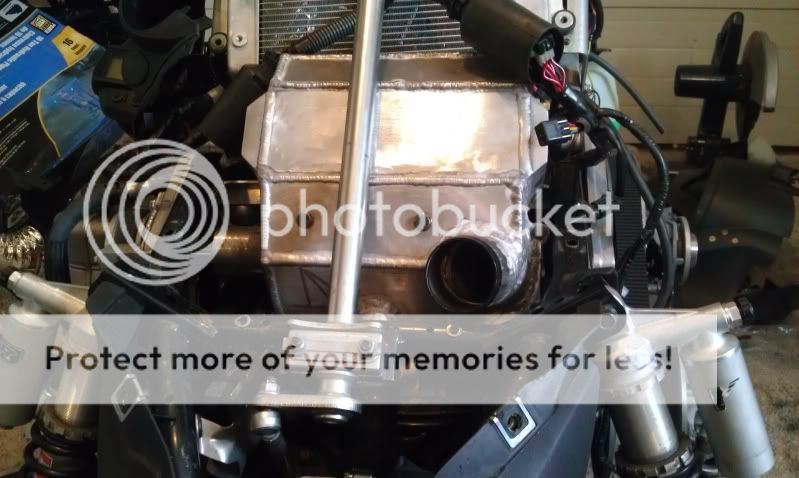
All that's left is to install the intercooler pump and hoses, and start tuning the RBR.
I ended up integrating the air intake into the body of the lower tank.
Cut in the take-off for the bypass valve.
Almost ready for the first test run.
All that's left is to install the intercooler pump and hoses, and start tuning the RBR.
raginyamaha
TY 4 Stroke Master
This thing should rip down low, i love the SC idea with a roots style. Very cool
Omega_5
Extreme
Not much progress this week.
I did some wiring, and gauge installation.
Managed to plumb most of the intercooler system.
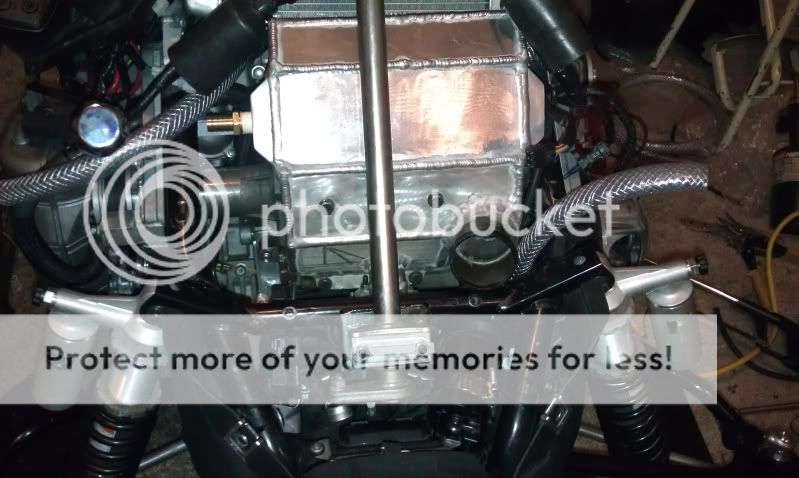
Bad news on the first startup, though.
The pulley tensioner I built seems to flex under load, and slips the belt.
So, I had to fab up a new option, using an OEM tensioner from a car. Not the nicest, but it will work for now.
Other than that, it runs great and idles just like stock.
I did some wiring, and gauge installation.
Managed to plumb most of the intercooler system.
Bad news on the first startup, though.
The pulley tensioner I built seems to flex under load, and slips the belt.
So, I had to fab up a new option, using an OEM tensioner from a car. Not the nicest, but it will work for now.
Other than that, it runs great and idles just like stock.
Similar threads
- Replies
- 0
- Views
- 2K
-
This site uses cookies to help personalise content, tailor your experience and to keep you logged in if you register.
By continuing to use this site, you are consenting to our use of cookies.