

Only need to remove the internal plate if intending to run the 8dn belt. If you do. Yes the three nuts holding the spring and helix on need to be removed to separate the secondary halves. Probably not needed but I put the halves back together in same. Position as original. Also when removing helix pay attention as to what holes each tang on spring ends goes into and what studs helix is on. Put it back same. The three 8mm bolts and washers on back are removed and if 8dn being used those and the 3 Phillips screws and plate are removed. In both cases the aluminum tube spacer and outside shim is also not used.
Barney Maclean
Veteran
- Joined
- Oct 15, 2014
- Messages
- 49
- Age
- 51
- Location
- ontario
- Country
- Canada
- Snowmobile
- 2016 Yamaha Viper RTX SE
Perfect thankx! I have installed! Waiting for my Ulmer clutch kit! My 8jp belt sits below top of Secondary? Normal?
Thanks for Help guys!
Thanks for Help guys!
weasel33
Expert
Cannon, do you have to split the secondary and remove the internal plate? I got proper belt deflection with just removing the three bolts in the back. Or can it be made better?
It can be made better. Some 8dn belts are narrow new. They all will eventually wear and the the plate will need to be removed for best deflection.
weasel33
Expert
Ok, thanks

Nytro40th
TY 4 Stroke God
- Joined
- Sep 19, 2007
- Messages
- 1,798
- Location
- Amherstview Ontario
- Country
- Canada
- Snowmobile
- 2014 SR Viper RTX SE
I just ordered one. Looks like a great tool.
Last edited:
Barney Maclean
Veteran
- Joined
- Oct 15, 2014
- Messages
- 49
- Age
- 51
- Location
- ontario
- Country
- Canada
- Snowmobile
- 2016 Yamaha Viper RTX SE
Thanks for yur Help Cannondale!
I just ordered the Ulmer Clutch kit and going to switch to 8DN belt! I will remove the plate when I install the kit.
A Newbie to Yamahas such as myself Appreciate Everyones time answering all my questions! Video was Great too!
I just ordered the Ulmer Clutch kit and going to switch to 8DN belt! I will remove the plate when I install the kit.
A Newbie to Yamahas such as myself Appreciate Everyones time answering all my questions! Video was Great too!
Reaper
TY 4 Stroke Junkie
- Joined
- Nov 10, 2005
- Messages
- 667
- Location
- Starbuck, Manitoba
- Country
- Canada
- Snowmobile
- 2014 SR Viper XTX. COTC, Hygear 141 pro link.
I would say it's coming up now because until now there hasn't been a nice little tool/adjuster available to do such a thing. I can't wait to try it out, just waiting for mine to show up.
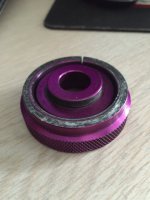
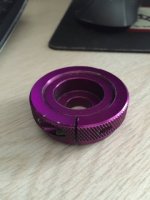
It's actually not a new idea. Depending on your vintage you may recall a guy named Mark Giammattei had developed a similar adjuster I used on my SRX's back in the late 90's.
Anodized purple for the late 90's vibe... lol
Attachments
Last edited:
ROCKERDAN
OCD Sledhead
- Joined
- Oct 8, 2005
- Messages
- 7,496
- Location
- Huntsville Ontario & Niagara NY
- Country
- Other
- Snowmobile
- '18 RTX 50th "Winder"
Very nice design Jim! lol !")
Dan
Dan
Blue Dave
Lifetime Member
- Joined
- Jan 7, 2008
- Messages
- 2,888
- Age
- 61
- Location
- Ham Lake, MN
- Country
- USA
- Snowmobile
- '17 Sidewinder LTX DX
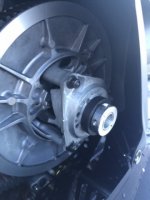
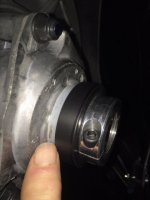
This tool is awesome!!!! Very well made and super easy to use. Imagine being to adjust your secondary sheave width (belt height) without having to remove the secondary to add or remove washers to compensate for different belts or belt wear over time. Every Yamaha owner should have one of these. It is worth every cent.
I put mine on yesterday and started with the sheaves fully together (collar not tightened against the cupped plate). The belt was higher than the sheaves and was slightly squealing at idle. I simply tightened the collar against the cupped plate a bit which opened up the sheaves and the squealing stopped. Wow! How easy & convenient!
I also like the fact that it can be used to aid in the removal of a belt which is a real PIA on the Viper because of the limited access for your hands around the secondary. However as others reported earlier in this thread, the tool does not have enough adjustment to remove a 8JP belt without some effort. So I made a spacer that I can place between the cupped plate and the helix when changing belts.
It is simply a ring that I cut out of a 1/4 " thick plastic sheet with two hole saws. When changing belts I simply place this spacer ring temporarily between the cupped plate and the helix which gives the tool enough adjustment to spread the sheaves to the point where the 8JP belt can be removed with no effort. After the belt is replaced I simply remove the plastic spacer ring and put it in my storage bag.
Attachments

Last edited:
bleedyamaha
TY 4 Stroke Master
- Joined
- Sep 28, 2013
- Messages
- 1,494
- Location
- Northern Iowa
- Country
- USA
- Snowmobile
- 2017 Yamaha Sidewinder Rtx Le 2012 Yamaha Vector Ltx
So where is your final adjuster sitting after you tightened up your collar in refrence to the threaded piece. It seams I have to have my adjuster threaded half way out to get my belt heighth right. Still havent been able to.get enough belt tension to get the belt to squeal or grab. I am using a 8dn as well.This tool is awesome!!!! Very well made and super easy to use. Imagine being to adjust your secondary sheave width (belt height) without having to remove the secondary to add or remove washers to compensate for different belts or belt wear over time. Every Yamaha owner should have one of these. It is worth every cent.
I put mine on yesterday and started with the sheaves fully together (collar not tightened against the cupped plate). The belt was higher than the sheaves and was slightly squealing at idle. I simply tightened the collar against the cupped plate a bit which opened up the sheaves and the squealing stopped. Wow! How easy & convenient!
I also like the fact that it can be used to aid in the removal of a belt which is a real PIA on the Viper because of the limited access for your hands around the secondary. However as others reported earlier in this thread, the tool does not have enough adjustment to remove a 8JP belt without some effort. So I made a spacer that I can place between the cupped plate and the helix when changing b
It is simply a ring that I cut out of a 1/4 " thick plastic sheet with two hole saws. When changing belts I simply place this spacer ring temporarily between the cupped plate and the helix which gives the tool enough adjustment to spread the sheaves to the point where the 8JP belt can be removed with no effort. After the belt is replaced I simply remove the plastic spacer ring and put it in my storage bag.
Last edited:
Blue Dave
Lifetime Member
- Joined
- Jan 7, 2008
- Messages
- 2,888
- Age
- 61
- Location
- Ham Lake, MN
- Country
- USA
- Snowmobile
- '17 Sidewinder LTX DX
So where is your final adjuster sitting after you tightened up your collar in refrence to the threaded piece. It seams I have to have my adjuster threaded half way out to get my belt heighth right. Still havent been able to.get enough belt tension to get the belt to squeal or grab. I am using a 8dn as well.
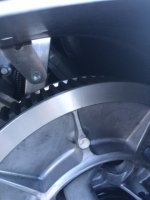
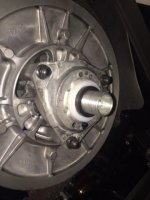
Did you remove the plate inside of the clutch that is supposed to be removed when running the 8DN belt? This is the plate that the OEM adjustment bolts bump against. If you look a few pages back in this thread there is a picture and discussion about this plate needing to be removed when running the 8DN belt.
With the 8JP belt I can get the top of the belt to be flush with the top of the sheaves with the tool collar outer edge about flush with the end of the threaded part. With my temporary spacer installed the outer edge of the collar is past the end of the threaded part. This is fine since I will only install my spacer when changing belts.
I agree that there should be some more adjustment without having the outer edge of the collar being past the end of the threaded piece. However I wonder if the threaded piece were to be made longer if it would rub on the foam in the inside of the side panel. If the cupped plate were made a 1/4" thicker (1/4" deeper cup) then the threaded piece should definitely be made at least a 1/4" longer as well. Again, I suspect that side panel clearance might be an issue.
In any case I am fine with using my spacer when changing belts since it literally only takes a few additional seconds to install and remove the spacer during a belt replacement. The only concern I have is using the allen wrench to spin the collar as I worry that eventually the allen head cap screw and the allen wrench will not fit tightly and may slip apart while spinning the collar. However if that happens it will be easy to replace the allen head cap screw and/or the allen wrench.
Overall this is an excellent product IMO.
Last edited:
bleedyamaha
TY 4 Stroke Master
- Joined
- Sep 28, 2013
- Messages
- 1,494
- Location
- Northern Iowa
- Country
- USA
- Snowmobile
- 2017 Yamaha Sidewinder Rtx Le 2012 Yamaha Vector Ltx
I got to thinking my dealer said he took my secondary off by removing the bolt and didnt touch the adjuster. You think I need to loosen the collar up and and than retighten the secondary bolt and make adjustments or that wont have anything to do with deflection?
Blue Dave
Lifetime Member
- Joined
- Jan 7, 2008
- Messages
- 2,888
- Age
- 61
- Location
- Ham Lake, MN
- Country
- USA
- Snowmobile
- '17 Sidewinder LTX DX
I got to thinking my dealer said he took my secondary off by removing the bolt and didnt touch the adjuster. You think I need to loosen the collar up and and than retighten the secondary bolt and make adjustments or that wont have anything to do with deflection?
When you tighten the center mounting bolt it will bottom the threaded aluminum part of the tool against the end of the jackshaft. It wouldn't matter where the collar was locked down. If the collar was locked down in a spot that put pressure on the helix then the center mounting bolt would overcome the helix spring and the clutch sheaves would open up to the same point as before the tool was removed with the collar locked in the same spot.
When you loosen the collar the belt will not pop up by itself because of the side forces on it. Loosen the collar some then lock it down and run the sled some on a stand to run the belt up and down in the secondary. Let it coast to a stop and then look at where the belt is sitting.
Did you remove the plate that I asked you about in my previous post?
bleedyamaha
TY 4 Stroke Master
- Joined
- Sep 28, 2013
- Messages
- 1,494
- Location
- Northern Iowa
- Country
- USA
- Snowmobile
- 2017 Yamaha Sidewinder Rtx Le 2012 Yamaha Vector Ltx
Sorry ya the bolts on back and the plate is removed. I did run it on stand and rechecked and kept backing collar out to the point I felt I shouldnt go any further. What about trying a new belt. The 8 dn I have was a used one a nytro buddy let me try. ?
Similar threads
- Replies
- 4
- Views
- 2K
- Replies
- 6
- Views
- 2K
- Replies
- 25
- Views
- 50K
-
This site uses cookies to help personalise content, tailor your experience and to keep you logged in if you register.
By continuing to use this site, you are consenting to our use of cookies.