Lococoin
Extreme
This fall I picked up an 08 Nytro MTX. The sled had 67 km's on it so pretty much brand new. The plan was to run it stock for the season but I found a new but used Powderlites stage 2 kit on Ty4stroke.com and decided to pull the pin on it.
The sled is somewhat of a "budget" build. Im not cutting any corners but I can't justify doing any more than the bare minimum to get this thing running. Next year I plan on doing some more stuff, hopefully by then the Canadian dollar will have recovered a bit.
Powderlites Stage 2 kit
Camo Extreme 162x15x2.5 track
Avid CNC drivers
Apex 162 rails
Stock Apex torsion springs
Frame stiffener update
Rear shock from Venture MP
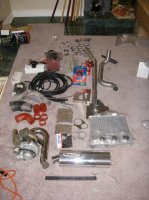
After getting jerked around by Purolator i finally got my turbo kit in. The box wasnt exactly in mint shape so i was a bit leary as to what I would find inside. It looks like the only thing that got a bit of a road rash was my intercooler. Doesn't look to be anything major and hopefully it will bend back ok without breaking. The price you pay when buying second hand, although im a happy man since i saved around $1600 from what it would be for me to buy that kit from Powderlites right now. UPDATE: After mentioning to Darren from Powderlites that my intercooler was damaged, he offered to take it back with him (I was at the Edmonton snow show) and will be shipping it out next week once it is repaired. I am really happy with the customer service so far, its nice to see some decent service in a day and age when it seems that nobody gives a crap. Thanks guys.
Here is the complete turbo kit. As you can see it has a lot of pieces and is supposed to be a complete kit. That's refreshing because I know exactly how much the little stuff adds up from when I did the custom kit on my Honda Civic. The instructions that come with the kit(via email) are pretty vague for someone who isn't doing these kits on a daily basis. UPDATED: I received the new install instructions and I must say they look to be very thorough.
The sled is somewhat of a "budget" build. Im not cutting any corners but I can't justify doing any more than the bare minimum to get this thing running. Next year I plan on doing some more stuff, hopefully by then the Canadian dollar will have recovered a bit.
Powderlites Stage 2 kit
Camo Extreme 162x15x2.5 track
Avid CNC drivers
Apex 162 rails
Stock Apex torsion springs
Frame stiffener update
Rear shock from Venture MP
After getting jerked around by Purolator i finally got my turbo kit in. The box wasnt exactly in mint shape so i was a bit leary as to what I would find inside. It looks like the only thing that got a bit of a road rash was my intercooler. Doesn't look to be anything major and hopefully it will bend back ok without breaking. The price you pay when buying second hand, although im a happy man since i saved around $1600 from what it would be for me to buy that kit from Powderlites right now. UPDATE: After mentioning to Darren from Powderlites that my intercooler was damaged, he offered to take it back with him (I was at the Edmonton snow show) and will be shipping it out next week once it is repaired. I am really happy with the customer service so far, its nice to see some decent service in a day and age when it seems that nobody gives a crap. Thanks guys.
Here is the complete turbo kit. As you can see it has a lot of pieces and is supposed to be a complete kit. That's refreshing because I know exactly how much the little stuff adds up from when I did the custom kit on my Honda Civic. The instructions that come with the kit(via email) are pretty vague for someone who isn't doing these kits on a daily basis. UPDATED: I received the new install instructions and I must say they look to be very thorough.
Attachments
Lococoin
Extreme
Last week I started the tear down. I wanted to get the engine out because I am going to be bringing it up to work with me on Wednesday. The plan is to do the head shim and cam timing up there while im working two weeks, and then i can just get right to reinstalling the engine when i get back. Followed by the turbo kit shortly after. Then last but not least the new track, drivers, and rails.
I am definitely impressed with the way this thing comes apart. It is a pain to get the engine out because of the rider forward position, but nothing is overly complicated to do and can be done with basic hand tools.


I am definitely impressed with the way this thing comes apart. It is a pain to get the engine out because of the rider forward position, but nothing is overly complicated to do and can be done with basic hand tools.
Lococoin
Extreme
I finally got around to doing the head shim and cam timing changes.
Valve cover off:

camshafts out:

Cylinder head:

Block:

camshafts/camshaft caps:

Head shim with spray a gasket on both sides. You split the new head gasket into two pieces and sandwich the head shim in between:

Head retorqued. You need to torque it to 18 ft lbs in proper sequence, then losen off and retorque to 18 ft lbs. From there you need to torque the bolts 175-185 degrees. I did this in two steps as per the powderlites instructions but the service manual doesnt say anything about an additional step. If you turn them past the required angle, do not losen and retighten, you will need to replace the bolt and redo the tightening sequence:

Setting camshafts to match powderlites cam degree shim:

Cam gear holes made bigger on exhaust side to change advance the cam. Intake side requires you to retard the cam by 1 tooth so no grinding required:

This picture shows the change in cam position after the overlap has been removed:

Valve cover off:
camshafts out:
Cylinder head:
Block:
camshafts/camshaft caps:
Head shim with spray a gasket on both sides. You split the new head gasket into two pieces and sandwich the head shim in between:
Head retorqued. You need to torque it to 18 ft lbs in proper sequence, then losen off and retorque to 18 ft lbs. From there you need to torque the bolts 175-185 degrees. I did this in two steps as per the powderlites instructions but the service manual doesnt say anything about an additional step. If you turn them past the required angle, do not losen and retighten, you will need to replace the bolt and redo the tightening sequence:
Setting camshafts to match powderlites cam degree shim:
Cam gear holes made bigger on exhaust side to change advance the cam. Intake side requires you to retard the cam by 1 tooth so no grinding required:
This picture shows the change in cam position after the overlap has been removed:
Topgun
Expert
So did you end up removing shims to get proper clearence???

seeing this at this stage reminds us why we went with yamaha. Keep up the good work!!!
Boost is fun!!!!
Boost is fun!!!!
Lococoin
Extreme
Topgun said:So did you end up removing shims to get proper clearence???
The clearance is at 0.007 intake, 0.009 exhaust. Not quite max specs like powderlites mentions but I called Dave and he said that those clearances would be fine. He said the Apex is the one that is most important to have max specs, the valves must recess quicker on those vs the vector/nytro.
I would have set it to max, but brought my engine up to work with me, and have no easy access to shims. To get the engine to work I had to bring it on the planewe use to go back and forth into the bush.
Attachments

kinger
VIP Member
Great picts! Any issues with the chain or tensioner installation? Just take them off the old cams and zip tie them up till you lay them back on the cam gears when your done? I assume the chain will be much tighter now or is the tensionerabel to compensate?
Lococoin
Extreme
You have to make sure you compress the tensioner and then hold it compressed using the little clip it has on it. Kind of hard to explain:
You squeeze the spring on the tensioner, compress it and then hook the clip on the pin at the end. Once you put it in the clip releases and it works as normal. You will damage the tensioner retainer spring if you try and put it in without doing this.
The headshim adds very little height and the tensioner has a lot of adjustment so no worries there.
Hope this makes sense.
Lococoin
Extreme

The instructions call for the big turbo hanger to be on the outside on the short section. I found that things didnt line up the way I liked that way so I am going to put them both on the inside.

I am going to try running the exhaust upside down so I can put a jerry can on the tunnel. The exhaust is pretty tight against the side of the tunnel, I may do a bit of trimming later. That or I will put a piece of rubber there to stop the exhaust from getting cut up too bad on the tunnel.


rxrider
Jan-Ove Pedersen
- Joined
- Apr 25, 2003
- Messages
- 7,356
- Age
- 59
- Location
- Lakselv - 70N & 25E
- Country
- Norway
- Snowmobile
- 2014 Phazer XTX, 2013 Phazer RTX, 2008 Apex RTX, 2007 Warrior, 2006 Attak
Lococoin - Great work
Man nice!! Looks like tons of work wow!!
Skydog
Skydog


Similar threads
- Replies
- 17
- Views
- 3K
- Replies
- 8
- Views
- 2K
- Replies
- 3
- Views
- 1K
-
This site uses cookies to help personalise content, tailor your experience and to keep you logged in if you register.
By continuing to use this site, you are consenting to our use of cookies.