RobX-1
VIP Member
- Joined
- Apr 13, 2003
- Messages
- 2,084
- Location
- Coldwater, OH
- Country
- USA
- Snowmobile
- 18 50th Apex XT-X, 08 40th Apex LTX GT, 08 40th Nytro RTX, & 03 RX-1
I had to split my primary to replace the fixed and sliding sleaves. We were able to make our own tool that utilized the three holes on the backside of the fixed sleave and was able to unscrew the clutch spider. The service manual states that when re-assembling everying and screwing the clutch spider back into the fixed sleave, I'm to use lock tight and its not applied on all of the threads. My questions to those that used their own tool or made their own adapter is how did you ensure the clutch spider was tightend to 145ft-lbs? Even if you used Yamaha's clutch spider separator tool, how would you know when it was tighten to spec? I have a torque wrench but I don't think it could be used to torque the clutch spider unless I'm missing something.
Mtnviper
Vendor
RobX-1
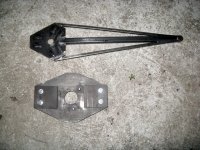
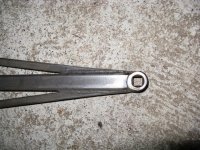
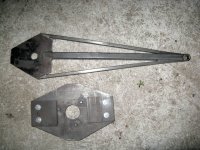
When I made my spider tool, I welded a 3/4" 1/2" drive socket to the end of the handle. The distance between the center hole and the 1/2" drive is the same as the OEM Yamaha tool. What you do is put a torque wrench on at the end of the handle. Then torque the tool/spider to 145 lbs. The actual torque at the spider is much greater, because of the length of the spider tool handle. It multiplies the torque.
I have used the OEM tool before, and I think the tool I made works much better. It is more robust, and engages the spider much better, without fear of it slipping off.
It's also a very good idea to send your clutch out for spin balancing, after you get it back together. I spend mine to Wilderness sports in Idaho. They do a good job for a reasonable price.