steveg_nh
TY 4 Stroke Junkie
Hi All,
I've come to the flip side, as I sell old reliable, my 2004 Yamaha SX Viper ER 700. That was a great sled, but I upgraded today to a 2007 Attak RTX. WOW. Nice sled, but I'm working out the kinks like everyone does with a new used sled.
Anyway, I am dealing with a couple of small things that I could use some tips on.
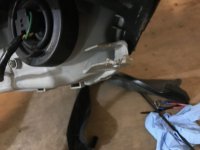
First, the starter relay has the common corrosion on it. Rather than risk a trail side no start situation, I did order a new starter relay. but I noticed the wire harness itself looks a little green and nasty, so I'd like to clean up the pins before I install the new relay. Can you slide the pins out of the white plastic connector? Is there a little tab to push down on to get them out, or should I be replacing that wire harness itself (assuming it's not a huge project to do it).
Next, I had to pull the airbox/cleaner to get to the relay, and I realized that the rubber boots on the airbox were not on the 4 air intakes (no carbs, so assume this is what you call them) that well. When I tried to put the box back in, I realized, it's pretty hard to get to those hex screws to tighten down the rubber boots on those intakes. How the heck do you do it? Do you slide the dash out or off or something to get behind and above the instakes so you can tighten the bolts?
I'm new to the sled, and 4 strokes, but I'm happy to have it and to learn.
Any advice or tips are appreciated on both points.
Thanks!
I've come to the flip side, as I sell old reliable, my 2004 Yamaha SX Viper ER 700. That was a great sled, but I upgraded today to a 2007 Attak RTX. WOW. Nice sled, but I'm working out the kinks like everyone does with a new used sled.
Anyway, I am dealing with a couple of small things that I could use some tips on.
First, the starter relay has the common corrosion on it. Rather than risk a trail side no start situation, I did order a new starter relay. but I noticed the wire harness itself looks a little green and nasty, so I'd like to clean up the pins before I install the new relay. Can you slide the pins out of the white plastic connector? Is there a little tab to push down on to get them out, or should I be replacing that wire harness itself (assuming it's not a huge project to do it).
Next, I had to pull the airbox/cleaner to get to the relay, and I realized that the rubber boots on the airbox were not on the 4 air intakes (no carbs, so assume this is what you call them) that well. When I tried to put the box back in, I realized, it's pretty hard to get to those hex screws to tighten down the rubber boots on those intakes. How the heck do you do it? Do you slide the dash out or off or something to get behind and above the instakes so you can tighten the bolts?
I'm new to the sled, and 4 strokes, but I'm happy to have it and to learn.
Any advice or tips are appreciated on both points.
Thanks!
4StrokeAddict
TY 4 Stroke Junkie
- Joined
- Apr 13, 2015
- Messages
- 514
- Age
- 39
- Location
- Michigan
- Country
- USA
- Snowmobile
- 2015 SR Viper LTX SE
It's possible to remove and install the airbox with the pod on, but difficult. You can pull the entire pod off as a single unit with 4 bolts. Just go slow and take apart all the wires. Also, use silicone spray to get the rubber over the intake. If it's not completely seated, it is impossible to get them to tighten and stay attached.
steveg_nh
TY 4 Stroke Junkie
Thanks. I have to see how to get that off then, as I want to be sure the boots are properly seated. I don't think they were before.
Do you know the answer on the question about the starter relay wire harness, if it's easily replaced or not?
Do you know the answer on the question about the starter relay wire harness, if it's easily replaced or not?

Winderallday!
VIP Member
Air box boots are finicky to get on correctly, and once installed incorrectly, the boots can be damaged and harder to install from then on. Definitely easiest to remove or set aside the headlamp/gauge pod by removing 2 bolts on either side of the black bracket and the pod slides toward the front and lifts off.
The band clamps tighten down only so far, I believe there is a stop or seat where the screw bottoms out and that's it. A long series ball end allen wrench is what you need to get at the clamp screws from the top side through the headlamp/pod bracket. The band clamps themselves have orientation tabs so they are in a set position (about 10:00 position standing in front of the sled), it is important they are aligned properly and loosened off prior to re-installing.
When re-installing the air box, I generally apply a light film of grease on the boot and throttle body so they don't grab and buckle. Work the air box on by gently moving it up/down side/side slightly. Check inside the air horns in the box and with a flashlight on the outside over the throttle bodies to ensure the boots are completely over the throttle bodies and not pinched. Your sled will not run great with the boots not installed properly.
As for the harness and green corrosion, I think you can release the lugs from the harness, but I generally clean them well with fine grit paper and a small screwdriver or similar. Once cleaned apply generous amount of dielectric grease to keep water/snow out of this connection.
Cheers.
Last edited:
4StrokeAddict
TY 4 Stroke Junkie
- Joined
- Apr 13, 2015
- Messages
- 514
- Age
- 39
- Location
- Michigan
- Country
- USA
- Snowmobile
- 2015 SR Viper LTX SE
What Apexallday said. You can use a wire brush on the contacts as well. Dielectric greese will help prevent further corosion. Unless you are having a major problem with the current fuses/relays, i wouldn't bother replacing. Just clean up and continue using.
steveg_nh
TY 4 Stroke Junkie
I was going to order a new one, so not worth it? Do I have to worry about shorting any of those terminals in the starter relay when cleaning? Not sure if they have +12V to them. I certainly could test with a meter, but having somewhere with experience is helpful. Assuming I can clean at will, I think I could clean them up very well, it's just the contacts in the wire connection that are hard to clean, hence why I want to take those out to clean properly. I don't want to get stuck trailside this winter.
And Apexallday, when you mention removing the two bolts on either side of the black bracket, is that when looking in motor with airbox removed, or when sitting on machine facing the pod and forward?
And Apexallday, when you mention removing the two bolts on either side of the black bracket, is that when looking in motor with airbox removed, or when sitting on machine facing the pod and forward?

thor452
Because I can
- Joined
- Jan 5, 2010
- Messages
- 3,029
- Location
- Shawano,WI 54166
- Country
- USA
- Snowmobile
- 2012 Apex XTX 2017 Sidewinder LTX-LE
the two bolts are on either side of the sled if you look in the gap between the side panel and hood you can see them the have a 10 mm head on them.
steveg_nh
TY 4 Stroke Junkie
Great, thank you!
Winderallday!
VIP Member
I was going to order a new one, so not worth it? Do I have to worry about shorting any of those terminals in the starter relay when cleaning? Not sure if they have +12V to them. I certainly could test with a meter, but having somewhere with experience is helpful. Assuming I can clean at will, I think I could clean them up very well, it's just the contacts in the wire connection that are hard to clean, hence why I want to take those out to clean properly. I don't want to get stuck trailside this winter.
Steveg: Wouldn't bother with a new harness unless it is totally dickered. I have found that squeezing the metal contacts together inside the harness that go over the spade lugs on the relay helps with maintaining contact as well, these contacts tend to relax over time due to being removed/replaced when servicing the sled under the battery basket. I chased an electrical gremlin for hours and finally found that wiggling this connector on the starter relay corrected the issue I was chasing.
And Apexallday, when you mention removing the two bolts on either side of the black bracket, is that when looking in motor with airbox removed, or when sitting on machine facing the pod and forward?
See bolt #9 in the fiche image below that thor452 mentioned above. Be careful not to drop them into the engine bay when removing. Also the spring clip #8 on the pod that they thread into can become dislodged and fall into the darkness as well.
steveg_nh
TY 4 Stroke Junkie
Awesome, thank you!
steveg_nh
TY 4 Stroke Junkie
Well, this is a bummer. I found the bolts you were talking about. Easy. Until I got to the right side and saw one was missing. Ok, no big deal, buy a new one. Then I pulled the pod out and saw the ear is broken on that side.  Previous owner didn't tell me that. Oh Well. Also the cowl trim on the left side is broken too, but that's cheap, so not a big deal. Anyway, is it worth a new light, or $180, or should I figure out a way to secure it? Poor design if you ask me, to have the whole headlight have to be replaced if this breaks.
This explains why the whole top seemed so loose and flimsy...bummer.
Edit: found some good ideas on this site for the headlight. Whew! Someone selling a kit with rubber bumpers. Hope he still has those.
And how the heck do you get to the far right air intake boot band when facing the sled? It's under some hoses and some type of mini manifold or something. Can't even see the hex head!
Previous owner didn't tell me that. Oh Well. Also the cowl trim on the left side is broken too, but that's cheap, so not a big deal. Anyway, is it worth a new light, or $180, or should I figure out a way to secure it? Poor design if you ask me, to have the whole headlight have to be replaced if this breaks.This explains why the whole top seemed so loose and flimsy...bummer.
Edit: found some good ideas on this site for the headlight. Whew! Someone selling a kit with rubber bumpers. Hope he still has those.
And how the heck do you get to the far right air intake boot band when facing the sled? It's under some hoses and some type of mini manifold or something. Can't even see the hex head!
Attachments
Last edited:
All the clamps are indexed on the boots. Should be easily seen as the other ones. If not remove the air box and spin the clamp until it slips into place.
Winderallday!
VIP Member
Well, this is a bummer. I found the bolts you were talking about. Easy. Until I got to the right side and saw one was missing. Ok, no big deal, buy a new one. Then I pulled the pod out and saw the ear is broken on that side.
This explains why the whole top seemed so loose and flimsy...bummer.
Edit: found some good ideas on this site for the headlight. Whew! Someone selling a kit with rubber bumpers. Hope he still has those.
I would guess the prior owner must have rolled or had sled on it's side in the cabbage to break both headlamp pod mount, and a piece of cowl, hey it happens. Not a great design, but Barn of Parts kit seems to be a solid alternative. Check for broken plastic windshield screws too, they generally pop the heads off when under stress if in fact sled was track side up at some point.
For the airbox band clamps, find a long series ball-end Allen wrench to get at those clamp bolts, I use lineman pliers on the short end of the Allen wrench to loosen/tighten them. I think you can get T handle long series Allen wrenches too. You should be able move stuff around sufficient to get at it, and be able to see it easier after headlamp pod is removed. As mentioned before all the clamps are orientated in the same position on the intake boots, so if not, then something isn't lined up properly.
steveg_nh
TY 4 Stroke Junkie
Thanks guys. Only one side of headlight is broke. I ordered the kit from Barn of Parts to fix that. And the cowl corner seems to be a common piece that breaks. He did tell me he rolled it on side once so he was honest about that. Lol. He's a good guy.
Anyway all 4 boot clamps seem to have stops at the 10:00 position. It's just the far right one (belt side) that is a bit hidden from view.
Anyway all 4 boot clamps seem to have stops at the 10:00 position. It's just the far right one (belt side) that is a bit hidden from view.
thor452
Because I can
- Joined
- Jan 5, 2010
- Messages
- 3,029
- Location
- Shawano,WI 54166
- Country
- USA
- Snowmobile
- 2012 Apex XTX 2017 Sidewinder LTX-LE
Travis is good to work with at BOP. good choice. with long ball end Allan's you should be able to get at all of the boot clamps. you may have to thread it in there a bit but I have never not been able too.
Similar threads
- Replies
- 24
- Views
- 2K
-
This site uses cookies to help personalise content, tailor your experience and to keep you logged in if you register.
By continuing to use this site, you are consenting to our use of cookies.