steveg_nh
TY 4 Stroke Junkie
I figured I would start a new clean thread on my project to replace both the left and right heat exchangers under the running boards on my 07 Attak. They both have stress cracks where they bolt through to the skid support on the tunnel.
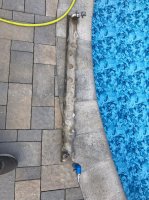
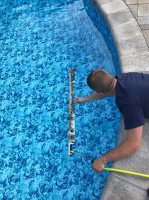
First I bought used ones to replace my bad ones so I will pressure test them with 8-10psi of air and then dunk test them in my swimming pool, looking for air bubbles.
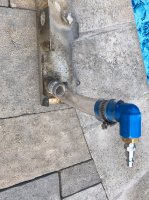
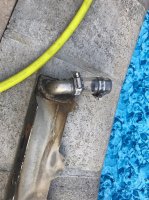
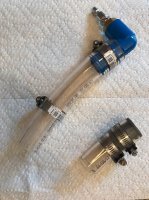
Here's the fittings I made to plug one pipe and put the air in the other on the used replacement parts. Dunk test later today. I will try to document the whole project with pics.
To make these fittings I bought:
1. 1 inch ID flexible pvc hose
2. 1" ID hose barb to 3/4" PVC fitting (the blue part)
3. 3/4" male to 1/4" Female brass reducer
4. Male air compressor fitting
5. 1" irrigation system end cap/plug
6. 4 hose clamps to gently hold it all together

steveg_nh
TY 4 Stroke Junkie
steveg_nh
TY 4 Stroke Junkie
Now it was time to pull the cracked heat exchangers. My plan was to salvage them and get them welded for backups, but they didn't come out all that well. Tabs cracked off, and they bent a bit here and there, so I just trashed them.
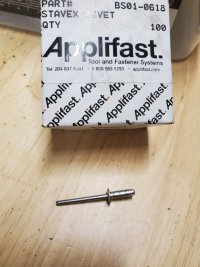
To drill out all the rivets, you will need a 3/16" drill bit, a center punch or nail set, and a hammer (gentle!). My recommendation on drilling the rivets: use oil. don't go too fast. only drill till the head pops off or maybe just a bit more. Try to carefully punch the rest of the rivet out with a punch or nail set. If it doesn't want to come out, be careful. If you bang too hard you could bend the plate it's secured into (I did in a couple of cases, but was able to get them back as they should be).
To access all the rivets, you will need to remove the rear plastic trim to expose the hoses on the rear of the sled. Also remove the front cover between the steering column and light pod, so you can access the coolant bottles. Beyond that, no other panels need to come off. My skid was off, so it was easy to get to the rivets inside the tunnel.
In all the pics you will see, any of the rivets or bolts that get removed will be circled in red.
Step one: Crack open the coolant cap. Grab a bucket, and pull the lower drain hose off the hx once you slide the clamp back onto the hose. You will likely get a couple of quarts of antifreeze collected here.
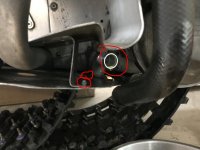
Step 2: Do the same thing in the rear and pull the rear hose and collect the antifreeze. Keep the bucket ready at the front of the sled, as more will drain out. Catch the coolant at the back hose with another bucket.
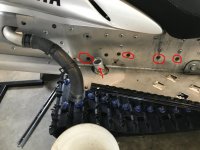
Now it's time to start drilling out rivets holding it in place.
To drill out all the rivets, you will need a 3/16" drill bit, a center punch or nail set, and a hammer (gentle!). My recommendation on drilling the rivets: use oil. don't go too fast. only drill till the head pops off or maybe just a bit more. Try to carefully punch the rest of the rivet out with a punch or nail set. If it doesn't want to come out, be careful. If you bang too hard you could bend the plate it's secured into (I did in a couple of cases, but was able to get them back as they should be).
To access all the rivets, you will need to remove the rear plastic trim to expose the hoses on the rear of the sled. Also remove the front cover between the steering column and light pod, so you can access the coolant bottles. Beyond that, no other panels need to come off. My skid was off, so it was easy to get to the rivets inside the tunnel.
In all the pics you will see, any of the rivets or bolts that get removed will be circled in red.
Step one: Crack open the coolant cap. Grab a bucket, and pull the lower drain hose off the hx once you slide the clamp back onto the hose. You will likely get a couple of quarts of antifreeze collected here.

Step 2: Do the same thing in the rear and pull the rear hose and collect the antifreeze. Keep the bucket ready at the front of the sled, as more will drain out. Catch the coolant at the back hose with another bucket.

Now it's time to start drilling out rivets holding it in place.
Last edited:
steveg_nh
TY 4 Stroke Junkie
What I found when doing the right side first, then the left, is a few rivets in the side of tunnel differed from left to right, but overall, they were very close. In all there are approximately 16-17 rivets to remove for each hx. There are also 3 bolts to remove for each HX, one up front, and two in the plate towards the rear of the tunnel.
1. Most rivets are accessible and visible from the top, and they are in the running boards and tunnel side.
2. There is one at the back, near the drain hose, that is inverted, so you drill it out when looking up at the bottom of the running board.
3. There are 1-2 (depending on who installed them I guess), underneath the front, near the front drain hose.
4. Inside the tunnel, there are 1-2 holding it in there as well.
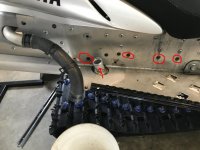
This shows the rear most rivets on the tunnel side. Not the two that DON'T get removed. You will notice the cutout in the hx where these reside. They do not hold the hx in.
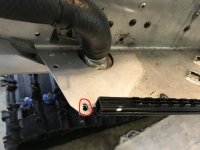
This shows the underside rivet at the rear. Yes that one wasn't kind and the hole enlarged a little. Luckily it's hidden by the cover plate, and a washer firmed it all right up.
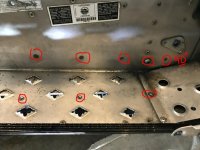
This pic shows the majority of the forward and running board rivets, as well as the 3 bolts that have to be removed. Two are bolts, and one is an allen head. If you're skid is in, be careful when removing the rear bolts. Mine was out.
Now looking underneath, towards the front near the drain hose, remove these rivets. One one side only one rivet was installed, on the left side, both were there. Odd.
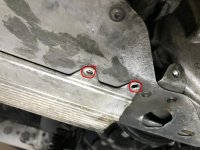
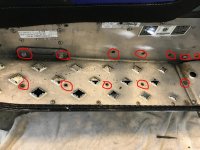
Now when looking up inside the tunnel, remove these two rivets facing out. Yes, I need a new track.
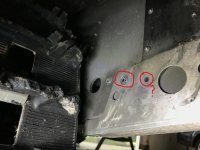
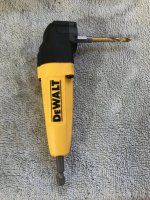
This pic shows the forward group of rivets. You will note the furthest forward rivet is very hard to get at with a regular drill. I have a handy little Dewalt right angle drill attachment ($15 at Lowes), that has come in very handy for me. I used it to drill this rivet out, and it worked great.
1. Most rivets are accessible and visible from the top, and they are in the running boards and tunnel side.
2. There is one at the back, near the drain hose, that is inverted, so you drill it out when looking up at the bottom of the running board.
3. There are 1-2 (depending on who installed them I guess), underneath the front, near the front drain hose.
4. Inside the tunnel, there are 1-2 holding it in there as well.
This shows the rear most rivets on the tunnel side. Not the two that DON'T get removed. You will notice the cutout in the hx where these reside. They do not hold the hx in.

This shows the underside rivet at the rear. Yes that one wasn't kind and the hole enlarged a little. Luckily it's hidden by the cover plate, and a washer firmed it all right up.

This pic shows the majority of the forward and running board rivets, as well as the 3 bolts that have to be removed. Two are bolts, and one is an allen head. If you're skid is in, be careful when removing the rear bolts. Mine was out.

Now looking underneath, towards the front near the drain hose, remove these rivets. One one side only one rivet was installed, on the left side, both were there. Odd.

Now when looking up inside the tunnel, remove these two rivets facing out. Yes, I need a new track.

This pic shows the forward group of rivets. You will note the furthest forward rivet is very hard to get at with a regular drill. I have a handy little Dewalt right angle drill attachment ($15 at Lowes), that has come in very handy for me. I used it to drill this rivet out, and it worked great.


Last edited:
steveg_nh
TY 4 Stroke Junkie
At this point, all fasteners holding the hx in should be out. You should have nice clean holes. Hopefully when you drilled the rivets you were careful to not enlarge any holes. I had a few stubborn ones and some minor casualties, but overall it went well getting them all removed.
Here's a pic showing all rivets removed, and bolts very loose.
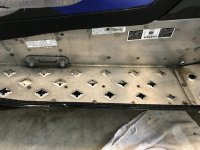
Next step, getting it actually off the sled.
More soon...
Here's a pic showing all rivets removed, and bolts very loose.

Next step, getting it actually off the sled.
More soon...
Last edited:


thor452
Because I can
- Joined
- Jan 5, 2010
- Messages
- 3,029
- Location
- Shawano,WI 54166
- Country
- USA
- Snowmobile
- 2012 Apex XTX 2017 Sidewinder LTX-LE
you did step one wrong or you miss spelled Beer as coolant cap.
steveg_nh
TY 4 Stroke Junkie
So now on to removing it. Once you have all the rivets and bolts out (assuming you didn't miss any), the hx will come out, but not easily. The pressure created by the side plates (where the 3 bolts were) hold it pretty securely in place.
Gently, starting at the front end, pull down a bit, and it will start to come out. Then pull down on the back to even it out, and work it all the way out, being careful to shift it as needed to drop the back end through the running board hole completely, and then twisting it a bit to get the front pipe out. Careful, there will still be some antifreeze in the hx, so pour it into a bucket.
Now you are ready to reinstall. Line up the new one, putting the front pipe in place first, then placing the rear pipe through the running board.
Now carefully line up the side of the hx with the metal plates (the hx goes between the metal plates and the tunnel), being careful to line up the bolt ones. You will likely not get it right the first time. You'll have to keep adjusting it a bit to line the holes up just right. Once you have the "left to right" adjustment just right, I find a gentle tap just below the bolt holes will push it up enough so you can get the bolts back in.
Put the bolts in loosely, and then check all your rivet holes. On my left side, I found a couple of back rivets in the tunnel didn't line up with the hx, so I just dripped through the tunnel into the hx side (which is just for mounting), so I could secure in the same spot.
Now go around and be sure you put all the rivets back in, securing them all. I will tell you this, get an air hydraulic riveter from Harbor Freight to make the job easier. 3/16" steel rivets are tough to properly clamp tightly, but the air riveter does an awesome job.
Don't forget about the ones underneath and inside the tunnel.
When all the rivets are in and you are done, hook up both the front and back hoses, and put the clamps back on.
You're done now. Full it up with a 50/50 premix silicate free ethylene glycol antifreeze, making sure to bleed the system for air, and check them out to be sure nothing is leaking and they get warm when the tstat opens.
My experience, doing this the first time, is that it takes about 1.5-2 hrs each side to remove and install. Mostly due to rivets that give you a hard time. Could go faster, could be longer, but leave yourself enough time to not rush.
Good luck!
steveg_nh
TY 4 Stroke Junkie
you did step one wrong or you miss spelled Beer as coolant cap.
LOL. No kidding! I hope this helps someone. I had looked for a thread on how to do this and couldn't find anything. This site has taught me a ton (on the 2 stroke side too), so it feels good to contribute and not just ask questions (take take take).
 Great post thanks for taking the time to do this.
steveg_nh
TY 4 Stroke Junkie
Great post thanks for taking the time to do this.
Glad I could do it. Belly pan replacement is next.
steveg_nh
TY 4 Stroke Junkie
So to close the loop on this one, I got the antifreeze put in last night and ran it up. After reading many posts, this is how I did it:
1. Jacked rear end of sled as high as I could, getting the bleed bolt on the back cross tube higher than the antifreeze (AF) tanks at the front of the sled.
2. Removed bleed bolt fully, and started fulling main res SLOWLY. You can hear it bubbling and burping. Go slow. Keep adding until the tank starts to fill.
3. Once main res almost full of AF (too much and it will overflow as sled heats up), leave rad cap off, and start sled and let it get up to temp. Keep your eye on the back bleed bolt and the main res tank.
4. As the sled heats up, you should start to see AF coming out of the bleed bolt and/or the AF level dropping in the main tank. If it does drop, add more to keep it pretty full, don't let it go empty.
5. Once AF is coming out of the rear bleed bolt, tighten it back up, and shut down sled. Torque bleed bolt to 9.3 ft lbs.
6. Top off main res and put cap on. Then fill the overflow tank to the full line, about 1/2 way up.
7. Keep your eye on it the first time you ride.
Mine took somewhere between 1.5 gallons of new 50/50 Antifreeze. Manual says total capacity is 6.3 quarts, so I got almost all the old stuff out beforehand. Also, my main tank never really went down once the sled was running, but it burped like crazy as I filled it in step 2. Most of the air was already purged before I even started it.

Austlor
Newbie
Thanks for this. I’ll be trying to tackle this chore myself
Similar threads
- Replies
- 7
- Views
- 3K
- Replies
- 46
- Views
- 146K
- Replies
- 6
- Views
- 1K
-
This site uses cookies to help personalise content, tailor your experience and to keep you logged in if you register.
By continuing to use this site, you are consenting to our use of cookies.

