
kinger
VIP Member
Hi guys,
Well I got a chance to get my Zx2 unpacked. I must say as much as Jean at AD Bovlin was in a rush all parts came complete, instructions are top notch, and overall I was very impressed with how it was packed and delivered. Kudos to them, this is bar none one of the finest aftermarket products I have purchased, its SO COMPLETE even I can't find anything to whine about. On to the review!
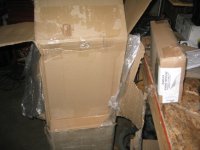
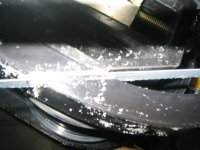
first pict you see it packed well
Well I got a chance to get my Zx2 unpacked. I must say as much as Jean at AD Bovlin was in a rush all parts came complete, instructions are top notch, and overall I was very impressed with how it was packed and delivered. Kudos to them, this is bar none one of the finest aftermarket products I have purchased, its SO COMPLETE even I can't find anything to whine about. On to the review!
first pict you see it packed well
Attachments
kinger
VIP Member
kinger
VIP Member
kinger
VIP Member
The assembly instructions are so well put together I do not need to add a thing, pictures for every step even I could figure it out. Well done!!!
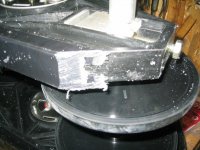
The skid comes with hy fax for a 141" skid I beleive so it has to be cut for anything smaller, the spec is 1/8" from rail at same angle.
The skid comes with hy fax for a 141" skid I beleive so it has to be cut for anything smaller, the spec is 1/8" from rail at same angle.
Attachments
kinger
VIP Member
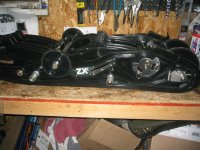
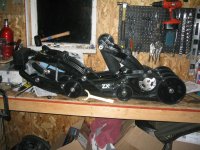
Here it full assembled, now lets get into the adjustments!! You can see there is a limiter strap, the manual is very specific on here leave it long for short tracks under 151" and short for anything over 151" easy.
Attachments
kinger
VIP Member
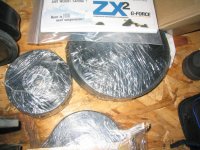
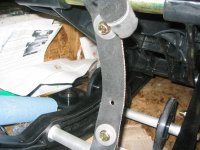
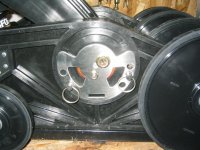
My favorite part the revolver. This is the neatest deal i have ever seen on a suspension. Here is how it works.
Take a edge suspension, SC10, or Proactive you know how the arms in the back have little blocks that limit how far the rear arm can go forward and how far the rear arm can go backwards? This is the same principle, behind the plate is a groove and at each end is a little rubber stop, that is attached to a offset axle connected to the shocks. As the suspension is coupled that revolver rotates, it stops where you put the pins, basically letting you rotate it as far as you set it to get more or less trasnfer and more or less couple. Freaking genius! The tool that adjusts the preload (coming up) also adjusts this via the little slot in the middle.
Beautiful design taking all of 15 seconds to adjust on the trail.
Attachments


1CrazySledder
Lifetime Member
- Joined
- Aug 11, 2005
- Messages
- 2,006
- Location
- Cartersville, GA.
- Country
- USA
- Snowmobile
- None, looking now!
Sweet. Looks awesome. It's a wonderful feeling opening them packages, huh? AAHHH...After market parts. I love it. lol
-1CS
-1CS
kinger
VIP Member
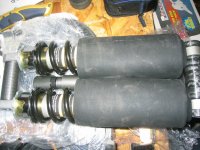
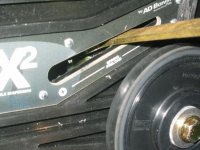
Here is the spring preload adjustment tool and procedure. This again is fool proof. The preload on the spring is not the gay locking collar crap system that take 2 tools and 3 guys to do on the stock yamahas its a collar that has different heights as so you rotate the collar it bumps to the next position, then bumps to the next, a total of 7 in all. you have to roatate in the same direction so just spin till you get it where you want. the manual again is awesome it gives a chart of what weight and rider you are to help get you set up right out of the gate.
Attachments
kinger
VIP Member


kinger
VIP Member
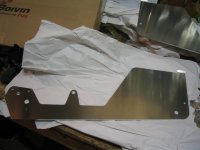
And concluding this initial review is the moutning kit. Well worth the price of admission here. Real easy to copy though...
This is a plate that uses YOUR sleds original mount points as a reference and you simply bolt through that hole swing the plate in place till it hits the top of the tunnel (even the top of the plate has a 'fold' in it to fit snugly) and drill, rivet and mount. No measureing here, and the instructions show MY 03 RX1 not some fake picture to let you interpret it. Again friggn awesome work here. I think AD put as much time in the manuals as they did the suspension!
Overall I'm amazed and I can't wait to ride the some beetch and put it through its paces this winter. Its almost dummy proof and it doesn't have a million adjustments where unless your in love with adjusting the thing its never just right, they did the homework for you and tell you where to put all the adjustment according to what you want. Its a real bolt in and ride set up.
Only thing I'm unsure of is the track tension adjustment looks to work like everything else but it says to use locktite red on the rear bolts that hold the outer rear 8" wheels in place, if I have to loosen them to get the axle to adjust I'm in trouble!
Overall great product, great manuals, and I expect it will be a awesome player on the trails. For you TC/SC guys there is a little blurb in there about if your running 200hp or more do this, so they must be expecting some big power to be spinning around this baby. Any questions let me know!!!
Attachments
LazyBastard
TY 4 Stroke God
From adboivin.com;
I don't find the weight issue to be at all surprising. In order to achieve the rigidity required, the synthetics have to be THICK. Plastics and composites are NOT inherently light weight. But 53 pounds... geeze. I think thats MORE than an ExpertX.
Depending on its length, the weight ready to install varies between 53 and 56 pounds, witch represents a weight saving up to 20 pounds for certain models.
I don't find the weight issue to be at all surprising. In order to achieve the rigidity required, the synthetics have to be THICK. Plastics and composites are NOT inherently light weight. But 53 pounds... geeze. I think thats MORE than an ExpertX.
kinger
VIP Member
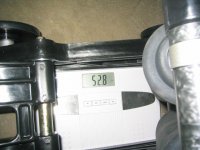
Pro action weighs 73 lbs!!!
I was being sarcastic that is very light and they were dead on with thier claims. A SC10III with non- rebuildable shocks and rails that are slotted and drilled for a summit comes in at 48lbs. That beefy azz expert has to be north of 60lbs, maybe some one can chime in with the exact number.
I was being sarcastic that is very light and they were dead on with thier claims. A SC10III with non- rebuildable shocks and rails that are slotted and drilled for a summit comes in at 48lbs. That beefy azz expert has to be north of 60lbs, maybe some one can chime in with the exact number.
xsivhp
Veteran
- Joined
- Nov 30, 2005
- Messages
- 46
- Location
- WI
- Website
- snowbikekits.com
- Country
- USA
- Snowmobile
- Yamaha XTX
edge skid I shipped weighed 74 about 5 maybe 6 of that packing.
-
This site uses cookies to help personalise content, tailor your experience and to keep you logged in if you register.
By continuing to use this site, you are consenting to our use of cookies.