Is this the temp plate you guys are useing to put a ZR skid in a Rx1? Some guys have said to bend the front rails up a 1/2" on the Cat skid?
Could i just move the front holes up a 1/2" and not bend the rails??
THank you Skydog P.S. Getting ready to drill! I want to drill one time!
Could i just move the front holes up a 1/2" and not bend the rails??
THank you Skydog P.S. Getting ready to drill! I want to drill one time!
Focker
Pro
Dat be the one I got!! I dont think its a good idea to move the front holes up 1/2" because this might create track clearance issues! Im going to try to bend my rails(its not that easy), if I cant, I will just ride it and see what happens. Another idea would be to lower the rear holes a little, that should bring the front of the skid up??...I just mounted mine according to the directions. Im not sure if that is a possibility or if it will mess up the geometry! !")


Buckeye
Lifetime Member
- Joined
- Apr 13, 2003
- Messages
- 1,430
- Location
- Lakes Region, NH
- Country
- USA
- Snowmobile
- 2018 Sidewinder LE XTX 137" 50th Aniversary
What is the reason for bending the rails?
nhrxrider
TY 4 Stroke Junkie
Bending the rails eliminates any problem with the front of the hyfax wearing. I skipped the rail bending until after I tested the skid, and so far I have almost 1000 miles on the Cat skid and the hyfax don't look any more worn at the front than the rest. I know a couple others on here who didn't bend the rails and didn't have any problems.
And yea, thats the template I used. There should be another part that shows the brackets for the rear mount, but using that one template you should be able to figure it out anyway.
Jim
And yea, thats the template I used. There should be another part that shows the brackets for the rear mount, but using that one template you should be able to figure it out anyway.
Jim
Well i guess i will bend them.
Thank you Skydog
Thank you Skydog
LICKETY SPLIT
Extreme
bending rails
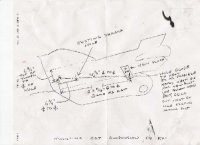
I have had a lot of inquires about this subject ,The reason for bending the rails,was just precautionaly,it looked like it was starting to wear on the nose cone and close to the bolt that holds the slider on,after 800 miles.Its real easy to bend, slide a 2" pipe over the nose,apply heat easy about 6" from the front and bent the front rail up !/2",this takes care of and wear on the nose cone and the bolt area .That drawing that you are showing is the drawing that I made up a while back, it is just a sketch ,it needs someone to make a new drawing and put it on this site,I also have a sketch for the new mounting bracket needed for the rear suspension support.Emale a fax # and i will send you the drawings,but really looking for someone to produce a new drawings and put them on this site.Lee
I have had a lot of inquires about this subject ,The reason for bending the rails,was just precautionaly,it looked like it was starting to wear on the nose cone and close to the bolt that holds the slider on,after 800 miles.Its real easy to bend, slide a 2" pipe over the nose,apply heat easy about 6" from the front and bent the front rail up !/2",this takes care of and wear on the nose cone and the bolt area .That drawing that you are showing is the drawing that I made up a while back, it is just a sketch ,it needs someone to make a new drawing and put it on this site,I also have a sketch for the new mounting bracket needed for the rear suspension support.Emale a fax # and i will send you the drawings,but really looking for someone to produce a new drawings and put them on this site.Lee
4Fighter
TY 4 Stroke God
Lee,
What would be the effects of lowering the rear hole a little bit?
What would be the effects of lowering the rear hole a little bit?
yamadoo
Yamadoo is a snowmobile ' aholic'.
- Joined
- Jun 3, 2003
- Messages
- 3,645
- Country
- USA
- Snowmobile
- 15 Viper STX DX red/white- GPS and KING AIR suspension 4kmiles
13 Apex XTX 45 anniversary RED/WHITE/BLACK 3K miles
10 Vector LTX Blue 9kmiles
11 Venture GT 4k miles
86 SnoScoot(2) for grand kids
QUESTION ?

Wouldn't moving the front suspension hole change the balance of the sled - front to back -under acceleration? As I see it, the track pushes the rails forward until limiter straps stop the extension of the front arm then the force is transmitted to the tunnel at the point of the holes / bolts.
AM I nuts or what, but doesnt that change the balance or feel alot?
Maybe alot to do about nothing Enlighten me please THanks
Yamapoo aka Yamadoo
(815)234-5357 Fax!!!! PLEASE!!!!
Thank you Skydog
Thank you Skydog
Focker
Pro
I would be willing to make a new drawing of the dimensions and what not...but everyone seem to go their own way on how they want to make and mount the rear brackets! I know Lickety said he made his in kind of a half moon shape, I think I know what he means there. I myself decided to go with just a rectangle shape and mount it on an angle in order to achieve the proper skid mount and still utilize the existing 3 tunnel holes. I'm not sure that it makes a difference how you make and mount the brackets...any thoughts on this Lickety or nhrx?
Got the Fax Lee!!!
THANK YOU Skydog
THANK YOU Skydog
nhrxrider
TY 4 Stroke Junkie
I got two copies from two different people on here last year, and I'm 99% sure one of them was Lee. They both included the same copy of the rear brackets, and I just used that to make mine. It worked very well, but the actual shape really doesn't matter...pretty much anything that imcorporates the original holes and locates the new holes in the proper location will work. Its the hole location that matters, not the shape of the bracket so much.
A couple of things: First, I can't remember if I ever asked anyone else, but has anyone else who installed a Cat skid made up reinforcement plates for the front mounts? Because the original skid was in a place with 2 layers of aluminum, and the new holes fall where there is only 1 layer, I used a sheet of aluminum to make up reinforcement plates that rivet in and create a second layer for the front mount. I just used 1/8" sheel aluminum.
Next, for anyone doing this conversion, be VERY careful when clearancing the bottom of the heat exchangers! Be patient and use a round file, NOT anything powered to do this! If you do use something powered, make sure its not very agressive. In my impatience, and my need for using power tools for everything (being dumb), I used an air die grinder with a carbide burr bit. It jumped around a bit on the aluminum, and it caught once and punctured the exchanger! I checked prices and availability, and trust me, you DON'T want to replace one! I repaired mine with JB Weld, which sounds butch, but its waterproof and has held for around 1000 miles so far. I check it often to make sure it doesn't leak, and so far so good. I just want to make sure nobody else makes my mistake.
Jim
Focker
Pro
Thanks for the info Jim! Yeah I added an 1/8" piece of aluminum along with the small steel support piece from the the factory front hole to support the front mount. I did my heat exchanger groove mostly with a file as I found that was the easiest, and I took care to not go any deeper than the factory grooves. Just another question, how tight was it to fit your skid in the rear with the 1/8" steel brackets? Mine is pretty tight and I have to spread the tunnel to get it in, was yours the same?
Focker
Focker
Similar threads
- Replies
- 21
- Views
- 5K
- Replies
- 4
- Views
- 2K
- Replies
- 3
- Views
- 367
-
This site uses cookies to help personalise content, tailor your experience and to keep you logged in if you register.
By continuing to use this site, you are consenting to our use of cookies.