Deeppow16
TY 4 Stroke Master
- Joined
- Oct 19, 2015
- Messages
- 1,159
- Age
- 29
- Location
- Montrose, Minnesota
- Country
- USA
- Snowmobile
- 2016 Arctic Cat M8000
2009 Yamaha Nytro MTX (Totaled)
2002 Polaris 600 XCSP (Sold)
1999 Ski-doo Formula 500 (Totaled)
Here is the picture of the failure.

Deeppow16
TY 4 Stroke Master
- Joined
- Oct 19, 2015
- Messages
- 1,159
- Age
- 29
- Location
- Montrose, Minnesota
- Country
- USA
- Snowmobile
- 2016 Arctic Cat M8000
2009 Yamaha Nytro MTX (Totaled)
2002 Polaris 600 XCSP (Sold)
1999 Ski-doo Formula 500 (Totaled)
Nope, I would start the sled and let it run for 15 min a couple times a week since I wasn't using it much and it never had a problem starting. It must have just been a freak thing and broke.Prior to that was it tough to start?
Deeppow16
TY 4 Stroke Master
- Joined
- Oct 19, 2015
- Messages
- 1,159
- Age
- 29
- Location
- Montrose, Minnesota
- Country
- USA
- Snowmobile
- 2016 Arctic Cat M8000
2009 Yamaha Nytro MTX (Totaled)
2002 Polaris 600 XCSP (Sold)
1999 Ski-doo Formula 500 (Totaled)
Yup relay was replaced first as I though that was the problem so already got that covered!I've installed DB Electrical starters also and as far as I know they are all still out there working. Make sure you replace the starter relay when doing a starter replacement.
Deeppow16
TY 4 Stroke Master
- Joined
- Oct 19, 2015
- Messages
- 1,159
- Age
- 29
- Location
- Montrose, Minnesota
- Country
- USA
- Snowmobile
- 2016 Arctic Cat M8000
2009 Yamaha Nytro MTX (Totaled)
2002 Polaris 600 XCSP (Sold)
1999 Ski-doo Formula 500 (Totaled)
I tired this last night and it worked great. I was able to do that job by myself.I added a little twist to those instructions that allowed me to do the job alone and not use pry bars potentially doing more damage. If you have a snowmobile lift you can follow his instructions to the point where you pry the engine up to let the starter fall out, from there raise the sled up as high as possible on the lift, you need an eye bolt in your ceiling and 2 ratchet straps, hook them to the eye bolt and the castings holes on the motor, lower the lift slowly and the starter will drop right out, install the new one and raise the lift until the mount holes line back up.
Might be doing this again as my starter is acting up.


- Joined
- Apr 13, 2003
- Messages
- 21,321
- Age
- 54
- Location
- Schofield, WI
- Website
- www.totallyamaha.com
- Country
- USA
- Snowmobile
- 2020 Sidewinder SRX
I tired this last night and it worked great. I was able to do that job by myself.
Awesome!! When it was locked up, did you get any dash codes?
Deeppow16
TY 4 Stroke Master
- Joined
- Oct 19, 2015
- Messages
- 1,159
- Age
- 29
- Location
- Montrose, Minnesota
- Country
- USA
- Snowmobile
- 2016 Arctic Cat M8000
2009 Yamaha Nytro MTX (Totaled)
2002 Polaris 600 XCSP (Sold)
1999 Ski-doo Formula 500 (Totaled)
Nope no codes. The only thing that was happening was the relay was clicking and that was it. I tried jumping the terminal's and nothing happened.Awesome!! When it was locked up, did you get any dash codes?


- Joined
- Apr 13, 2003
- Messages
- 21,321
- Age
- 54
- Location
- Schofield, WI
- Website
- www.totallyamaha.com
- Country
- USA
- Snowmobile
- 2020 Sidewinder SRX
Nope no codes. The only thing that was happening was the relay was clicking and that was it. I tried jumping the terminal's and nothing happened.
ok thanks. We had one this last weekend that did the same thing but it thru a code 12. We still are waiting on the new starter to see if all is good.

lockburner2000
VIP Member
I have had 2 starters do the same thing on my Vector magnets fall off. The original one went at about 7000 miles after market went at 7600 miles so I went and got a OEM starter and hope I don't need to do it again. Also installed the starter saver so I know if the starter sticks on. I think the starter solenoid is to light duty, the cold starts it takes a lot to start these motors so the contacts weld themselves together I think.
RobWarrior
TY 4 Stroke Junkie
Glad that helped you out, enjoy the sled!I tired this last night and it worked great. I was able to do that job by myself.
RobWarrior
TY 4 Stroke Junkie
Good to know Grizz, I did also change the relay and give it a good dose of Dielectric every year.I've installed DB Electrical starters also and as far as I know they are all still out there working. Make sure you replace the starter relay when doing a starter replacement.
Hooray!
TY 4 Stroke Junkie
- Joined
- Aug 12, 2017
- Messages
- 707
- Location
- Maine USA
- Country
- USA
- Snowmobile
- 2009 Yamaha FX Nytro XTX
1998 Yamaha VMAX 700 XTC
Attempting this tonight... instructions from Ray below with the added note of using a lift / strap vs. pry bars on motor. I like the lift idea so may be holding off and finding a friend with a lift, would think a come-along would do the same trick without a lift... instructions below in case Ray's link goes dead at some point (attached as a PDF too):
THE EASY WAY TO REPLACE A YAMAHA NYTRO STARTER MOTOR
1. To begin remove the hood, side covers, belly pan plate, the oil filter and drain the oil from the engine and the tank. (the oil filter must be off to get the starter out). Working under the sled remove the plastic cover and you can see the oil filter; you must remove it. I also drain the engine oil now and the side oil tank, It’s time for a oil change.
2. Remove the steering shaft that’s above the air box (I remove the tie rod at the front of the sled) I do this by putting the nut back on about half way and use a 12″ pipe that just fits over the threads but not the nut and hit with a hammer, it’s a tapered fit and pretty tight. now swing the shaft out of the way with all wires and cables from the handle bars attached. Now remove the air box. Once you pull the steering shaft and air box you can remove the 2 front motor mount bolts, they are very tight and watch how the washers go back on. HINT—Take pictures.
3. From here you can remove both front motor mount bolts. You do not need to loosen the long rear motor mount bolt.
4. I than raise the front of the sled enough to get under it. Now you can see the starter motor–Important—before removing the red cable from the starter motor, take the black negative cable off the battery. Now you can remove the red cable and the 2 bolts holding the starter, pull it out of the engine and jiggle it until it’s at it’s lowest spot. This is the frustrating part, it’s so close to coming out. To remove the starter motor bolts use a 12mm ratchet box wrench and a 10 mm nut on the battery cable.
5. Now pull the starter out of the engine and notice how close it is to coming out the bottom, set it in a spot as close to coming out as possible.
6. If you look at each side of the sled through the frame you can see the engine, you want to put a 3 foot or longer pry bar through this hole in the frame and against the Back of the engine. You want to push on a lower part of the engine to move it forward only about 3/4 of an inch. IMPORTANT you do not want to poke your pry bar through the engine (BAD) This is where you will need 2 people with 2 pry bars, one on each side pushing the engine forward at the same time. Find a reinforced spot on the engine to put the tip of each pry bar on, look around and you will see what I mean. Where a side cover and the case come together are fine. As you move the engine forward you will hear the starter fall out–YHAAAA NOTE—If the engine is very hard to move forward and you are worried about damaging it you can loosen the front motor mount bolt. To do this you must remove the parking brake assy the main brake and the disk, just loosen the nut. All 3 exhaust pipes coming from the engine have flex pipes built in and this is why you don’t have to remove them. I now get another person to help me and with two long pry bars going in from the sides prying against the frame and a safe place on the engine, move the engine back about 3/4 of an inch and the starter motor falls in the drain pan under the oil filter. I find that there is enough flex in the exhaust flex pipes to allow the engine to move back the small amount you need. You do not need to drain the coolant or remove any more parts to do this. with two people holding the engine back again you can get the new starter back in.
ALT LIFT METHOD: If you have a snowmobile lift, instead of prying engine for the starter to fall out, raise the sled up as high as possible on the lift, you need an eye bolt in your ceiling and 2 ratchet straps, hook them to the eye bolt and the castings holes on the motor, lower the lift slowly and the starter will drop right out, install the new one and raise the lift until the mount holes line back up.
7. You will have to pry the engine forward to get the new starter back in, don’t forget to grease the new o-ring on the new starter.
8. Put all the removed parts back on and enjoy all the time you saved from flat rate. Yamaha now offers a replacement brush kit for this starter, now you don’t have to replace the whole starter
Attachments
Hooray!
TY 4 Stroke Junkie
- Joined
- Aug 12, 2017
- Messages
- 707
- Location
- Maine USA
- Country
- USA
- Snowmobile
- 2009 Yamaha FX Nytro XTX
1998 Yamaha VMAX 700 XTC
Reading more of the starter threads, this alt method appears to be even simpler as long as you can get at the front motor mount bolts this way. I also like the idea of no pry bars and raising / lowering with a car jack under motor as I don't have an eye bolt in ceiling:
ALT METHOD:
1. Remove the two airbox bolts
2. Drain oil and take filter off
3. Remove two front motor mount bolts
4. Lift engine (alt to pry method):
ALT #1: Front bumper with a come-along to overhead eye bolt, raise sled, then put a piece of wood under the engine, lower the sled onto the block and the engine will tip back, allowing old starter to be removed and new starter installed. Lift up on come-along to line up motor mount bolts, re-install bolts, put oil in it. No need to remove steering shaft, airbox or have two people.
ALT #2: Use a piece of wood across the sub-frame rails and bar-clamps to lift the front of the engine up, rather than lowering the sled onto a block.
ALT #3: Put car jack under engine and lift up on wood spanning underside of engine, gently raise to remove starter and re-install new one, lower to align bolts.
RobWarrior
TY 4 Stroke Junkie
My Alt method eliminates #7, you don't raise it back up until the starter is re-installed.
Hooray!
TY 4 Stroke Junkie
- Joined
- Aug 12, 2017
- Messages
- 707
- Location
- Maine USA
- Country
- USA
- Snowmobile
- 2009 Yamaha FX Nytro XTX
1998 Yamaha VMAX 700 XTC
Success tonight! Here is the simplest method I have read about with pics and details what I did:
1. Place sled on four cinder blocks, one under each ski, two under track, position two more concrete blocks between skis to set floor jack on (optional put scrap 2x6 under each ski and track, 12"x24" 3/4" Advantec on blocks between skis for jack to sit on).
2. Remove the two airbox bolts, remove battery connections
3. Remove skid plate
4. Remove the oil sensor plug (push release is on top where you cant see it), remove starter wire, remove two 12mm starter mount bolts using ratchet wrench (things are tight so prepare for one click per wrench motion, be patient).
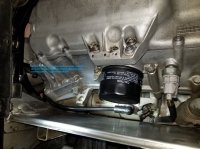
5. Remove oil filter (do not drain), only a 1/4 cup of oil will spill if you are careful, let dry sump drain until drips stop and then plug with small wad of paper towel. My oil was brand new so I did not want to change it.
6. Remove nuts on front engine mount bolts (nuts are on the outside), tap bolts in until they just exit the threaded engine mount collars (see pic), DO NOT LET bolts fall out of rubber engine mount on the inside, if you do, you now have to remove the forward plastics (a-arms, etc). They balance inside with just the rubber supporting them ok. Your engine will drop down a 1/4" once both sides are released. You DO NOT need to mess with the threaded engine mount collars, these are used to center the engine in alignment with the rear mounts which you have not touched. The rear mounts will keep the front aligned when you jack up so no need to try and use a flat head inside the collar to unscrew (this requires a special Yamaha tool purpose built - again not required, don't touch these threaded collars).
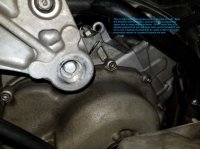
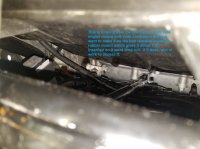
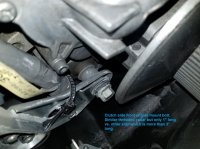
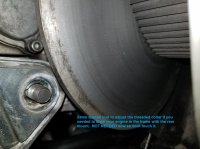
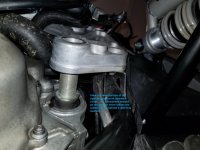
7. Jack up engine by placing a 2x4x8" block just behind oil filter, casting is built up here. You will lift skis off the ground as engine only really moves once suspension travel is lifted off. Some over pry the engine to create enough space for the starter to "drop out", if you go this far, makes sense some have mentioned feels like you are pushing things and the airbox cover may even hit the steering shaft. This is WAY MORE movement than needed if you thread the starter out vs. needed the clearance for "drop out" performance. Technique I used was pry end of starter free from engine, there is an o-ring that seals the gear on the starter so a little nudge is needed. Once free and the starter gear is clear of the engine rotate the starter vertically as there is "headroom" above the starter, this allows you to thread the starter vertically down in alignment with the oil filter mount between the two block castings that would otherwise prevent the starter from "dropping out". Using this technique you don't even come close to the air box hitting the steering shaft which I have not touched.
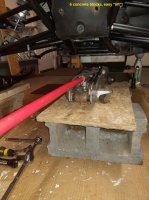
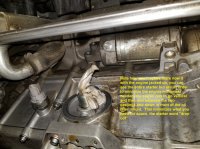
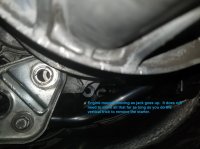
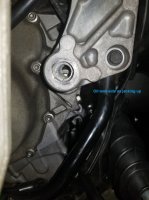
8. Have new starter ready and orientated exactly like the starter just removed and articulate the starter up vertically, over horizontally and insert gear (pre-greased gear and o-ring). Wiggle the starter and twist a little and the gear will slide into alignment inside the engine smoothly as you press the starter in until the o-ring seals the starter. Mount bolts will now be close to alignment. Inserting mounting bolts is tricky as there is not much room, I found the lower mount bolt could be inserted pinching the bolt as normal and wiggling into the hole and threading to align the starter upper mount bolt. The lower bolt has an oil sensor wire retainer clip so make sure to align it the way it was on removal (note this when you remove it). I spread open the clip so I could remove and re-insert the oil sensor wire easily after I did the upper mount bolt. The upper mount bolt presents an issue as I had to hold the bolt between two fingers like a cigarette and wiggle it into position without the dexterity of a pinch grip. Only option as this method keeps space near starter to an absolute minimum (preventing any removal of anything above the engine). Tighten and guess 19 lb-ft torque. Mount battery cable and tighten, slide oil sensor wire into clip, pinch closed with pliers, plug in the oil sensor wire. Re-install the oil filter (don't let oil in filter drain out). Congratulations, you just installed your starter and saved $1000.
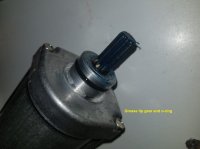
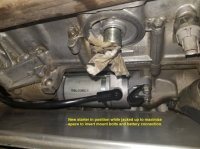
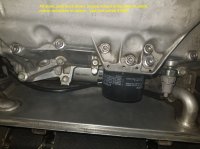
9. Put a 12" and 6" 1/4" extension on a 17mm socket and carefully insert from the opposite side of the engine near the other engine mount bolt and capture the bolt head of the engine mount bolt and guide up re-insertion in the threaded collar, if you have a friend, slowly let the jack down until your pressure on the bolt slips it into the collar. Repeat on the other side again, for me the 18" extension made short work of aligning the opposite bolt and allowed me to put a torque wrench on both. The clutch side only an open end wrench could slip behind the primary sheave so I torqued it from the oil tank side thanks to the 18" extension.
10. Connect battery, test starter, mine turned over greased smooth... I installed a new starter relay as step 1 in the troubleshoot and a new battery so all new starter circuit.
11. Re-install lower engine cover and front plastic rivet to hold in place, insert side plastic tabs into lower engine cover,make sure all are flat interlocked together, place skid plate over assembly and insert four skid plate bolts. I retrofitted my frame with four C-clip nuts and bought 1.5" stainless bolts and fender washers, easy and strong connection once done as the bolts are sandwiching three layers of plastic.
12. Install upper plastics, hood, test starter again. : )
- This method saves not only the insane front clip removal, coolant drain, oil drain, total electrical harness release, brake removal, clutch removal, drive removal, engine removal after exhaust and airbox disconnect, but also from having touch the steering shaft or even removing the airbox cover! Hope this is helpful for the next guy as this project requires patience but only average wrenching skill. Good luck.
1. Place sled on four cinder blocks, one under each ski, two under track, position two more concrete blocks between skis to set floor jack on (optional put scrap 2x6 under each ski and track, 12"x24" 3/4" Advantec on blocks between skis for jack to sit on).
2. Remove the two airbox bolts, remove battery connections
3. Remove skid plate
4. Remove the oil sensor plug (push release is on top where you cant see it), remove starter wire, remove two 12mm starter mount bolts using ratchet wrench (things are tight so prepare for one click per wrench motion, be patient).

5. Remove oil filter (do not drain), only a 1/4 cup of oil will spill if you are careful, let dry sump drain until drips stop and then plug with small wad of paper towel. My oil was brand new so I did not want to change it.
6. Remove nuts on front engine mount bolts (nuts are on the outside), tap bolts in until they just exit the threaded engine mount collars (see pic), DO NOT LET bolts fall out of rubber engine mount on the inside, if you do, you now have to remove the forward plastics (a-arms, etc). They balance inside with just the rubber supporting them ok. Your engine will drop down a 1/4" once both sides are released. You DO NOT need to mess with the threaded engine mount collars, these are used to center the engine in alignment with the rear mounts which you have not touched. The rear mounts will keep the front aligned when you jack up so no need to try and use a flat head inside the collar to unscrew (this requires a special Yamaha tool purpose built - again not required, don't touch these threaded collars).


7. Jack up engine by placing a 2x4x8" block just behind oil filter, casting is built up here. You will lift skis off the ground as engine only really moves once suspension travel is lifted off. Some over pry the engine to create enough space for the starter to "drop out", if you go this far, makes sense some have mentioned feels like you are pushing things and the airbox cover may even hit the steering shaft. This is WAY MORE movement than needed if you thread the starter out vs. needed the clearance for "drop out" performance. Technique I used was pry end of starter free from engine, there is an o-ring that seals the gear on the starter so a little nudge is needed. Once free and the starter gear is clear of the engine rotate the starter vertically as there is "headroom" above the starter, this allows you to thread the starter vertically down in alignment with the oil filter mount between the two block castings that would otherwise prevent the starter from "dropping out". Using this technique you don't even come close to the air box hitting the steering shaft which I have not touched.


8. Have new starter ready and orientated exactly like the starter just removed and articulate the starter up vertically, over horizontally and insert gear (pre-greased gear and o-ring). Wiggle the starter and twist a little and the gear will slide into alignment inside the engine smoothly as you press the starter in until the o-ring seals the starter. Mount bolts will now be close to alignment. Inserting mounting bolts is tricky as there is not much room, I found the lower mount bolt could be inserted pinching the bolt as normal and wiggling into the hole and threading to align the starter upper mount bolt. The lower bolt has an oil sensor wire retainer clip so make sure to align it the way it was on removal (note this when you remove it). I spread open the clip so I could remove and re-insert the oil sensor wire easily after I did the upper mount bolt. The upper mount bolt presents an issue as I had to hold the bolt between two fingers like a cigarette and wiggle it into position without the dexterity of a pinch grip. Only option as this method keeps space near starter to an absolute minimum (preventing any removal of anything above the engine). Tighten and guess 19 lb-ft torque. Mount battery cable and tighten, slide oil sensor wire into clip, pinch closed with pliers, plug in the oil sensor wire. Re-install the oil filter (don't let oil in filter drain out). Congratulations, you just installed your starter and saved $1000.


9. Put a 12" and 6" 1/4" extension on a 17mm socket and carefully insert from the opposite side of the engine near the other engine mount bolt and capture the bolt head of the engine mount bolt and guide up re-insertion in the threaded collar, if you have a friend, slowly let the jack down until your pressure on the bolt slips it into the collar. Repeat on the other side again, for me the 18" extension made short work of aligning the opposite bolt and allowed me to put a torque wrench on both. The clutch side only an open end wrench could slip behind the primary sheave so I torqued it from the oil tank side thanks to the 18" extension.
10. Connect battery, test starter, mine turned over greased smooth... I installed a new starter relay as step 1 in the troubleshoot and a new battery so all new starter circuit.
11. Re-install lower engine cover and front plastic rivet to hold in place, insert side plastic tabs into lower engine cover,make sure all are flat interlocked together, place skid plate over assembly and insert four skid plate bolts. I retrofitted my frame with four C-clip nuts and bought 1.5" stainless bolts and fender washers, easy and strong connection once done as the bolts are sandwiching three layers of plastic.
12. Install upper plastics, hood, test starter again. : )
- This method saves not only the insane front clip removal, coolant drain, oil drain, total electrical harness release, brake removal, clutch removal, drive removal, engine removal after exhaust and airbox disconnect, but also from having touch the steering shaft or even removing the airbox cover! Hope this is helpful for the next guy as this project requires patience but only average wrenching skill. Good luck.
Sevey
TY 4 Stroke God
- Joined
- Feb 15, 2011
- Messages
- 1,742
- Location
- Collingwood, ON
- Website
- www.ty4stroke.com
- Country
- Canada
- Snowmobile
- 2018 Sidewinder RTX
This is a great write up.
So - as you jack the lower pan of the engine, it rotates the engine up on the rear mounting bolts slightly to open up space to get at the starter?
Your pics of the mounting holes above, look like the engine is lower than these holes - this must be how they look prior to jacking?
MS
So - as you jack the lower pan of the engine, it rotates the engine up on the rear mounting bolts slightly to open up space to get at the starter?
Your pics of the mounting holes above, look like the engine is lower than these holes - this must be how they look prior to jacking?
MS
Similar threads
- Replies
- 3
- Views
- 1K
-
This site uses cookies to help personalise content, tailor your experience and to keep you logged in if you register.
By continuing to use this site, you are consenting to our use of cookies.
