Mikey
TY 4 Stroke Junkie
Freddie what are your thoughts on offsetting the timing key on a stock ECP equipped RX-1? Longevity? Reliabliity? Is there any downfalls? I would assume that there must be a trade off somewhere or the factory would be doing it , wouldnt they? Your opinion is greatly respected and apreciated. Thanks for your time.
SUPERTUNER
TY 4 Stroke Master
Mikey said:Freddie what are your thoughts on offsetting the timing key on a stock ECP equipped RX-1? Longevity? Reliabliity? Is there any downfalls? I would assume that there must be a trade off somewhere or the factory would be doing it , wouldnt they? Your opinion is greatly respected and apreciated. Thanks for your time.
Mikey,
Thanks for bringing this up. The RX1...every year are very conservatively timed. You won't get enough advance out of the keyway to show any appricable gains in performance. What we do is remove and slot the ignition pickup and slam it as far as it will go. We also replace the shouldered bolt with a SHCS (allen bolt) to allow more room for advance. I do these on a vertical miller in the shop at ECP. To anyone doing this themselves, remember to check which way to slot it as it is easy to make a mistake.
Freddie
BURMAD69
Expert
Is this reliable enough to trail ride? And how much does it really help?
SUPERTUNER
TY 4 Stroke Master
BURMAD69 said:Is this reliable enough to trail ride? And how much does it really help?
Yes it is BURMAD69. All of our stage 2 engine packages have the pickup slotted and I have done a bunch and they are still running today. I have customers even running regular unleaded fuel instead of premium.


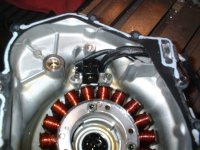
LIke this?
I turned the allen screw down some in the lathe to gain clearance,I didnt think I should grind on the plastic.I moved it .112 which according to my calculations is 2.5 degrees.Do you move them more freddie?Thanks
Yes it is alittle confusing as the fly wheel turns the opposite direction as the clutch.
Attachments
SUPERTUNER
TY 4 Stroke Master
steve 05 RX-1 said:LIke this?
I turned the allen screw down some in the lathe to gain clearance,I didnt think I should grind on the plastic.I moved it .112 which according to my calculations is 2.5 degrees.Do you move them more freddie?Thanks
Yes it is alittle confusing as the fly wheel turns the opposite direction as the clutch.
That is exactly what we do at ECP Steve.
Freddie
JDMCRX
TY 4 Stroke Junkie
What kind of gains will u see with doing this?
SUPERTUNER
TY 4 Stroke Master
JDMCRX said:What kind of gains will u see with doing this?
2 to 3 HP everywhere in the curve. Well worth doing!
Freddie
Frostbite
TY 4 Stroke God
Can someone provide step by step instructions on how to do this? Why haven't we heard of this before now? I have needed this extra hp for three seasons now.
What parts do I need to order to do this job? Does anyone have the part numbers?
Roughly how long does it take to do this?
Sorry for all the questions but I want to Git er dun!
Frosty
Man, this litte mod with the intake rings could provide at least 5 solid hp!
What parts do I need to order to do this job? Does anyone have the part numbers?
Roughly how long does it take to do this?
Sorry for all the questions but I want to Git er dun!
Frosty
Man, this litte mod with the intake rings could provide at least 5 solid hp!
DC5
TY 4 Stroke Junkie
Mikey
TY 4 Stroke Junkie
Those ground lil keys are exactly why I asked Freddie the question in the first place . In my opinion theres always a better way of doing things and the offset key to me seems like the band-aid for the correct way of advancing the timing. I knew Freddie would have the correct answer. ")
You won't get enough advance out of the keyway to show any appricable gains in performance.
RX1Jim
TY 4 Stroke Junkie
When it comes to expertise on cycle and sled engines, Freddie is the man! He will give you solid advice which will help you avoid wasting money on the crap that is out there.
SUPERTUNER
TY 4 Stroke Master
RX1Jim said:When it comes to expertise on cycle and sled engines, Freddie is the man! He will give you solid advice which will help you avoid wasting money on the crap that is out there.
Thanks Jim, I will mail your check next week!!! LOL!
Just kidding.
Freddie
SUPERTUNER
TY 4 Stroke Master
Frostbite said:Can someone provide step by step instructions on how to do this? Why haven't we heard of this before now? I have needed this extra hp for three seasons now.
What parts do I need to order to do this job? Does anyone have the part numbers?
Roughly how long does it take to do this?
Sorry for all the questions but I want to Git er dun!
Frosty
Man, this litte mod with the intake rings could provide at least 5 solid hp!
Remove the RH engine cover, unplug the ignition pickup, unbolt the pickup. Remove the built in dowels on the back with a belt sander or vertical mill or Dremel tool or porting tool. Mic the size of the bolts and and carefully mill the slot IN THE CORRECT DIRECTION!!! Remember that due to the undriven PTO shaft, it appears to spin backwards. Well, actually it does! These are metric bolts so metric end mills are required to do this properly. Too big of an end mill will produce problems with the air gap of the pickup. Install a new gasket or if you are daring reuse the old one and you are done. You can do it this or,
Send it to ECP and for $20.00 I will get it done the same day it arrives!
Freddie
Frostbite said:Can someone provide step by step instructions on how to do this? Why haven't we heard of this before now? I have needed this extra hp for three seasons now.
What parts do I need to order to do this job? Does anyone have the part numbers?
Roughly how long does it take to do this?
Sorry for all the questions but I want to Git er dun!
Frosty
Man, this litte mod with the intake rings could provide at least 5 solid hp!
1st order a gasket.I was realy carfull with mine and still tore the gasket in one spot.I didnt want to wait for gasket so I put some yamabond on both sides of the tear and all is well.
Pull the side panel off and drain the oil out of the tank.Pull the 90 degree elbow off bottom of oil tank and clean the screen thats in there.Two 10mm bolts on top and one 12 mm in the front of oil tank and tanks loose.Flip oil tank up and over out of your way,no need to remove lines on the top of the oil tank.I think I did unhook the dipstick connector though.
I think the allen bolts that hold the mag cover on are 5mm,I have the allen wrenches that have a ball on the end so that you can use them at an angle.I dont think you could get the cover off with out this type of allen wrench.If you dont have this type off wrenches buy a good set,mine are BONDHUS "gorillaproof" and Ive never broken one.
Pull ALL of the allen bolts out and you may want to put them in some kind of order as they are not all the same length.DOUBLE CHECK all allens are out. In the front of the cover there is a spot to pry the cover,I have a set of mini crowbars and the smallest one worked perfect.Once you break the seal on the gasket pull the housing straight out .It will be hard to pull as its magnetic.Unhook the wire harness from the rectifier (?) in the front of the sled,under the tool box.I think it was the top connecter,it has a tang that you have to press together to release the connection.Work the harness out of the sled paying attention to how it was routed.
Now that the cover and wiring is out of the sled I set the cover on the mill and put clean rags over it to make shure no chips get into it.Clamp pickup coil into vise(carefully its just plastic) and first machine the bottom.There is on each hole a boss that keeps the pickup coil from being able to move.Then just slot the holes in the correct direction(see picture) and clean everything up and put back together.By the way I turned the one screw down in the lathe for clearance.Be shure to clean oil out of where the screws go and locktite them back in.They are loctited from the factory also.If these screws were to come out ,it really makes a mess,especially since with the cover off you can see right to the rods.
This probaply could be done with out a milling machine by grinding the bosses on the bottom off and center punching where the holes need to be and drilling them out.You could turn the allen head down by clamping it in a drill and turning it against a bench grinder,opposite directions work best.
Since we havent got any snow right now I havent been able to test it out yet.Hopfully the turbo guys are in trouble now.
!") Well I might need the velocity rings also.
Well I might need the velocity rings also.-
This site uses cookies to help personalise content, tailor your experience and to keep you logged in if you register.
By continuing to use this site, you are consenting to our use of cookies.