Frostbite
TY 4 Stroke God
Tundra, nice picture!
I ran the 16 x 159 x 2 1/4" Skidoo track the last half of the season and couldn't believe how well my sled worked in the deep, deep stuff. It was really a night and day difference. I was honestly digging out the two Rev 800 Summits I ended up riding with all day. Let's just say they were shocked too. I still remember them saying, "hey, isn't that sled a four stroke"?
I had the sled put away and stored for the summer when I got a PM and a nice fellow wanted to buy my 159" track. I initially didn't want to sell it but I read on the Skidoo forums how they seemed to think it was a "tencher". I did remember not being able to "get up on plane" a couple times in the super deep stuff. It felt like a boat where you try to get up on plane but you either don't have enough horsepower or too much weight to get up.
So, I read everything I could find about the Camo Extreme 162 x 16 x 2 1/2". Contrary to the Skidoo track, I don't think I read one bad thing so I sold my track, bought an Extreme, new drivers, trimmed my cooling fins on the front of the tunnel, changed my jackshaft bearing, axle bearing and one of my chain case bearings that felt rough.
Now I just need a couple hours to put it all back together.
Frosty
PS: My new Boss seat with a LED taillight should be here today or tomorrow!") Then I need to get together and do the driver forward mod with Kachess.
Then I need to get together and do the driver forward mod with Kachess.
I ran the 16 x 159 x 2 1/4" Skidoo track the last half of the season and couldn't believe how well my sled worked in the deep, deep stuff. It was really a night and day difference. I was honestly digging out the two Rev 800 Summits I ended up riding with all day. Let's just say they were shocked too. I still remember them saying, "hey, isn't that sled a four stroke"?
I had the sled put away and stored for the summer when I got a PM and a nice fellow wanted to buy my 159" track. I initially didn't want to sell it but I read on the Skidoo forums how they seemed to think it was a "tencher". I did remember not being able to "get up on plane" a couple times in the super deep stuff. It felt like a boat where you try to get up on plane but you either don't have enough horsepower or too much weight to get up.
So, I read everything I could find about the Camo Extreme 162 x 16 x 2 1/2". Contrary to the Skidoo track, I don't think I read one bad thing so I sold my track, bought an Extreme, new drivers, trimmed my cooling fins on the front of the tunnel, changed my jackshaft bearing, axle bearing and one of my chain case bearings that felt rough.
Now I just need a couple hours to put it all back together.
Frosty
PS: My new Boss seat with a LED taillight should be here today or tomorrow!
Then I need to get together and do the driver forward mod with Kachess.tundra
TY 4 Stroke Junkie
Frosty, i would like if you could put a picture of your track install on the beast.
What your final selection for gearing ?
What your final selection for gearing ?
Frostbite
TY 4 Stroke God
Tundra, I still haven't taken a picture but the 162 x 16 x 2.5" Extreme is mounted with 7 tooth 3.0" pitch drivers. I have very little clearance up front (5/32" to 3/16") but the track seems to clear just fine (whew, that was close).
My gearing choice at least initially will be a 20 x 42. There were plenty who said to go to 19 x 42 but I still ride some trails and I'd like at least some legs for the sled. The 7 tooth 3.0" drivers are a bit larger than the 8 tooth 2.52" pitch drivers (21" circumference vs. 20.16") so that will affect the final gearing as well. Won't going to a slightly larger driver make my overall gearing just a bit higher?
One other thing. I installed my Wildchild kit yesterday. The kit fits well but the instructions weren't so hot. The pictures were photocopied and dark but, once you've done one though I'm quite certain it's pretty straight forward on each subsequent mod. Grinding the gas tank cowling and hood required me to have a beer (ok, two) before I started. So here's my question.
For those of you using the Wildchild kit. Do you use a bar riser with the kit? If so, how high do you prefer for all around use? I will be riding some trails as well as plenty of off trail riding. I currently have an articulating bar riser on there now that I had used before the Wildchild mod and it raises the bar roughly 3.5" over what stock height would be and allows the bar to rotated into an almost infinite variety of positions. I haven't sat on the sled yet (I haven't put mt Boss high rise back on yet) do you think this bar setup will be too high?
Thanks guys
Frosty
Powder Nomad
Veteran
riser
Hey Frosty... we put the wild child rider forward on my sled a few weeks ago, as well as putting on a boss seat (the LED lights on back are way cool!), and I also have a 2" riser.
So, I haven't ridden it yet, BUT, standing on my sled, sitting on it, kneeling, etc., it feels friggin perfect. I'm 5'10", and was kinda worried it'd feel too tall, but due to the increase in height of the seat, it actually feels less weird than stock seat/stock steering angle/post/with 2" riser.
In the attached pics, you can see how low the stock seat was relative to cowling, and how high the new seat is. Also throwing in some pics of me standing with the bars... hope that helps, but I'd think your 2.75" riser will be fine!
Nomad
Attachments


Frostbite
TY 4 Stroke God
Remind me to never piss you off!
I'm 5'10" too but not nearly as "beefy" as you! Yikes! Why do I keep thinking defensive end????
I remeasured and my bars are probably 3 1/2" taller than they would be with the stock setup. I have an extra 2" riser so I can always go to 2" if 3 1/2" is too high.
Thanks for the input.
Frosty
I'm 5'10" too but not nearly as "beefy" as you! Yikes! Why do I keep thinking defensive end????
I remeasured and my bars are probably 3 1/2" taller than they would be with the stock setup. I have an extra 2" riser so I can always go to 2" if 3 1/2" is too high.
Thanks for the input.
Frosty
powder muncher
TY 4 Stroke Junkie
Hi Frosty the 2" will probably work great for you,I have the same set up at my 6.2'' The 3.5" riser would be Ideal.
With the rider forward make sure to build a good stop that is aligned with the new steering angel while you are at it. the first time you pull on the ski they go over centre from there on it will be a pain in the but until you make a proper stop.
With the rider forward make sure to build a good stop that is aligned with the new steering angel while you are at it. the first time you pull on the ski they go over centre from there on it will be a pain in the but until you make a proper stop.
Frostbite
TY 4 Stroke God
The Wildchild kits now have a newly redesigned steering stop plate. I haven't yanked on a ski yet but the stops seem pretty solid (at least on the stand). The last couple pages of the instructions changed the way the steering stop is mounted.
Now the wiring for the gauge pod. Is there an easy way to get wires back to the new location? Does anyone have a complete pod wiring breakdown? Electrical work is not my best attribute.
Frosty
Now the wiring for the gauge pod. Is there an easy way to get wires back to the new location? Does anyone have a complete pod wiring breakdown? Electrical work is not my best attribute.
Frosty
TT
TY 4 Stroke Master
Frosty,
please take a picture of the redesigned steering stop plate
please take a picture of the redesigned steering stop plate
Frostbite
TY 4 Stroke God
I'm not sure it's been completely redesigned but the instructions indicate there has been a change recently. Bascially, it's a black steel plate riveted on the front side of the frame to contact the steering stops on the handle bar rider.
I'll get the camera outside.
Frosty
I'll get the camera outside.
Frosty
TT
TY 4 Stroke Master
Thanks!
Frostbite
TY 4 Stroke God

TT
TY 4 Stroke Master
Good enough - Thanks alot Frosty!
Frostbite
TY 4 Stroke God
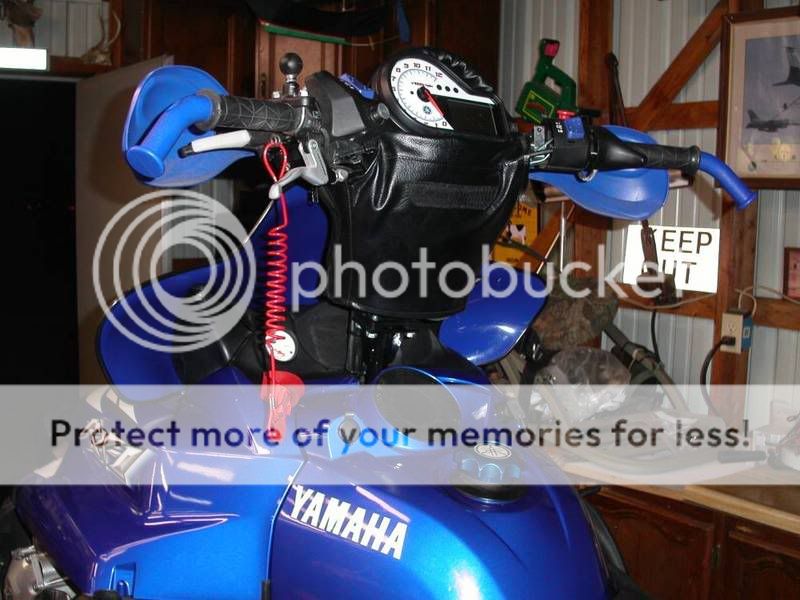
Hey guys, I finally had time to make a gauge pod bracket for the handlebars. I just couldn't see having to look down between my legs to see my instruments when I was boondocking.
The cool thing is I can still pivot my handlebars fore and aft with the atriculating bar riser and the stock cover for the handle bar pad already has a cutout in it so no cutting of the handle bar cover was needed. Mounting the whole thing literally took me 15 minutes.
I used .100 5052 aluminum and cut a piece 5" wide x 10" long. Measuring along the long edge I made a 90 degree bend at 2 1/2" and then measured 4 1/4" up from that bend and bent a 30 degree bend. I then punched three 9/16" holes for the mounting of the gauge into the bracket in the remaining 3 1/2" section and walla.
It flexes enough to move during a rollover but it's plenty sturdy enough to hold the gauge.
I tried to post pictures but the camera was set on too high of a setting so I'll have to retake them or crop them. Dang....
Frosty
bdm
Expert
Frosty,
While you have the camera out can you get a shot of the underside of the hood. I just did the wildchild and got a little over zealous pulling out wires and hood mounting hardware. I would like to see how everything SHOULD go back together.
Thank you!
While you have the camera out can you get a shot of the underside of the hood. I just did the wildchild and got a little over zealous pulling out wires and hood mounting hardware. I would like to see how everything SHOULD go back together.
Thank you!
Jonny Rocket
TY 4 Stroke Guru
- Joined
- Apr 13, 2003
- Messages
- 766
- Reaction score
- 1
- Points
- 893
- Location
- Colville, Washington
- Country
- USA
- Snowmobile
- 2008 MXC boosted Nitro
Here they are.


Similar threads
- Replies
- 11
- Views
- 2K
- Replies
- 45
- Views
- 6K
- Replies
- 18
- Views
- 3K
-
This site uses cookies to help personalise content, tailor your experience and to keep you logged in if you register.
By continuing to use this site, you are consenting to our use of cookies.