Hotrodder
Newbie
- Joined
- Jan 28, 2017
- Messages
- 19
- Reaction score
- 3
- Points
- 63
- Location
- Wisconsin
- Country
- USA
- Snowmobile
- 2005 Yamaha RX-1 ER
So a common problem on RX-1's is the starter relay sticking after it's running and burning up your battery and starter because of it. This happened to me and it seemed outrageous to pay $500 for a new RX-1 starter when you can get an aftermarket Apex starter for $70. I figured it was worth it to try an Apex one seeing as the only difference I could see was the brush end housing, so I would take the old one and put it on there and I was good to go. Boy was I wrong. The armature was completely different and the end housing wasn't even the right diameter. So this is what I came up with.
The only way it will fit is if you rotate it 180 degrees. Otherwise the mounting flanges are in the wrong position and will raise the back end up. (Do NOT try and grind the flanges down as you will grind them off before you get it thin enough that it will fit.) In order to rotate it you have to move the terminal to the opposite side of the brush end housing or it will hit the block before the starter is in place, and make spacers to go from the mounting flanges to the block
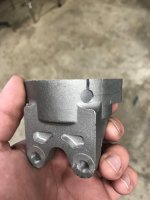
So step 1 is take the end housing off and the brush assembly out and drill the same size hole as the original 180 degrees across from where the original hole is. You should get it as close as possible but there is a little bit of room for error. It should end up about here:
Step 2 is to put a cover over the old hole. I just used a piece of shim stock and gasket maker as the adhesive. Just what we had laying around the shop.
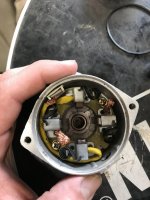
Step 3 is to put the brush assembly back in 180 deg. off so the terminal is sticking out the new hole. You will have to run the long brush wire over the top of the backing plate instead of under it otherwise it will stick into the armature underneath it. It should look like this:
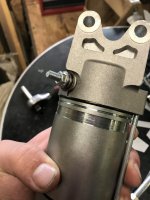
Now you can put the starter back together. Remember to pull the springs out of the brush holders or you will never get the armature back in. You can see them out in the previous picture. When your all done it should look like this:
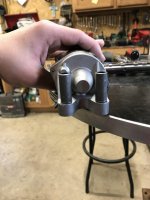
Step 4 is making the spacers. Find a piece of tubing that your bolts will fit through. I used 1/2" OD, 3/8" ID steel tubing. It does not have to be conductive because the starter will ground through the bolts. I decided that 1.240" long would be pretty close, but ended up grinding a little bit off to make them fit. If you grind on them make sure to do a little off each one or the starter will sit crooked and your bolts will cross thread. Here's so you have an idea of what it'll end up like:
Now run to the hardware store and find 2 m8 bolts the same as the originals but 2 1/2" long, as this will give you the same amount of threads in the block as the originals. Here's what it should look like:
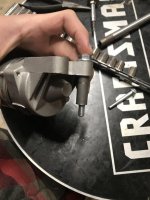
When you go to put it in like I said you might have to grind the spacers down a little bit. The starter will be held in place by the other end in the engine so don't worry about having them at an exact length, just so that they're the same and they fit snug.
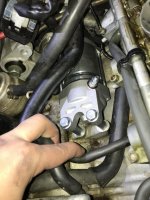
It's a decent amount of work but if you ask me it makes up for the $430
difference.
The only way it will fit is if you rotate it 180 degrees. Otherwise the mounting flanges are in the wrong position and will raise the back end up. (Do NOT try and grind the flanges down as you will grind them off before you get it thin enough that it will fit.) In order to rotate it you have to move the terminal to the opposite side of the brush end housing or it will hit the block before the starter is in place, and make spacers to go from the mounting flanges to the block
So step 1 is take the end housing off and the brush assembly out and drill the same size hole as the original 180 degrees across from where the original hole is. You should get it as close as possible but there is a little bit of room for error. It should end up about here:

Step 2 is to put a cover over the old hole. I just used a piece of shim stock and gasket maker as the adhesive. Just what we had laying around the shop.
Step 3 is to put the brush assembly back in 180 deg. off so the terminal is sticking out the new hole. You will have to run the long brush wire over the top of the backing plate instead of under it otherwise it will stick into the armature underneath it. It should look like this:

Now you can put the starter back together. Remember to pull the springs out of the brush holders or you will never get the armature back in. You can see them out in the previous picture. When your all done it should look like this:

Step 4 is making the spacers. Find a piece of tubing that your bolts will fit through. I used 1/2" OD, 3/8" ID steel tubing. It does not have to be conductive because the starter will ground through the bolts. I decided that 1.240" long would be pretty close, but ended up grinding a little bit off to make them fit. If you grind on them make sure to do a little off each one or the starter will sit crooked and your bolts will cross thread. Here's so you have an idea of what it'll end up like:

Now run to the hardware store and find 2 m8 bolts the same as the originals but 2 1/2" long, as this will give you the same amount of threads in the block as the originals. Here's what it should look like:

When you go to put it in like I said you might have to grind the spacers down a little bit. The starter will be held in place by the other end in the engine so don't worry about having them at an exact length, just so that they're the same and they fit snug.

It's a decent amount of work but if you ask me it makes up for the $430
difference.
Last edited:
