

MyOutdoors
Lifetime Member
- Joined
- May 4, 2003
- Messages
- 447
- Reaction score
- 66
- Points
- 988
- Location
- Lempster, NH
- Country
- USA
- Snowmobile
- 2020 Sidewinder Ltx Se
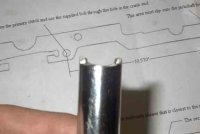
I posted the other day and got some good responses but I just wanted to show a few pics of the bolts needed to adjust the center to center and alignment. I also made a custom tool out of a 13mm deep socket to adjust the mounts. All you need to do is cut 2- 1/16" slits and grind out the rest and you have a perfect "specialty" tool (which you may never use again...LOL)
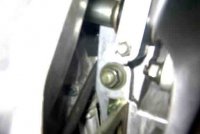
You have to remove the headlight pod and air box to get access to the bolts. As everyone has stated, you cannot move the motor forwards or back, but by pivoting the front of the motor you will-1. Realign your clutches, which, 2. Gives you the perfect center to center. Mine was off by quite a bit and I was surprised how easy it was to get aligned.
Once you get the nuts and washers off the 2 front and 1 rear, push the rear bolt until it's flush with the frame. This way you can adjust the rear mount bushing if needed(I just made sure it was just snug to the frame), you can look inside the mount and see a slotted bushing. This is where the 13mm socket will come in handy to adjust the bushing in or out to get the alignment correct. In the last pic of my "off" center alignment, I had to move the front of the motor to the right, so I loosened the right bushing and tightened the left bushing. I did this until my center -center tool was laying on top of the secondary without any persuasion. You may have to pry the motor using the frame as your anchor point. Once aligned, I made sure all the bushings were snug against the frame and tightened the rear mount to 47 ftlbs. Then tighten the front 2 mounts to the same 47 ft lbs. The last pic shows how the center-center should be with the tool. Hope this helps someone out down the road.
Attachments
-
 center-center off.jpg35.6 KB · Views: 388
 -
 Left-motor-mount.jpg8.9 KB · Views: 1,434
 -
 Right-side-mount.jpg8.8 KB · Views: 1,458
 -
 Rear Motor Mount.jpg7.3 KB · Views: 1,441
 -
 13mm-tool.jpg7 KB · Views: 1,446
 -
 13mm-tool2.jpg7.9 KB · Views: 1,450
 -
 Alignment-perfect.jpg7.3 KB · Views: 1,461
 -
 Alignment-perfect.jpg7.5 KB · Views: 1,434
AIRWOLF
Guest
- Joined
- Oct 1, 2004
- Messages
- 846
- Reaction score
- 1
- Points
- 823
- Location
- New York
- Website
- www.sledpartsgarage.com
I just put my clutch tool on my 2007 RTX and I have the same result
looks like i'll be moving the motor
looks like i'll be moving the motor
ReX
TY 4 Stroke God
What do you notice in the way of performance changes once the clutches are aligned?
I know in theory the clutching should "work better", but what do you really see?
My original belt still looks good at 6200 km and my clutching works well (although it is revving higher than I'd like).
I know in theory the clutching should "work better", but what do you really see?
My original belt still looks good at 6200 km and my clutching works well (although it is revving higher than I'd like).
SledFreak
TY 4 Stroke God
- Joined
- Feb 7, 2005
- Messages
- 5,511
- Reaction score
- 466
- Points
- 1,733
- Location
- Ontario. Canada
- Country
- Canada
- Snowmobile
- Current 2020 ThunderCat. - SOLD!
More top end probabbly, with cooler clutches...
NY_SXR700
Pro
- Joined
- Dec 30, 2003
- Messages
- 149
- Reaction score
- 0
- Points
- 846
- Location
- Webster, NY
- Website
- www.sohonetworksny.com
- Country
- USA
- Snowmobile
- 2001 SXR700
2006 Apex-GT
So, are you saying the bushing is an offset type of rubber. If I rotate it one way it mounts fwd and the other it moves it rear. The tool you made is just a tool that fits the slots in the bushings. How many spots is the motor mounted in, I would think 4 if so, where are they located. Your photos only ref. two of them. BTW, great post and photos. I am just a bit confused and don't have a spare 13mm deep well to grind down. I do have plenty of round tubing the same size to make the tool, if that is all it does. Thanks, Doug
SharkAttak
TY 4 Stroke God
NICE PIC'S
Similar threads
- Replies
- 3
- Views
- 2K
- Replies
- 3
- Views
- 2K