ontarioyamaha
Pro
- Joined
- Mar 26, 2017
- Messages
- 150
- Reaction score
- 26
- Points
- 363
- Location
- Port Perry, Ontario
- Country
- Canada
- Snowmobile
- 2010 Vector ltx GT
2010 MXZ X 1200
- LOCATION
- Port Perry
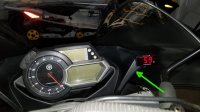
I completed the installation of the Koso slim line hard wired gauge
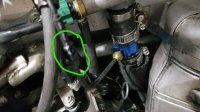
The adapter , 26mm, from Koso was installed in the down tube.
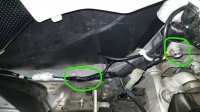
Quick disconnect - I installed the system with quick disconnects such that it can be unhooked when pulling the headlight and gauge pod. Note: The temp sender comes with a quick disconnect. I only needed to create one for the power. I ended up using an old heated helmet connector.
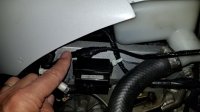
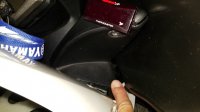
I tapped into the power wire for the tail light. Be sure to run sled to determine which one is the tail light as it will have constant power. I probe and found the blue wire to be live.
Access to this wire is by your right foot. pull off small plastic cover that goes across the top of you foot and wraps along side the fuel tanks.
I only cut into the live wire and used a chassis ground as you can see in the picture.
The Gauge was mounted on the LH side. Their is a small plastic cover , below the gauge, that you can remove with one screw in order to run the wires. I am pointing at it in one of the pictures below.
The adapter , 26mm, from Koso was installed in the down tube.
Quick disconnect - I installed the system with quick disconnects such that it can be unhooked when pulling the headlight and gauge pod. Note: The temp sender comes with a quick disconnect. I only needed to create one for the power. I ended up using an old heated helmet connector.
I tapped into the power wire for the tail light. Be sure to run sled to determine which one is the tail light as it will have constant power. I probe and found the blue wire to be live.
Access to this wire is by your right foot. pull off small plastic cover that goes across the top of you foot and wraps along side the fuel tanks.
I only cut into the live wire and used a chassis ground as you can see in the picture.
The Gauge was mounted on the LH side. Their is a small plastic cover , below the gauge, that you can remove with one screw in order to run the wires. I am pointing at it in one of the pictures below.
Attachments


- Joined
- Apr 13, 2003
- Messages
- 21,713
- Reaction score
- 9,312
- Points
- 2,103
- Location
- Schofield, WI
- Website
- www.totallyamaha.com
- Country
- USA
- Snowmobile
- 2020 Sidewinder SRX
Looks like it is a really clean install.