
Doc Harley
TY 4 Stroke God
- Joined
- Oct 17, 2016
- Messages
- 3,406
- Age
- 55
- Location
- Here & there
- Country
- USA
- Snowmobile
- '17 Sidewinder LTX SE
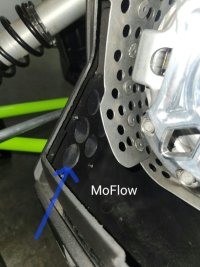
Using templates supplied by MoFlo going to attempt to make my own vents, both front & rear.
Just want to do my own thing and color match the screening to the color of particular panel.
Going to follow the template accordingly and use the suggested holes. Rivet with washer on the backside, utilizing pet screen. If a failure point is reached, I will then just install the MoFlo product.
Couple questions;
1)What is the best way to line up the knee vent? Pics always help!!
2) best tool to cut it out.
Attention to detail is a must as I won't have the trim piece to finish it off.
Any tips and suggestions will be considered & very helpful.
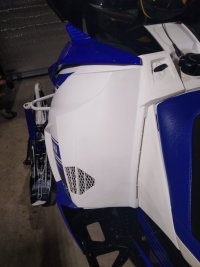
Wesley's bleach white and magic eraser combo. Panel was dirtier than I thought.


Just want to do my own thing and color match the screening to the color of particular panel.
Going to follow the template accordingly and use the suggested holes. Rivet with washer on the backside, utilizing pet screen. If a failure point is reached, I will then just install the MoFlo product.
Couple questions;
1)What is the best way to line up the knee vent? Pics always help!!
2) best tool to cut it out.
Attention to detail is a must as I won't have the trim piece to finish it off.
Any tips and suggestions will be considered & very helpful.
Wesley's bleach white and magic eraser combo. Panel was dirtier than I thought.
Attachments

Last edited:

KnappAttack
24X ISR World Drag Racing Champion
- Joined
- Feb 19, 2004
- Messages
- 4,673
- Location
- Welch MN
- Country
- USA
- Snowmobile
- 2023 Sidewinder LTX-LE
2017 Sidewinder LTX-LE
Here is what I did with my 17, 2 different sized hole saw holes and used marine goop to glue hardware store cat screen in the inner panel. All the cat screen does is keep the big stuff out, the pressure is outwards so no snow ever comes in here in the back panel anyway. Also no weakening of the panel this way either.


I used the moflo vents and drilled varying sized holes inside the template outline to retain some panel integrity rather then cut the area out completely.
Clintww
VIP Member
- Joined
- Mar 6, 2022
- Messages
- 108
- Age
- 53
- Location
- Central MN
- Country
- USA
- Snowmobile
- 2001 SXR. 2005 RX1. 2017 Sidewinder
- LOCATION
- MN
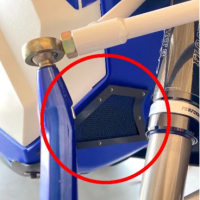
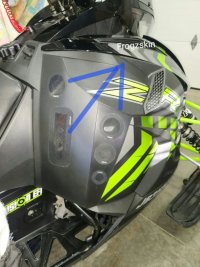
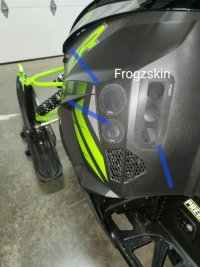
I used this type of panel over some holes. I find myself up against the knee pads occasionally so i wouldn't want a grill there. I do have these on both sides and drilled like Mike shows. Grill panels are on Ebay


Doc Harley
TY 4 Stroke God
- Joined
- Oct 17, 2016
- Messages
- 3,406
- Age
- 55
- Location
- Here & there
- Country
- USA
- Snowmobile
- '17 Sidewinder LTX SE
OK.OK....what about The belly pan (front)?
Mike, judging by your pics and coming up with a quick compilation of dimension & design... It appears you used a 2.5" top & 2" bottom hole saw?
Mike, judging by your pics and coming up with a quick compilation of dimension & design... It appears you used a 2.5" top & 2" bottom hole saw?
Last edited:
Love the Cummins 3500 in the back ground! A fellow owner of a REAL TRUCK!I used this type of panel over some holes. I find myself up against the knee pads occasionally so i wouldn't want a grill there. I do have these on both sides and drilled like Mike shows. Grill panels are on Ebay View attachment 174671View attachment 174671
")
Clintww
VIP Member
- Joined
- Mar 6, 2022
- Messages
- 108
- Age
- 53
- Location
- Central MN
- Country
- USA
- Snowmobile
- 2001 SXR. 2005 RX1. 2017 Sidewinder
- LOCATION
- MN
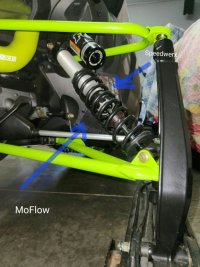
Here are the kits I used. The Speedwerx kit is in the side panel, and the other goes next to it in the lower panel. I drilled the largest holes I could fit under each of the panels. The Speedwerx kit does tend to ice over, so by mid day they are blocked sometimes. Your belt guard may block these vents on the clutch side too. They would mount in the white area of the pic.OK.OK....what about The belly pan (front)?
Mike, judging by your pics and coming up with a quick compilation of dimension & design... It appears you used a 2.5" top & 2" bottom hole saw?
Attachments
Clintww
VIP Member
- Joined
- Mar 6, 2022
- Messages
- 108
- Age
- 53
- Location
- Central MN
- Country
- USA
- Snowmobile
- 2001 SXR. 2005 RX1. 2017 Sidewinder
- LOCATION
- MN
2017 with 25,000 miles - never seen snow. But it gets worked hard in the summer!Love the Cummins 3500 in the back ground! A fellow owner of a REAL TRUCK!
Doc Harley
TY 4 Stroke God
- Joined
- Oct 17, 2016
- Messages
- 3,406
- Age
- 55
- Location
- Here & there
- Country
- USA
- Snowmobile
- '17 Sidewinder LTX SE
Clintww, I want to do something like the one you show. Yes your belt guard will be in the way, but, and forgive me for asking... What's the difference? I assume once the incoming air hits that guard it will just wrap around it and continue its journey?!?!
I mean I don't mind drilling a few holes in it without losing its rigidity. Just asking.
I mean I don't mind drilling a few holes in it without losing its rigidity. Just asking.
Clintww
VIP Member
- Joined
- Mar 6, 2022
- Messages
- 108
- Age
- 53
- Location
- Central MN
- Country
- USA
- Snowmobile
- 2001 SXR. 2005 RX1. 2017 Sidewinder
- LOCATION
- MN
I agree with your thought on airflow, but I have a guard from PEFI and it is solid in that area. just thought I should mention it may not be as helpful as one would like. I haven't even put the clutch side on yet as you do need to remove the lower panel to install. Even in the small panels, I drilled holes rather than cutting the whole area open. The kit also comes with very nice templates for drilling and marking.Clintww, I want to do something like the one you show. Yes your belt guard will be in the way, but, and forgive me for asking... What's the difference? I assume once the incoming air hits that guard it will just wrap around it and continue its journey?!?!
I mean I don't mind drilling a few holes in it without losing its rigidity. Just asking.
74Nitro
VIP Member
- Joined
- Feb 18, 2013
- Messages
- 5,228
- Age
- 52
- Location
- Dublin Ontario
- Country
- Canada
- Snowmobile
- 2019 Sidewinder LTX
Love that Oliver in the background looks like a 77.
I have a 49 88 Rowcrop narrow front.
I have a 49 88 Rowcrop narrow front.
Clintww
VIP Member
- Joined
- Mar 6, 2022
- Messages
- 108
- Age
- 53
- Location
- Central MN
- Country
- USA
- Snowmobile
- 2001 SXR. 2005 RX1. 2017 Sidewinder
- LOCATION
- MN
1950 88 Standard Wheatland gasLove that Oliver in the background looks like a 77.
I have a 49 88 Rowcrop narrow front.
Turboflash
TY 4 Stroke God
- Joined
- Mar 18, 2019
- Messages
- 2,443
- Location
- Southern MN
- Country
- USA
- Snowmobile
- '17 ZR9000 Ltd. 137 - PEFI Stage 4
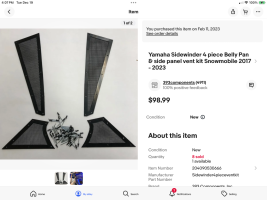
I agree with your thought on airflow, but I have a guard from PEFI and it is solid in that area. just thought I should mention it may not be as helpful as one would like. I haven't even put the clutch side on yet as you do need to remove the lower panel to install. Even in the small panels, I drilled holes rather than cutting the whole area open. The kit also comes with very nice templates for drilling and marking.
Attachments
74Nitro
VIP Member
- Joined
- Feb 18, 2013
- Messages
- 5,228
- Age
- 52
- Location
- Dublin Ontario
- Country
- Canada
- Snowmobile
- 2019 Sidewinder LTX
I like those Moflows
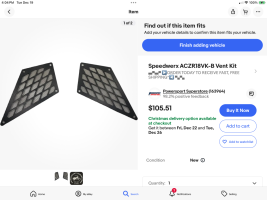
For bottom moflows I cut the entire area out with cutoff wheel on a dremel as the area is so small it does not really weaken it when fully open. No problems this way on 4 sleds total. lower side panel can stay on for all of it. I just removed lower shock bolt so I could pivot it out of the way for better room. Air riveter fit in there just fine and so did drill. Added some holes in the precision belt guard to allow better airflow. Upper vents I used some hole saw bits and drilled some larger holes at bottom working my way to smaller sizes near the top. Panel is still strong in this area this way.
-
This site uses cookies to help personalise content, tailor your experience and to keep you logged in if you register.
By continuing to use this site, you are consenting to our use of cookies.