Fish N Chicks
Newbie
- Joined
- Oct 17, 2017
- Messages
- 10
- Reaction score
- 2
- Points
- 33
- Location
- Warren, MI
- Country
- USA
- Snowmobile
- '17 Sidewinder LTX-SE
Please feel free to post your boredom mod pics here.
Well, the only snow we have here in the mitten is not in the mitten, but in the UP, which isn't always easy to get to. In the meantime to break up the cabin fever I had some fun with the SW. I've been wanting some accent lighting so I went for it. Took me all day but was being very tedious and methodical; I didn't want to just start swiss cheesing my tunnel for some lights I may or may not like.
I searched the local auto parts stores (Pep Boys, Autozone, Oreilley's, etc) and actually found the brightest and most reasonably priced strips at Meijer. While I don't prefer to go there, I also checked Walmart to exhaust all my local options. They were more expensive and not as well made from what I can tell. The one's I picked up are super bright, and came with genuine 3M tape. Something I will recommend to those working in cooler climates, you will want to take a heat gun to the surfaces you're applying the strips to to warm up the surface. I like hitting the strips with some heat too. Your adhesion level will be a million times better. This is all after cleaning the surface with rubbing alcohol or my preference: acetone.
I have a '17 Blue/White SW, so I went with the blue lights. Not sure how they'll go over on the trails with the Deeners, but I've heard they really don't care if you're not being a dick out there. I hooked my tunnel lights to a switch off my pack. Given the battery location and where I wanted the lighting, it worked out best for my needs and was the least invasive to the machine.
For the hood lighting, I tapped into the cigarette lighter wiring. I debated on using quick clips or actually cutting and splicing the Lighter's wiring with new female quick connects, but ultimately figured it's a protected area, and corrosion should not be an issue. If it becomes one, it wouldn't take much to repair. I don't think it'll get to that though. I like using these stick on zip tie mounts to control my wiring. They have them in the electrical aisle at your local hardware store or home depot/Lowe's.


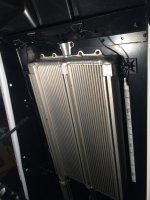
The tunnel lighting proved to be a lot more difficult. I powered up the strips and positioned them by hand to get an idea where I would get the most light thrown, and found the strips wanted to be pretty far aft, and as close to the heat exchanger as possible. I found that my tunnel pack had some vacant rivet holes in it, and the outboard most ones were outboard of the heat exchanger. My apologies, I didn't get a pick of the GROMMETED hole before installing the wiring. If you're drilling your tunnel, or any panel for that matter, you should always use a grommet to protect from chafing and to better keep debris out. I also had to de-solder the connector for the strip lights, so I can get away with the smallest hole possible. I hugged the most outboard side of one of the outboard holes in my tunnel pack, and drilled an 1/8" pilot. Always measure twice to ensure you are not going to drill through your heat exchanger! After confirming from below I was well enough away from the exchanger, I drilled a 5/16" hole for the grommet, ran my wires through, and re-soldered the connector. If you're wondering what surrounds my tunnel pack, I cut a 1/2" Neoprene form to cover my tunnel. Protects it and looks better than the inevitable scuffs the tunnel gets.

Looking in the tunnel pack:

The grometted hole below:

There's a flap in the pack that holds the excess wiring very nicely. I used a pre-wired switch, so no terminals are exposed:

The wiring comes directly from the battery using eye terminals for connectors, and runs from under my seat to the tunnel pack. Not my most ideal execution but again, the least invasive to the machine. This whole process I drilled one 5/16" hole, which still made shiver!
Under tunnel pics and how it looks next.
Well, the only snow we have here in the mitten is not in the mitten, but in the UP, which isn't always easy to get to. In the meantime to break up the cabin fever I had some fun with the SW. I've been wanting some accent lighting so I went for it. Took me all day but was being very tedious and methodical; I didn't want to just start swiss cheesing my tunnel for some lights I may or may not like.
I searched the local auto parts stores (Pep Boys, Autozone, Oreilley's, etc) and actually found the brightest and most reasonably priced strips at Meijer. While I don't prefer to go there, I also checked Walmart to exhaust all my local options. They were more expensive and not as well made from what I can tell. The one's I picked up are super bright, and came with genuine 3M tape. Something I will recommend to those working in cooler climates, you will want to take a heat gun to the surfaces you're applying the strips to to warm up the surface. I like hitting the strips with some heat too. Your adhesion level will be a million times better. This is all after cleaning the surface with rubbing alcohol or my preference: acetone.
I have a '17 Blue/White SW, so I went with the blue lights. Not sure how they'll go over on the trails with the Deeners, but I've heard they really don't care if you're not being a dick out there. I hooked my tunnel lights to a switch off my pack. Given the battery location and where I wanted the lighting, it worked out best for my needs and was the least invasive to the machine.
For the hood lighting, I tapped into the cigarette lighter wiring. I debated on using quick clips or actually cutting and splicing the Lighter's wiring with new female quick connects, but ultimately figured it's a protected area, and corrosion should not be an issue. If it becomes one, it wouldn't take much to repair. I don't think it'll get to that though. I like using these stick on zip tie mounts to control my wiring. They have them in the electrical aisle at your local hardware store or home depot/Lowe's.
The tunnel lighting proved to be a lot more difficult. I powered up the strips and positioned them by hand to get an idea where I would get the most light thrown, and found the strips wanted to be pretty far aft, and as close to the heat exchanger as possible. I found that my tunnel pack had some vacant rivet holes in it, and the outboard most ones were outboard of the heat exchanger. My apologies, I didn't get a pick of the GROMMETED hole before installing the wiring. If you're drilling your tunnel, or any panel for that matter, you should always use a grommet to protect from chafing and to better keep debris out. I also had to de-solder the connector for the strip lights, so I can get away with the smallest hole possible. I hugged the most outboard side of one of the outboard holes in my tunnel pack, and drilled an 1/8" pilot. Always measure twice to ensure you are not going to drill through your heat exchanger! After confirming from below I was well enough away from the exchanger, I drilled a 5/16" hole for the grommet, ran my wires through, and re-soldered the connector. If you're wondering what surrounds my tunnel pack, I cut a 1/2" Neoprene form to cover my tunnel. Protects it and looks better than the inevitable scuffs the tunnel gets.
Looking in the tunnel pack:
The grometted hole below:
There's a flap in the pack that holds the excess wiring very nicely. I used a pre-wired switch, so no terminals are exposed:
The wiring comes directly from the battery using eye terminals for connectors, and runs from under my seat to the tunnel pack. Not my most ideal execution but again, the least invasive to the machine. This whole process I drilled one 5/16" hole, which still made shiver!
Under tunnel pics and how it looks next.
Attachments
Fish N Chicks
Newbie
- Joined
- Oct 17, 2017
- Messages
- 10
- Reaction score
- 2
- Points
- 33
- Location
- Warren, MI
- Country
- USA
- Snowmobile
- '17 Sidewinder LTX-SE
The strip opposite of the access hole side was run with the wiring going aft, to rout around the exchanger. Again, note the zip tie mounts used to control the wiring. It should probably be loomed, and I intend on doing that too:

The side closest to the wiring access hole. Unfortunately the wiring covers the grommet:

Daytime:

Kill time:

Love how it glows through the snow flap:

Had to cover the headlamp here to get the hood lighting to show in the pic:

Now I just need some snow to rip it all off while I ride!!
The side closest to the wiring access hole. Unfortunately the wiring covers the grommet:
Daytime:
Kill time:
Love how it glows through the snow flap:
Had to cover the headlamp here to get the hood lighting to show in the pic:
Now I just need some snow to rip it all off while I ride!!


Mike P
Lifetime Member
- Joined
- Nov 18, 2015
- Messages
- 564
- Reaction score
- 276
- Points
- 1,078
- Location
- Berlin CT
- Country
- USA
- Snowmobile
- Sr Viper R-TX SE
- LOCATION
- Berlin CT
Did you fuse the line from the battery to your switch? The tunnel lights will most definitely fall off or at the very least take on a lot of damage while riding.
Fish N Chicks
Newbie
- Joined
- Oct 17, 2017
- Messages
- 10
- Reaction score
- 2
- Points
- 33
- Location
- Warren, MI
- Country
- USA
- Snowmobile
- '17 Sidewinder LTX-SE
Did you fuse the line from the battery to your switch? The tunnel lights will most definitely fall off or at the very least take on a lot of damage while riding.
I did not run a fuse inline as the LED's I got do not require one. The low voltage demands of LED make them really easy to work with.
After about 300 miles, I incurred one repair. Not running the wire around the heat exchanger made it susceptible to ice chunks slicing it, which i thought might happen, and did. Not a big deal, the kit provides ample wiring. I soldered and heat shrink-wrapped the cut wire, then ran conduit around it the whole way to the grommet. Worst i've seen so far is some ice hanging from it after another 100 miles.
The LED strips themselves have a rubber-type lens surface to them. They have taken 400 miles of abuse and are still crazy bright. Worst thing that happens there is you get some ice build-up around the strips as they do not create heat to melt it. The 3M tape works extremely well if applied correctly.
sledjunk
Extreme
- Joined
- Aug 7, 2007
- Messages
- 54
- Reaction score
- 13
- Points
- 808
- Location
- Pefferlaw, Ontario
- Country
- Canada
- Snowmobile
- 2015 Vector LTX 12141 KM
2015 Vector LTX 30736 KM
2012 Vector 20100 KM
2007 Vector GT 30638 KM (Sold)
I would still fuse the circuit. While the LED's do not draw much current, the short circuit that might happen if / when the wire breaks will. Always fuse for the expected load (plus a bit of headroom) so that a short doesn't make a fuse of your wiring.
JMO
JMO
Similar threads
- Replies
- 7
- Views
- 2K
- Replies
- 15
- Views
- 3K