NWT RX-1
Newbie
- Joined
- Jan 7, 2007
- Messages
- 11
- Reaction score
- 0
- Points
- 281
THIS POSTING IS A GUIDE ONLY. YOU ASSUME ALL RISK ASSOCIATED WITH ADDING A RISER TO YOUR SLED, AND WITH MAKING ANY ADUSTMENTS NOTED HEREIN. FOLLOW ALL MANUFACTURERS GIDELINES SUPPLIED WITH ANY EQUIPMENT YOU ADD. THE INFORMATION INCLUDED BELOW IS TO HELP MAKE YOUR INSTALLATION EASIER AND WILL HOPEFULLY ANSWER ANY QUESTIONS YOU MAY HAVE, THAT I HAVE ALREADY ENCOUNTERED.
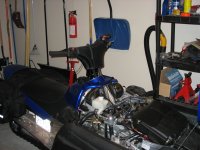
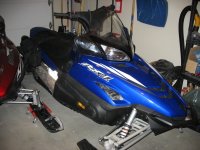
I've added a 1-1/2" Powermadd pivot adapter and 4" pivot Riser. Total 5-1/2".
I had to change the brake line, and add a Powermadd throttle cable extender. BEWARE, THERE IS A SPECIFIC PART FOR 4 STROKE YAMAHAS ON THE THROTTLE CABLE EXTENSION. However, you can modify your stock cable and the Powermadd universal extension to make this work. The way you do this is to take the stock cable off the adjustment mount on the engine and move the lock nut to the bottom of the mount. Thread the adjuster back in, and then carefully (not cross threading it) screw the lock nut on the bottom of the mount. This is what you will adjust the cable length with. On the throttle cable extension, grind off the lock nut on the adjuster. I had the mechanic at the local dealer do this as he had an air grinder with a very thin disc on it. You could probably also use a rotary tool with a thin grinding wheel on it. Then use a pair of wrenches, tighten the two nuts together.
When you order the Powermadd pivot block and pivot riser, you must make sure that you get the pivot riser for use with the pivot adapter. Also make sure that the holes on the pivot adapter line up exactly with the stock handle bar mounting plate on the end of the steering column. I had the right part number on the package, but the wrong pivot riser in the box. This led to frustration and unnecessary reeming of the stock holes. It looks like it all worked out ok though. I will be test riding today. Make sure you follow manufacturers torque specifications on riser bolts. I would suggest that you keep an eye on the torque on the bolts after your frist few rides as it would be devistating to have the bolts come loose on your bars or riser.
If you want to run with your bars forward, watch for windscreen clearance. Also watch that the bars on the pivot adapter are lined up side to side with the pivot riser. You can get it off centre to once side or the other. You wil also have to snake the throttle cable snaked around under the hood, as the extension is 10" and will leave you with extra. Also watch the choke cable. It is JUST BARELY long enough for this configuration. I don't know if an extension is available.
After installing the longer brake line, bleeding the brakes was straight forward. Have patience. I had an assistant squeeze the brake lever in and I cracked the brake bleed on each side of the caliper one at a time until I found NO bubbles coming from the bled screw. Even after it ran with out bubbles, make sure you run some brake fluid through the bleed screws until you are totally sure you have no air in the system. I also found small bubbles coming up through the fluid reservoir. I checked with a mechanic, who is a neighbour of mine, and he said this is ok. It is small bubbles that are sticking in the brake line and are slowly releasing. These will float up to the surface through the reservoir.
I also had to reroute the parking brake cable. I ran this under the cooling line and over the frame on the RHS of the sled. This will require you to remove the cable from the parking brake caliper. When you reinstall take some time to make sure that you have the tension loose enough for the brake not to drag, but not so loose the brake won't hold. After you have completed the install, take your sled to a hill and apply the parking brake. Be ready to jump on the hand brake. Jump up and down on your sled and make sure it doesn't move (because the brake is not holding, not because the sled is sliding on the slope). THIS IS JUST A BARE MINIMUM CHECK. FOLLOW ALL MANUFACTURERS INSTRUCTIONS ON PARKING BRAKE ADJUSTMENT.
If you have any questions, please make a post. I will be keeping an eye on this list and will do my best to answer any questions. I'll post photos later.


Um....you a dealer?
Swiss Sledder
TY 4 Stroke God
- Joined
- Apr 18, 2003
- Messages
- 2,792
- Reaction score
- 6
- Points
- 816
- Location
- Bidford on Avon, United Kingdom
- Website
- www.mi5.gov.uk
NWT RX-1, just need you to clarify your intentions here. Are you trying to push Powermadd or trying to help out site members?
Honk
TY 4 Stroke Master
sounds like somethings up with this guy, with all his warnings and trying to protect himself. This TY.Com site is a group of guys all interested in providing info to his fellow riders. It is not for self. never was. get real.
AaronBND
TY 4 Stroke Junkie
Huh???
NWT RX-1
Newbie
- Joined
- Jan 7, 2007
- Messages
- 11
- Reaction score
- 0
- Points
- 281
NOPE
No financial interest whatsoever in Powermadd produts. Just used them to improve my ride.
Just covering butt with the disclaimers.
No financial interest whatsoever in Powermadd produts. Just used them to improve my ride.
Just covering butt with the disclaimers.
Len Todd
TY 4 Stroke God
Must be a lawyer! :ORC
bdm
Expert
Maybe he is from California, to live out here you have to end every sentence with "at your own risk" or someone will be trying to retire off of your money.
t_r_h
Newbie
- Joined
- Dec 6, 2006
- Messages
- 11
- Reaction score
- 0
- Points
- 281
Could you post some pics? I'd like to get an idea of the range of adjustment it provides.
---Just noticed you said you'd post some. OK. Thanks.
My Dad's also really concerned about the possible liability issues of just about anything.
I guess when you bust your tail all your life to get what you have, you don't want it all to go away because of some potential Darwin Award winner and his ambulance-chaser attorney.
NWT RX-1
Newbie
- Joined
- Jan 7, 2007
- Messages
- 11
- Reaction score
- 0
- Points
- 281


Similar threads
- Replies
- 2
- Views
- 1K
- Replies
- 8
- Views
- 1K
-
This site uses cookies to help personalise content, tailor your experience and to keep you logged in if you register.
By continuing to use this site, you are consenting to our use of cookies.