

Super Sled
Lifetime Member
- Joined
- Feb 25, 2009
- Messages
- 3,631
- Reaction score
- 5
- Points
- 1,218
- Location
- Riding on the North Shore, MN
- Country
- USA
- Snowmobile
- Summit X
You don't have to take it all apart. Good practice, but not completely necessary. I just remove the primary cover (6 bolts) and liberally apply a strong degreaser into the clutch components. Then I can get a toothbrush in there and clean it out. Then two cycles in the dishwasher (hot water) on the scrubber cycle with some Dawn dishsoap mixed in there with the old Cascade and the get really clean. I do this to both the primary and secondary clutches. Really helps. Clutches run smoother/ more efficiant and belts don't get so hot.
black knight
Expert
so to change the plastic slider buttons I have to remove the fixed sheave?
grader
TY 4 Stroke Master
so to change the plastic slider buttons I have to remove the fixed sheave?
yes, the clutch must be taken apart.
yes, the clutch must be taken apart.
the kitchen
Expert
Snomobileadict, The spec you have is correct but it is to place the fixed sheave back on to the spider shaft. The spec I spoke about was to place the whole clutch assembly back on to the crank.
The walls on the box iron are 1/4" thick. I just placed the spider on the block and marked where I wanted to cut the slots.
The center of the spanner wrench does not need to be cut as long as the bolts protruding through are a little longer than the one that I have.
The walls on the box iron are 1/4" thick. I just placed the spider on the block and marked where I wanted to cut the slots.
The center of the spanner wrench does not need to be cut as long as the bolts protruding through are a little longer than the one that I have.
Snowmobileaddict
TY 4 Stroke Junkie
the kitchen said:Snomobileadict, The spec you have is correct but it is to place the fixed sheave back on to the spider shaft. The spec I spoke about was to place the whole clutch assembly back on to the crank.
The walls on the box iron are 1/4" thick. I just placed the spider on the block and marked where I wanted to cut the slots.
The center of the spanner wrench does not need to be cut as long as the bolts protruding through are a little longer than the one that I have.
Cool. Thanks!
I am going to make one of these for sure.
MidwestMetalWarehouse.com (they are not far from where I work) has that 4" sq. tube in stock with no minimum and no cut charge.
Just got to get myself a clutch puller.
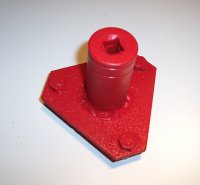
Here are a couple of pics of the spider wrench that I made for P-85 clutches. I still not convinced that it won't work on the Yami clutch. Just have to do some checking wth the clutch cover plate off.
Attachments

the kitchen
Expert
Pins should be 3 3/8" from center to center to center. If your tool is as stated you will be all set.
Yamadogger
Extreme
I made a tool very similar to "the kitchen's" tool but rather than make a separate wrench for the fixed sheave, I traced the back side of the fixed sheave with a piece of paper and crayon to locate the threaded holes and then transfered that pattern to my work bench. I drilled the 6 holes through my bench top and then got the correct length metric bolts and bolted the clutch right to my bench from the underside. Now you have your clutch bolted down and all you need is the wrench for the spider which I also made similar to what is shown. I used some 4" steel pipe that I cut 3 cutouts using a torch to fit over the spider and a long chunk of bar welded on top of the pipe for leverage. Same idea as what the pictures show. Definitely need to remember the reverse threads as mentioned above as well.
Snowmobileaddict
TY 4 Stroke Junkie
Are you guys needing to apply heat to the spider to break them free as the manual indicates? It says to dunk it in boiling water for several minutes, get it on the bench in the fixture and break it loose.
I suppose a heat gun or careful heat applied with a propane torch would work as well.
I have second thoughts about trying to split it without warming it up, don't want to crack anything.
I suppose a heat gun or careful heat applied with a propane torch would work as well.
I have second thoughts about trying to split it without warming it up, don't want to crack anything.
gun nut
Expert
clutch
My wife uses dish soap on her aluminum pots and pans. They aren't pitted.
My wife uses dish soap on her aluminum pots and pans. They aren't pitted.
the kitchen
Expert
I use a little heat with a small hand held torch. There is loc tite on the threads so aply the heat near the threads but very little as it will heat up quick.
Snowmobileaddict
TY 4 Stroke Junkie
the kitchen said:I use a little heat with a small hand held torch. There is loc tite on the threads so aply the heat near the threads but very little as it will heat up quick.
Cool, thanks...
Snowmobileaddict
TY 4 Stroke Junkie
Finished putting together my yamaha clutch holder today and was able to tear down my 7000-mile primary for a good cleaning.
Here are some photos of the holder, spider wrench and clutch. I ended using 1/4" grade 8 bolts as the 3 holder pegs that engage the fixed sheave. Those pegs get spaced in an equilateral triangle 87mm on center.
The pegs are bolted to a 6" square piece of 1/4" plate and that is attached to 3/4" plywood fastened to the wall in my shop. I ended up using the holding clamps fom my polaris p-85 clutch holder. These work very well.
The spider wrench is one I made specifically for P-85 clutches a few years back. It just so happens that it works great for the Yamaha variety as well. Its set up for use with a 1/2" drive socket wrench. I ended up using a 2' cheater bar to break the spider loose.
The clutch was plenty dirty with belt crud and I'm almost done cleaning it up. I did notice that it is in fantasic shape for 7000+ miles. Nothing is worn out. All the sliders and bushings are within spec. Yamaha builds a nice durable primary
Cleaning up the sliding surfaces with scotch brite is making this primary like new all over again.
the kitchen
Expert
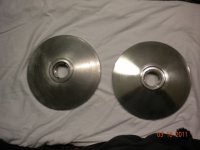
Nice to see the different ideas that each person has to get these clutches apart. Looks like it works great. I can't send you photo's in your mail box as it is too full. (snomobileaddict). This is the polish I used for the spider chanels. I use this on the whole sled and it works great. After I polish the sheaves I scuff with emery cloth. sheave on left not clean, the one on the right is polished I will scuff and wipe clean.
Attachments

Similar threads
-
This site uses cookies to help personalise content, tailor your experience and to keep you logged in if you register.
By continuing to use this site, you are consenting to our use of cookies.