snomobubl
Extreme
Recently rebuilt the rear suspension on my 2007 Attak GT - New front arm, rebuilt Ohlins EC, new idler bearings, new bushings.
I am having a hell of a time getting the suspension back in. I read about and have tried a few tricks including - disconnecting transfer rod from front arm, and disconnecting limiter strap. I am trying to get the front bolts in first and the issue I am having is that I am not able to get the suspension back far enough to get the holes to line up. I have gotten it very close by using ratchet straps from the rear bumper pulling back on the front idler wheel mounts but not close enough to get the bolts in. I read that some guys recommended to completely compress the suspension. I tried to compress the suspension with a ratchet strap from the top of the rear arm to the bottom of the front arm. I am able to get it slightly compressed, however with the freshly charged shock and a big boy spring I am not able to get it to move very far. I even tried to stand on the top of the rear arm - with all 240+ lbs of my weight, the shock barely budges even when I jump on it.
What are the tricks and tips to getting the monoshock EC installed? I appreciate the advice!
APEX 06
TY 4 Stroke God
- Joined
- Apr 30, 2009
- Messages
- 4,016
- Location
- Sheboygan, WI
- Website
- www.sheboyganyamaha.com
- Country
- USA
- Snowmobile
- 09 Nytro XTX, 08 Apex Mtx
You could remove the rear wheels. But you need to have the tansfar rod unhooked. And.with alot of force move to arm in place. Have someone to help is good to.
Kaz
Expert
Once you have the suspension inside the track I used a piece of 2x4 to prop up the front suspension arm, then used a 4 ft bar to pry the suspension up so I could get a screw driver in one of the front mounting holes. Once you have one of the mounting holes pinned your home free, insert a bolt in the opposite side and continue bolting it up.
For the rear mounting holes I used the assistance of a rachet strap between the front and rear arms to lign up the holes, used two rachet straps, one on either side.
This was all done on a sled lift, just lower the sled lift as low as possible and still leave enough room to install the suspension. Also move the rear axle as far forward as possible and tighten prior to installing in the track. As the above suggested you could also remove the wheels to give you a bit more wiggle room.
To ease the install of the suspension into the track lay a couple of broom sticks on the track to help side it up and over the nubs inside the track.
Just did one recently by myself and it's always a work out, especially when I'm not getting any younger.
Kaz
APEX 06
TY 4 Stroke God
- Joined
- Apr 30, 2009
- Messages
- 4,016
- Location
- Sheboygan, WI
- Website
- www.sheboyganyamaha.com
- Country
- USA
- Snowmobile
- 09 Nytro XTX, 08 Apex Mtx
Helps alot if you just left the back of the sled.
snomobubl
Extreme
Unfortunately I do not have a sled lift. I am lifting the back of the sled with a cable hoist that is attached to my garage ceiling. This is part of the challenge as it wants to shift the suspension toward the front. That is why I was using ratchet straps to pull the suspension backward. I got those puppies cranked as tight as I can get them and it is effective at pulling the suspension back - just a hair short of where it needs to be. It is also tough to lift up the front arm very high as you cant get past those damn rivets in the front very easily.
Thanks for the tips. Will just need to keep trying.
Thanks for the tips. Will just need to keep trying.
john10toe
Pro
snomobubl said:Unfortunately I do not have a sled lift. I am lifting the back of the sled with a cable hoist that is attached to my garage ceiling. This is part of the challenge as it wants to shift the suspension toward the front. That is why I was using ratchet straps to pull the suspension backward.
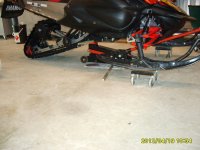
I have the same cable lift and this is what works for me. Lift the skies off the floor about 6", I leave them up on the casters and this allows you to reposition the sled if necessary. Raise the back of the sled with the hoist. Get a piece of 1x4 and lay it across a floor jack and position under the front of the track (this is the hardest part). Then simply jack the suspension up into the skid while being careful not to catch or bind anything on the way up. As the suspension moves up into place it will be displaced towards the back of the sled..... no need for straps , pry bars, etc. Install 2 front bolts and lower the back of the sled into position to install 2 rear bolts. Pictures is worth 1000 words. See attached. This method works for long or short tracks mono shock or pro-active.....
Attachments
MT.man
Pro
I always move the rear wheels as far forward as they will go and tighten the axle. But the best way is to have someone help you , 4 hands are better than 2.
snomobubl
Extreme
Got the mono installed and learned a few tricks in the process after reading some posts and trial and error of a few approaches:
- Detach the transfer rod at front mounting position
- Detach limiter strap at bottom
- Raise skis up on blocks about 4-6 inches - helps provide some clearance in front
- Raise rear of suspension (I use a cable puller attached to garage ceiling)
- After you have skid inside of the track - shove a piece of 2 x 4 (about 10" long) horizontally under skid under front of shock and over rails to prop up front arm
- Use a 24" Clamp/Spreader (Type used for clamping & gluing wood etc.), set it to spreader setting and use it to spread tunnel open - helps you get past rivets under tunnel near front mounting holes
- Lower rear of machine and attach skid at rear holes first (I found this much easier as skid weight is balanced better and you are not fighting the weight of the skid when aligning holes). Use the spreader to get shaft in between rear mounting brackets if necessary.
- Use ratchet straps from top of rear arm to top of front arm to compress suspension and get front holes aligned horizontally
- Use a pry bar (broomstick, 2 x 4 or whatever is available) to make vertical adjustments to align holes (with balanced skid weight at rear mounting position, this does not require much force on front or back of skid to align)
- Pop bolts in, hook up transfer rod and limiter strap and you are done
stevieu1
Expert
thats alot of steps. when i did mine,i lowered the back of the sled once i had the skid in the track,do the back bolts first,and the front arms just lifted into place(disconnecting the transfer rod is a must).never had to spread the tunnel and my skid comes out every year for service


yamadoo
Yamadoo is a snowmobile ' aholic'.
- Joined
- Jun 3, 2003
- Messages
- 3,645
- Country
- USA
- Snowmobile
- 15 Viper STX DX red/white- GPS and KING AIR suspension 4kmiles
13 Apex XTX 45 anniversary RED/WHITE/BLACK 3K miles
10 Vector LTX Blue 9kmiles
11 Venture GT 4k miles
86 SnoScoot(2) for grand kids
Looking at your pics I see the rear part of suspension is folded in. Happened to us last year simply lift the rear bolt shaft and it will fold differently and the holes will easily line up. At least that was it for me
Yamamoto
Yamamoto
LJ 452
TY 4 Stroke God
For installing the Mono I only required two tools;
A 14mm Socket and Wrench
A 14mm Combination Wrench
There may have been a larger size 17mm combination wrench needed for the front-arm inside nuts, but I may be confusing the Nytro with the Apex after all it was 5 years ago.
The skis of the sled should be placed directly on the floor, the rear of the sled held in the air with a stand or hoist. An adjustable stand/hoist capable of height adjustments in 1/2" increments is best.
Place the skid in the sled, I use the remaining cut drops from hi-fax (another reason to buy 144+ length) to help slide the skid in place. If you locate them strategically, you will actually be able to push the skid in very easily. One or two along the flat, two or three around the rear wheels.
Check the front arm bushings and sleeves, these tend to move around quite a bit while wrestling the skid in place, (a good helping of fresh grease can help hold them in place). Make sure the bushings are pressed all the way in, as the very thin lip will tend to catch on the mounting plate as you attempt to slide the arm in to place. The front arm should go in without struggle, if you find it difficult, the bushings are likely the cause. Once inside the reinforcement plate it's just a matter of lifting up the arm as the stamped guide will help locate the arm. Slide the bolts through each side, washer on the inside, loctite the nut and tighten.
For the rear, remove the rear transfer rod bolt, this will allow the scissor to over-extend and thus allowing the cross shaft more room to move without engaging the shock, no compression of the shock is necessary. The key to this working, is to adjust the height of the tunnel (on the lift or hoist) to the correct level. There is a sweet-spot, lower the tunnel a 1/2" at a time, then pivot the rear arm to see how it will line up, you quickly see were it needs to be and without any struggle the cross-shaft will line up. The only way I can see this possibly not working, is if you run crazy amounts of track tension. I did the same with my Nytro, (different transfer system but same idea, remove the transfer blocks), an F6, the SnoPro just lines up, so no transfer block removal needed. It works, no question about it.
A 14mm Socket and Wrench
A 14mm Combination Wrench
There may have been a larger size 17mm combination wrench needed for the front-arm inside nuts, but I may be confusing the Nytro with the Apex after all it was 5 years ago.
The skis of the sled should be placed directly on the floor, the rear of the sled held in the air with a stand or hoist. An adjustable stand/hoist capable of height adjustments in 1/2" increments is best.
Place the skid in the sled, I use the remaining cut drops from hi-fax (another reason to buy 144+ length) to help slide the skid in place. If you locate them strategically, you will actually be able to push the skid in very easily. One or two along the flat, two or three around the rear wheels.
Check the front arm bushings and sleeves, these tend to move around quite a bit while wrestling the skid in place, (a good helping of fresh grease can help hold them in place). Make sure the bushings are pressed all the way in, as the very thin lip will tend to catch on the mounting plate as you attempt to slide the arm in to place.
The front arm should go in without struggle, if you find it difficult, the bushings are likely the cause. Once inside the reinforcement plate it's just a matter of lifting up the arm as the stamped guide will help locate the arm. Slide the bolts through each side, washer on the inside, loctite the nut and tighten.For the rear, remove the rear transfer rod bolt, this will allow the scissor to over-extend and thus allowing the cross shaft more room to move without engaging the shock, no compression of the shock is necessary. The key to this working, is to adjust the height of the tunnel (on the lift or hoist) to the correct level. There is a sweet-spot, lower the tunnel a 1/2" at a time, then pivot the rear arm to see how it will line up, you quickly see were it needs to be and without any struggle the cross-shaft will line up. The only way I can see this possibly not working, is if you run crazy amounts of track tension. I did the same with my Nytro, (different transfer system but same idea, remove the transfer blocks), an F6, the SnoPro just lines up, so no transfer block removal needed. It works, no question about it.
Similar threads
- Replies
- 2
- Views
- 765
-
This site uses cookies to help personalise content, tailor your experience and to keep you logged in if you register.
By continuing to use this site, you are consenting to our use of cookies.