For those of you with the Proactive CK skid, you may have warped and cracked your rails like I did.
This skid is weak everywhere, especially when you start to add more stress to it when shock revalving or other major suspension mods.
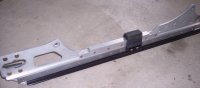
I cracked my rails just forward of the rear bump stops and made a failed attempt at welding and strengthening the area. Typically when aluminum cracks it is a sign of bigger problems such as cyclic fatigue failure where the alloy has yielded. Since a set of new rails run almost $400, I still decided to give it a try without success. You can see from my picture that the rail is bent like a banana and even my strengethening bars cracked along the same original crack area. The steel piece in the picture is a straight edge and on both sides of the rear bump stop, there is ~3/8" of deflection! Let me just say that this caused quite the Hyfax wear issue! So I picked up a set of undamaged used rails and came up with a strengthening scheme.
I custom fabricated 3 gussets for each side. The top gusset is a 3/4" thk "U" profile while the bottom gussets are simply 1/4" thk x 0.85" high aluminum strips mounted on both side of the rail. I used 3/4" grip length S/S rivets to sandwich it all together. Welding aluminum can result in residual warpage if not done properly, so I decided to stitch it all together with rivets. The final detail is that I used Apex LTX/Attak rear bump stops which have straight sides to mount over my gussets. Another detail not shown is that many of the rivets for the bottom gussets are mounted through the stock rail slots. In order to ensure proper mounting through these slots, I pressed in an aluminum spacer in each slot. These are 1/2" diameter x 1/4" thk spacers with a 3/16" thru-hole for the rivet.
While I was working on the rail, I also decided to address the inadequate hyfax mounting holes that easily strip out and whose thread breakout of the rail wall thickness. I simply made a custom barrel nut as shown and mounted it into a 1/2" hole that drilled thru the rail web. The picture is self-explanatory.
Finally, I added a Fix Powersports wheel kit to the rear of the rail to help with future hyfax wear. I liked the idea of this kit because it used a cross-shaft which which also stiffen the rails and maintain rail width in this unsupported area. However, as you will see, these poor little wheels had no chance of survival in this harsh area. I only got 100 miles before they self-destructed and that was in favorable clean and loose snow trail conditions. Oh well... At least the cross-shaft will help
FYI and good luck to all...