poor farmer/logger
TY 4 Stroke Junkie
- Joined
- Dec 3, 2012
- Messages
- 543
- Location
- Saskatchewan
- Country
- Canada
- Snowmobile
- 2015 SR Viper XTX 2009 Yamaha Nytro XTX
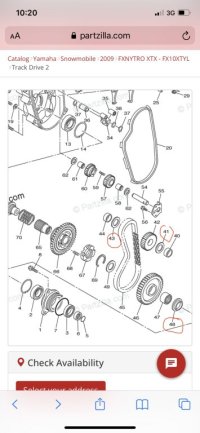
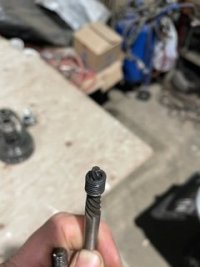
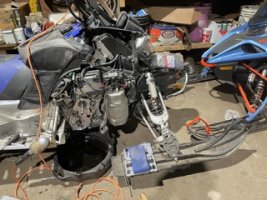
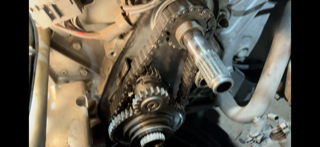
Have a problem I’m hoping someone can shed some light on for me. Working on a 2009 nytro xtx that had a broken bolt on the track driveshaft as well as a speedo side bearing gone. Have that out and all the new parts needed for reassembly. Machined a new spacer tonight for the bolt in hopes of preventing it breaking again. Problem I ran into is it appears someone has been in there before and didn’t put everything back together correctly. I’ve owned this sled for 11 years now I think and it’s worked fine the whole time but there’s a washer that I’m missing on the upper sprocket. I believe they installed it on the lower collar number 48 on the diagram. 41 and 43 are the washers that I’m looking for help with. They’re a conical spring washer. I don’t know which one goes where(or if they are different) as well as which way the curve should go. Any help is appreciated.
Attachments
poor farmer/logger
TY 4 Stroke Junkie
- Joined
- Dec 3, 2012
- Messages
- 543
- Location
- Saskatchewan
- Country
- Canada
- Snowmobile
- 2015 SR Viper XTX 2009 Yamaha Nytro XTX
Pulled it back apart this morning as it was getting late last night and verified where that other washer actually went. It’s a different size then the internal one on the top sprocket so they’ll only fit one way. It wasn’t completely flattened out so I just went ahead and installed it. Just fighting with the cover at the moment now but it will at least be back together again shortly hopefully.


- Joined
- Apr 13, 2003
- Messages
- 21,501
- Age
- 54
- Location
- Schofield, WI
- Website
- www.totallyamaha.com
- Country
- USA
- Snowmobile
- 2020 Sidewinder SRX
The cover can be a bear. You have to get the forks up on the reverse and slowly drop them over gear as you slide cover on.Pulled it back apart this morning as it was getting late last night and verified where that other washer actually went. It’s a different size then the internal one on the top sprocket so they’ll only fit one way. It wasn’t completely flattened out so I just went ahead and installed it. Just fighting with the cover at the moment now but it will at least be back together again shortly hopefully.
poor farmer/logger
TY 4 Stroke Junkie
- Joined
- Dec 3, 2012
- Messages
- 543
- Location
- Saskatchewan
- Country
- Canada
- Snowmobile
- 2015 SR Viper XTX 2009 Yamaha Nytro XTX
Got it back together without to much more fuss after I pushed the lower footwell back a little bit. Over the years it’s been pushed forward some I guess and was holding the housing back from lining up correctly.The cover can be a bear. You have to get the forks up on the reverse and slowly drop them over gear as you slide cover on.
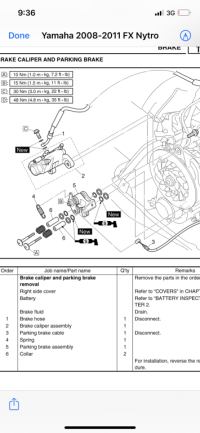
Currently fighting with the parking brake. Book says 1.5-2mm between the pads and disc combined from both sides. It’s almost like there should be some shims holding the parking brake assembly closer to the disc as there’s probably 1.5-2mm gap just on the inside alone. I’ve got it working and ultimately I may just expect more then this brake has to give maybe. Cable length is supposed to be 43.5-46mm. Appears they’re measuring from the back side of the parking brake where the cable adjuster threads in to the center of the cable end in the pictures.
Next adventure will be the starter and front end rebuild. Ball joints and tie rods are starting to get loose again and the starter was acting up last winter a bit. When it was cold out it was slow to crank over. If you cranked it over for a couple seconds then stopped and waiting for 10 seconds or so it would crank over fast enough to fire up and then once warm it would start normal again. Battery is weak but I tried it with a freshly charged nearly new battery as well and it didn’t make any difference.


- Joined
- Apr 13, 2003
- Messages
- 21,501
- Age
- 54
- Location
- Schofield, WI
- Website
- www.totallyamaha.com
- Country
- USA
- Snowmobile
- 2020 Sidewinder SRX
Ya I would guess starter is coming apart. As far as that parking brake if you release the jamb nut right at the parking brake by holding the center threaded part, you can thread the center part in and it pushes on the parking break puck. Then mess with cable.Got it back together without to much more fuss after I pushed the lower footwell back a little bit. Over the years it’s been pushed forward some I guess and was holding the housing back from lining up correctly.
Currently fighting with the parking brake. Book says 1.5-2mm between the pads and disc combined from both sides. It’s almost like there should be some shims holding the parking brake assembly closer to the disc as there’s probably 1.5-2mm gap just on the inside alone. I’ve got it working and ultimately I may just expect more then this brake has to give maybe. Cable length is supposed to be 43.5-46mm. Appears they’re measuring from the back side of the parking brake where the cable adjuster threads in to the center of the cable end in the pictures.
Next adventure will be the starter and front end rebuild. Ball joints and tie rods are starting to get loose again and the starter was acting up last winter a bit. When it was cold out it was slow to crank over. If you cranked it over for a couple seconds then stopped and waiting for 10 seconds or so it would crank over fast enough to fire up and then once warm it would start normal again. Battery is weak but I tried it with a freshly charged nearly new battery as well and it didn’t make any difference.
poor farmer/logger
TY 4 Stroke Junkie
- Joined
- Dec 3, 2012
- Messages
- 543
- Location
- Saskatchewan
- Country
- Canada
- Snowmobile
- 2015 SR Viper XTX 2009 Yamaha Nytro XTX
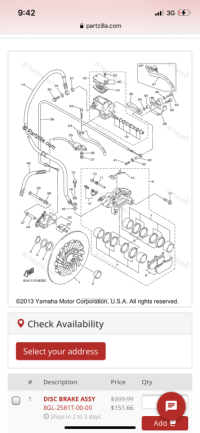
Still not really happy with how the parking brake is working. Looking at the service manual it shows 4 washers but the parts diagram only shows 2. Still makes me wonder if there shouldn’t be 2 more washers to take up space on the inside.
Attachments


- Joined
- Apr 13, 2003
- Messages
- 21,501
- Age
- 54
- Location
- Schofield, WI
- Website
- www.totallyamaha.com
- Country
- USA
- Snowmobile
- 2020 Sidewinder SRX
See that little box B. That shaft need to go in. Hold that shaft and break the jamb nut loose and turn shaft in. It will make a huge difference.Still not really happy with how the parking brake is working. Looking at the service manual it shows 4 washers but the parts diagram only shows 2. Still makes me wonder if there shouldn’t be 2 more washers to take up space on the inside.
Stubbs
TY 4 Stroke Master
- Joined
- Nov 7, 2006
- Messages
- 1,120
- Age
- 44
- Location
- Uxbridge, On, Can.
- Country
- Canada
- Snowmobile
- ‘16 Apex XTX with 137” Mono II
+ other gooodies
- LOCATION
- Uxbridge ON
Listen to Sleddy, it’s a thing. We have half a dozen high mileage four strokes in our family and all of them have been trailered a lot so the p brake cables are pretty stretched. Repositioning the shaft inward will get you where you need to be, I’ve had to do it on several sleds over the years.
poor farmer/logger
TY 4 Stroke Junkie
- Joined
- Dec 3, 2012
- Messages
- 543
- Location
- Saskatchewan
- Country
- Canada
- Snowmobile
- 2015 SR Viper XTX 2009 Yamaha Nytro XTX
I have adjusted it in to the point where it’s almost touching the brake disc with that adjuster. Brake disc actually gets hot so I had to back it off a 1/4 turn or so. Even with it adjusted to that point you can grab the brake disc and move it by hand with the parking brake on. Like I said before the gap inside the disc/ inner pad is large enough that it doesn’t put a lot of pressure on the brake disc when you flip the leaver over.See that little box B. That shaft need to go in. Hold that shaft and break the jamb nut loose and turn shaft in. It will make a huge difference.


- Joined
- Apr 13, 2003
- Messages
- 21,501
- Age
- 54
- Location
- Schofield, WI
- Website
- www.totallyamaha.com
- Country
- USA
- Snowmobile
- 2020 Sidewinder SRX
Something don’t seem right. Maybe those pads are shot. I have never had one I could not get to hold.
poor farmer/logger
TY 4 Stroke Junkie
- Joined
- Dec 3, 2012
- Messages
- 543
- Location
- Saskatchewan
- Country
- Canada
- Snowmobile
- 2015 SR Viper XTX 2009 Yamaha Nytro XTX
I just installed new ones as the outer one was wore down. Naturally I had the leaver out to change the pads and I’m reasonably sure I got it back in correctly. The cable only has so much pull so it can only sit one way to line up really.Something don’t seem right. Maybe those pads are shot. I have never had one I could not get to hold.
poor farmer/logger
TY 4 Stroke Junkie
- Joined
- Dec 3, 2012
- Messages
- 543
- Location
- Saskatchewan
- Country
- Canada
- Snowmobile
- 2015 SR Viper XTX 2009 Yamaha Nytro XTX
Well I’ve about given up on this parking brake for now. Problem with it is the brake puck on the outside of the adjuster doesn’t sit square with the rotor. The o-rings or guides inside the parking brake must be worn enough that it doesn’t sit properly. When I adjust the parking brake pad to the point where it doesn’t rub on the rotor it doesn’t put any pressure on the inside pad any more. I can’t find any part numbers for the o-rings. Not sure if anyone has a source or possibly a good number for them.


- Joined
- Apr 13, 2003
- Messages
- 21,501
- Age
- 54
- Location
- Schofield, WI
- Website
- www.totallyamaha.com
- Country
- USA
- Snowmobile
- 2020 Sidewinder SRX
That stinks. Wish it was closer so I could actually see what’s going on.Well I’ve about given up on this parking brake for now. Problem with it is the brake puck on the outside of the adjuster doesn’t sit square with the rotor. The o-rings or guides inside the parking brake must be worn enough that it doesn’t sit properly. When I adjust the parking brake pad to the point where it doesn’t rub on the rotor it doesn’t put any pressure on the inside pad any more. I can’t find any part numbers for the o-rings. Not sure if anyone has a source or possibly a good number for them.
poor farmer/logger
TY 4 Stroke Junkie
- Joined
- Dec 3, 2012
- Messages
- 543
- Location
- Saskatchewan
- Country
- Canada
- Snowmobile
- 2015 SR Viper XTX 2009 Yamaha Nytro XTX
The wear on the brake rotor likely doesn’t help any either. Not sure what new is but it’s definitely grooved a bit. Best guess is new is 4mm and this ones sitting at 3.35-3.40 so less then ideal I’m sure.That stinks. Wish it was closer so I could actually see what’s going on.


- Joined
- Apr 13, 2003
- Messages
- 21,501
- Age
- 54
- Location
- Schofield, WI
- Website
- www.totallyamaha.com
- Country
- USA
- Snowmobile
- 2020 Sidewinder SRX
I have never had one I could not get adjusted to grab tight using the center shaft and cable adjustment. Not sure what I could do to help.The wear on the brake rotor likely doesn’t help any either. Not sure what new is but it’s definitely grooved a bit. Best guess is new is 4mm and this ones sitting at 3.35-3.40 so less than ideal I’m sure.
Similar threads
- Replies
- 4
- Views
- 2K
- Replies
- 3
- Views
- 1K
- Replies
- 2
- Views
- 851
-
This site uses cookies to help personalise content, tailor your experience and to keep you logged in if you register.
By continuing to use this site, you are consenting to our use of cookies.

