550ss
Veteran

550ss
Veteran

550ss
Veteran
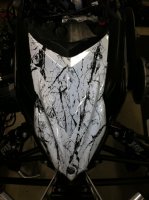
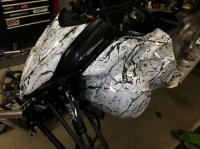
And then I decided to do something with the stock plastics...The stock white was catching too much of the dirt and starting to yellow. So, I decided to get them Hydrodipped. White Base with Black Marble vein...What do you guys think? The White and Black EzRyde with this color scheme should compliment well together...
Attachments
550ss
Veteran

550ss
Veteran
550ss
Veteran
With the skids and track out, next will be pressing the smaller MTX drivers on the drive shaft, reinstalling EZRyde skid (very easy to mock up and drill new hole), and reassembly of the plastics, new exhaust, etc. Im almost there...the hard part's done.
Let me know if you guys have any thoughts or questions!
Thanks for following...I will be updating more frequently now that I have a little time on my hands.
Let me know if you guys have any thoughts or questions!
Thanks for following...I will be updating more frequently now that I have a little time on my hands.
nswsparky
Pro
- Joined
- Oct 2, 2011
- Messages
- 147
- Reaction score
- 6
- Points
- 218
- Location
- North Shore, MN
- Website
- www.nsw4x4.com
- Country
- USA
- Snowmobile
- Phazer
That dipping is awesome would you mind saying about how much that costs?

LEE337
VIP Member
That is awesome! I love the plastics. Also would like to know what that runs if you don't mind and who does that sort of dipping.
550ss
Veteran
Hey guys, thanks for the comments...I know it looks great right? My Brother in Law had an Apex 2 years ago and did everything and it was so sick, so I needed to do something with mine!
Cost wise, well worth it in my book. Depending on what you do and how much you do, its all custom based on # of parts and size of parts, paint used, etc. Can even do it on metal parts as well. (Hint hint for next year!) That said, I had all plastics on sled done, roughly 10-15 pieces and a few other odds and ends and it was around $700 with shipping included in that. I had a place in Idaho do it as we have ahd great luck with them. If you guys want somewhere more local to avoid shipping costs, just type in "Water Transfer" to Google to search for a place near you. It's the new coating "fad" and there are many places around that do it now. Its the same process used on guns to put camo patterns, pictures, etc anything you desire! Holds up to UV, scratches, chips great! Basically they spray the part with a base color then dip it and clear it! The options are endless!
I use Kelly from H20 Graphix in Nampa, ID
Lookin' great 550ss! Can't wait to see the new skid installed.
Curious as to your choice of muffler. Nothing against Skinz (I love their stuff), but you might have been able to save a little more weight and gain a little extra power with something else ... was noise pollution a factor in your decision?
Curious as to your choice of muffler. Nothing against Skinz (I love their stuff), but you might have been able to save a little more weight and gain a little extra power with something else ... was noise pollution a factor in your decision?

Looks great.I think your brotherlaw is who kinger bought his from.
I remember his build on the apex.
I remember his build on the apex.
550ss
Veteran
That is was...both his and now Kinger's sleds were sick!!!
550ss
Veteran
MTX Drivers pressed onto stock shaft and ready to drop in, holes drilled and final mock up completed on the tunnel. Ready for reassembly. Should go quick now!
Pics to follow soon!
Pics to follow soon!
yzman
Expert
Nice work man, should be a night and day difference when your done 
550ss
Veteran
Here we go...EzRyde may have been one of the easiest installed skids I have ever taken part in. Very simple and the instructions were quite easy to follow. Basically 4 holes to drill. One hole about 4 inches back from the stock mounting location between a set of vertically stacked rivets and a stock screw hole. Basically splitting the difference on both sides. See the first picture. Then the rear hole was drilled from a vertical line that is straight down from the rear tip of the foot rails and connects to the bottom mounting hole of the rear grab bar...see picture 2.
Lastly mock up and bolt up and your good to go. See picture 3.
Now all thats left for the ezryde is to mount the rear shock reservoir on the side of the steel panel that holds the rear part of the foot rail and were good to go!
Im not sure where some people got the idea that the Ezryde will need to be narrowed and cut, etc. but the skid dropped in right as promised from the guys at ezryde and they did a wonderful job with the skid and instructions.
Attachments

Similar threads
- Replies
- 1
- Views
- 1K
-
This site uses cookies to help personalise content, tailor your experience and to keep you logged in if you register.
By continuing to use this site, you are consenting to our use of cookies.