local 25
Expert
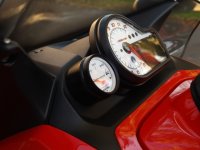
I installed my gauge surface mount instead of flush mount.The reason for doing it this way was there is a metal support bar for the new style mirrors that runs behind where the gauge would be if I flush mounted it.Also I did not want to cut the cowl.I used p.v.c pipe for the outer shell of the gauge.it fit the 2 and 1/16 gauge nice and snug. Then i painted it.
Attachments

JDMCRX
TY 4 Stroke Junkie
Looks nice what did u use to space it out?
local 25
Expert
I used p.v.c pipe for the outer shell of the gauge.it fit the 2 and 1/16 gauge nice and snug. Then i painted it.
Black 1000
TY 4 Stroke Junkie
That looks awsome. I was going to put a gauge like that on mine but didnt want to cut up the inside of my hood. I'm now going to be looking at doing something like that.
rx1 fern
TY 4 Stroke Junkie
how did you get the gauge to hold on
Len Todd
TY 4 Stroke God
This is a good idea. I too do not like cutting up the internals of the hood.
local 25
Expert
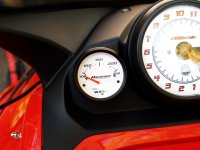
To get the gauge to hold on ,there are 2 threaded studs that stick out of the bottom of the gauge.I drilled 2 holes for them about 1 & 3/4 apart and a hole in the middle of those for the the 3 wires.


GUAGE
Man that looks awesome! I am so glad you posted that I am going to do it your way!

Man that looks awesome! I am so glad you posted that I am going to do it your way!
rx1 fern
TY 4 Stroke Junkie
do you have any pics of the back part to show how you did it.thanks
local 25
Expert
Sorry I did not take any pics of the back,but its pretty basic .You use a 3/4 wing bit for the center hole and 3/16 drill for the gauge mount studs. Just center the holes in the area next to the speedo .Hope this helps.
Similar threads
- Replies
- 24
- Views
- 3K
- Replies
- 0
- Views
- 2K
-
This site uses cookies to help personalise content, tailor your experience and to keep you logged in if you register.
By continuing to use this site, you are consenting to our use of cookies.