4Fighter
TY 4 Stroke God
- Joined
- Oct 28, 2003
- Messages
- 1,792
- Reaction score
- 18
- Points
- 943
- Location
- Sault, MI
- Country
- USA
- Snowmobile
- '07 Attak GT
DaveRX1 said:(shame on Yamaha for using a sub standard skid for so long)
If it rides half as good as it looks, I will be one very happy customer for a totall investment of $380.
More like $50.00 after you sell the Pro-Craption on eBay.
nhrxrider
TY 4 Stroke Junkie
I didn't have enough to sell, since mine was so shot. Even so, it was around $400 including the coupling kit for my Cat skid, which is still cheaper than just the W arm. Hmmmm, I wonder how hard it wouold be to go from a Cat skid in an RX to an SC10III?
Jim
Jim
Boomer
Expert
Dave, Please post some install instructions. Based on your comments and what you accomplished, I bought Sno-xr's used SC10-III skid so I can install it in my 03 shorty. Please help me and anyone else out who is planning this "upgrade".
What do I need to buy in addition to the skid and especially the critical measurements.
BTW - LOOKS SWEEEEEEEET!!!!!!!!!!!!!!!!!!!!!!!
Hope it rides as good for me when I get it installed.
What do I need to buy in addition to the skid and especially the critical measurements.
BTW - LOOKS SWEEEEEEEET!!!!!!!!!!!!!!!!!!!!!!!
Hope it rides as good for me when I get it installed.
Attachments
Lets have a closer look at your homemade coasters for your sled. They are made out of wood and look a lot like mine.
SIMMER
TY 4 Stroke Master
Hey guys...I wanted to bring this topic TTT. Anyone install a SC10-III into a 2005? Any differences in mounting locations?
AKrider
TY 4 Stroke God
Im curious how the width issue was dealt with? The Yammie tunnel is wider than a Ski-doo.
DaveRX1
Expert
Add 3/16" plate inside tunnel on both sides of yammi tunnel for doo skid install
Jack_Shaft
TY 4 Stroke Guru
rockrider said:Im curious how the width issue was dealt with? The Yammie tunnel is wider than a Ski-doo.
Dave's response is a good one, use some plate on each side, inside the tunnel. For my Polaris Pro-X install, I used the stock rear drop brackets in the rear from a 121" RX-1 and since they have a raised section in them, they were the perfect "adaptor" for the rear. I did have to move them from the original position, of course.
For the front torque arm mount, I relocated the front gusset plates used in the stock location and then used a few good heavy Yamaha flat washers to make up the difference. Worked fine.
-Rob
Jack_Shaft
TY 4 Stroke Guru
Boomer said:Dave, Please post some install instructions.
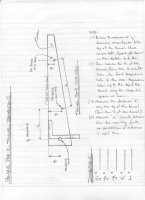
You need only round up a sled with the same SC-10 III (or II, or whatever you have) and measure the points back from the axle and down from the top of the tunnel, as shown in the attached sketch.
You could simplify this procedure (if an SC-10 sled is not available) by removing your ProAction skid and placing it on the floor next to the SC-10 III and aligning the rearmost point of the rear idlers. You can then measure the difference in the "at rest" positions of the FR & RR torque arms positions. I would be somewhat weary of this however, since many skids tend to "spring back" when removed from a sled.
The best bet is to go find a sled with an SC-10 III in it, fill-in the blanks as per the attached drawing and go to it.
-Rob
Attachments
Daverx1 do you have the measuments?
Dave I found this in another post
The front arm bolt hole center is on the rear edge of the stock .060 thick out side tunnel re-enforcing plate by your foot well. The center of the hole is on the exact edge of the plate and 1 5/8" up from the foot rest (New mounting hole will be a few inches to the rear from proaction hole). You will need to add an additional .060" plate to the rear of the stock plate to support the front arm bolt and washer. Add some 3/16"x4x4" plate to the inside of the tunnel for reenforcing on the front arm. Use lots of large head steel rivits to secure the 4x4x3/16" aluminum
On the rear, remove stock steel drop mount brackets and make new ones from 3/16" aluminum.(Mount the drop mounts using 3/8" x 3/4" bolts in stock mounting holes and add steel 3/16" rivits spread around to secure aluminum plate to inside of tunnel) Make brackets wider than stock so that you can use the stock bracket bolt holes and drill new hole for rear arm mount 12-5/8" forward of the rear end of the running board heat exchanger, 1" down from bottom of exchanger fins.
Remember measure 3 times and centerpunch holes then drill once
I will try to add some more pics of install tomorrow
Good Luck!
_________________
RX1 The ONLY one!!!
Back to top
View user's profile Send private message
DaveRX1
Pro
Joined: 16 Apr 2003
Posts: 192
PostPosted: Sun Jan 08, 2006 3:45 am Post subject: Reply with quote Edit/Delete this post Delete this post
Note: my instructions are for an sc10 III out of an 2004 rev adrenaline. This skid dosnt have a front cross shaft (Like the mono or a fire crapper). I have noticed that the sc10 III that boomer purchased has a front cross shaft. I believe that the sc 10 III with the cross shaft is out of an MXZ, not a rev chassis. The mount points and all MAY be the same, you must verify the skid width and front to rear arm center to center meas to be same a rev version before using my dimensions. I also noticed the skid in the classified section has the limiters pulled way up, better let those puppys out a few holes before install.
_________________
ttt for Tim
SledHedz
Pro
- Joined
- Jul 21, 2007
- Messages
- 158
- Reaction score
- 0
- Points
- 296
- Location
- Northern Michigan
- Website
- www.sled-hedz.com
rxrider
Jan-Ove Pedersen
- Joined
- Apr 25, 2003
- Messages
- 7,355
- Reaction score
- 64
- Points
- 1,753
- Location
- Lakselv - 70N & 25E
- Country
- Norway
- Snowmobile
- 2014 Phazer XTX, 2013 Phazer RTX, 2008 Apex RTX, 2007 Warrior, 2006 Attak
drdave - nice looking sled you've got, I had to look very close to spot your SC-III skid. Nice custom yellow black theme 


maxdlx
Lifetime Member
- Joined
- Feb 27, 2004
- Messages
- 1,832
- Reaction score
- 92
- Points
- 1,108
- Location
- Tipton, Iowa
- Country
- USA
- Snowmobile
- 07 Apex RTX
So how about an update, is it still riding good. I can't get my warrior to ride how I want it too. Even with the ohlins it just isn't quite what I want. Maybe I am getting old. Maxdlx
Similar threads
- Replies
- 6
- Views
- 3K
- Sticky
- Replies
- 15
- Views
- 19K
- Replies
- 1
- Views
- 1K
- Replies
- 2
- Views
- 1K
-
This site uses cookies to help personalise content, tailor your experience and to keep you logged in if you register.
By continuing to use this site, you are consenting to our use of cookies.


