

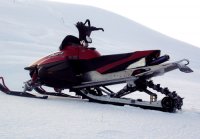
Well after reading about the under tunnel exhaust for a couple of years I decided to take the plunge after burning a hole in my pack that I had strapped to the back of the seat (it slipped down and the exhaust melted a nice hole). I read rockmeister post and used this as my starting point.
http://www.ty4stroke.com/viewtopic.php? ... ht=exhaust
I used a Cherry bomb exhaust bought at a local auto parts store.

Next I bought a steel exhaust baffle from motorcycle parts dealer in Canada. RX1MPete- if you buy it from this dealer you'll have to have a local bike shop order it as Motovan is a distributor and only sells to dealers. here's the link
http://www.motovan.com/common/catalog/2 ... on_en.html
I had originally order a 1 3/4 inlet oulet pipe from a hotrod shop in Winnipeg but when it arrived it was a 2 inch inlet outlet. After talking with them I was told the one I ordered was on back order. So after a couple of months of waiting (I had sent the pipe back) I called they informed me that they were not making the 1 3/4 any longer. So I had already order a 1 3/4 exhaust baffle so I just bought a reducer from Canadian Tire.
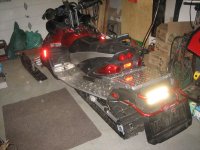
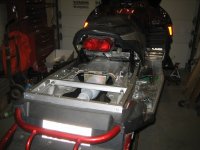
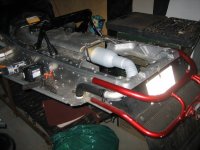
When I took apart the sled I discovered my Y-pipe was already cut for me. The only thing holding it on was 4 rivets. I also discovered all my exhaust donuts gone. I bought new donuts and then found the exhaust clamps were shot back to the dealer for more parts.

I brought the Cherry bomb exhaust with the the reducers Y-pipe to a local welder and had it welded together.

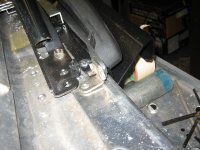
I used an exhaust clamp and drilled a hole in the middle of the bracket. I then ground down a bolt head slid it through the exhaust clamp. This I how I secured it to the sled.


I used the stock bolts and rubber mounts from the stock exhaust and cut a piece of aluminum checkered plate to cover the hole. I cut the stock heat shied in half and used it to cover the rest of the hole and add some support. I had a welder weld up a bracket to hold the seat. I think the seat bracket might need some tweaking I'll see how it holds up.


If any one has photos of there seat bracket I would like to take a look. The exhaust system probably cost me $150 but that's including the cost of welding. I think it cost more to replace the exhaust donuts and clamps. The sled sounds quieter than last year but I had a cracked Y-pipe and no exhaust donuts on the sled. With the steel baffle insert it has a real nice street bike sound maybe a let deeper.
http://www.ty4stroke.com/viewtopic.php? ... ht=exhaust
I used a Cherry bomb exhaust bought at a local auto parts store.
Next I bought a steel exhaust baffle from motorcycle parts dealer in Canada. RX1MPete- if you buy it from this dealer you'll have to have a local bike shop order it as Motovan is a distributor and only sells to dealers. here's the link
http://www.motovan.com/common/catalog/2 ... on_en.html
I had originally order a 1 3/4 inlet oulet pipe from a hotrod shop in Winnipeg but when it arrived it was a 2 inch inlet outlet. After talking with them I was told the one I ordered was on back order. So after a couple of months of waiting (I had sent the pipe back) I called they informed me that they were not making the 1 3/4 any longer. So I had already order a 1 3/4 exhaust baffle so I just bought a reducer from Canadian Tire.
When I took apart the sled I discovered my Y-pipe was already cut for me. The only thing holding it on was 4 rivets. I also discovered all my exhaust donuts gone. I bought new donuts and then found the exhaust clamps were shot back to the dealer for more parts.
I brought the Cherry bomb exhaust with the the reducers Y-pipe to a local welder and had it welded together.
I used an exhaust clamp and drilled a hole in the middle of the bracket. I then ground down a bolt head slid it through the exhaust clamp. This I how I secured it to the sled.
I used the stock bolts and rubber mounts from the stock exhaust and cut a piece of aluminum checkered plate to cover the hole. I cut the stock heat shied in half and used it to cover the rest of the hole and add some support. I had a welder weld up a bracket to hold the seat. I think the seat bracket might need some tweaking I'll see how it holds up.
If any one has photos of there seat bracket I would like to take a look. The exhaust system probably cost me $150 but that's including the cost of welding. I think it cost more to replace the exhaust donuts and clamps. The sled sounds quieter than last year but I had a cracked Y-pipe and no exhaust donuts on the sled. With the steel baffle insert it has a real nice street bike sound maybe a let deeper.
ViperTurboPete
TY 4 Stroke Master
- Joined
- Mar 25, 2005
- Messages
- 1,068
- Reaction score
- 22
- Points
- 993
- Location
- Sudbury, Ontario
- Country
- Canada
- Snowmobile
- 2015 Viper XTX LE MPI Turbo
2022 Expedition Extreme 850
Jig,
Looks good! It doesn't seem too complicated at all. You may want to research AaronBND's posts regarding his seat bracket. He had a nice one set up as his seat support. Tundra has/had one done too.
I can't remember if there were any jetting changes changes necessary with this exhaust set up. Does anyone know?
powder muncher
TY 4 Stroke Junkie
Had a street bike exhaust done up before the turbo-- needed the midrange richened up I think I lifted the needle two notches to get the best throttle response --- all else stayed the same.
cheers..........
cheers..........
Thanks I'll keep that in mind. What did your seat bracket look like?
powder muncher
TY 4 Stroke Junkie
This is the best I could find I made a aluminium cover so you can not see much. The end of the cover is where the bridge goes up and over.
It just was 2 1" straps between the stock rubber mounts on the tunnel and from there a bridge underneath the seat right to where the rubber bumpers are with the stock hold down hooks just shortened up -- very simple .
I also did hang the exhaust on the same seat mount.
In did it in steel for strength and it was less than 2 pounds with the covers.
Attachments

Thanks
obile
Pro
heres the bracket i built but never used.


bolts to the bottom where the hold down hooks are and bolts to the stock holes in the mufler tub.
bolts to the bottom where the hold down hooks are and bolts to the stock holes in the mufler tub.
NewfieRage
Newbie
I went with under tunnel exhaust last season following a number of posts from TY website. Cut 60lbs off rear end. Stock exhaust was 20+ lbs alone.
I had researched how to finish the rear of seat extensively but decided to just modify and reuse some of the stock parts. Cheap and easy.
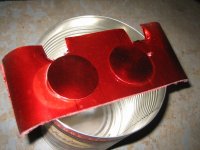
Cut a couple of discs (painted to match) to put in place of exhaust tips. Glued in with red silocone. Modified the existing seat bracket. Added some mounting brackets for stock trim parts.
I was changing the seat and had to move the old seat bracket ahead to accomidate the Apex seat. This sled was formally an RS Venture. This will not be the case in most applications.
See pics attached.
Next step. Change out track and driver. 1 7/8 Track, screw in studs and 7 tooth extraverts. Already dropped the rear barckets to accept larger track.
I am on the far east coast of Canada and our conditions can be anywhere from slush to powder. Hard to find the right set up.
I had researched how to finish the rear of seat extensively but decided to just modify and reuse some of the stock parts. Cheap and easy.
Cut a couple of discs (painted to match) to put in place of exhaust tips. Glued in with red silocone. Modified the existing seat bracket. Added some mounting brackets for stock trim parts.
I was changing the seat and had to move the old seat bracket ahead to accomidate the Apex seat. This sled was formally an RS Venture. This will not be the case in most applications.
See pics attached.
Next step. Change out track and driver. 1 7/8 Track, screw in studs and 7 tooth extraverts. Already dropped the rear barckets to accept larger track.
I am on the far east coast of Canada and our conditions can be anywhere from slush to powder. Hard to find the right set up.
Attachments


Hardou
Newbie
Bonjour NewfieRage,
What mod's have you done for removing 60 lbs on the rear end....
Bonjour Jigger,
How works your ZX2 suspension ?
Is it good ? How many pounds have you saved ?
Thanks for your responses.
Salut.
MD
What mod's have you done for removing 60 lbs on the rear end....
Bonjour Jigger,
How works your ZX2 suspension ?
Is it good ? How many pounds have you saved ?
Thanks for your responses.
Salut.
MD
note I was missing the mounting harware/ brackets and a couple of wheels on the old skid when I weighed it. 75.5 lbs ZX-2 with everything except the mounting plates 58.5 lbs equals a 17 pound difference. the link
http://www.ty4stroke.com/viewtopic.php? ... hlight=zx2
http://www.ty4stroke.com/viewtopic.php? ... hlight=zx2
NewfieRage
Newbie
-60Lbs
Hardou
Sent you a PM.
Regards
NewfieRage
Hardou
Sent you a PM.
Regards
NewfieRage
mx1500
Expert
wouldnt ur exaughst rub on the track when u land a jump or cat walk
chuckr
Extreme
looks good
looks good
i have ran mine for 2 yrs now i'am pulling it off the pipe to weld in a bung for the o2 sensor and was woundering about cutting out the metal where the old exhaust package was "see OP pics 3 and 4" should be worth a few pounds
just cutting off the part that protrudes down so what do you guys think about that idea
YES NO GOOD BAD?
-
This site uses cookies to help personalise content, tailor your experience and to keep you logged in if you register.
By continuing to use this site, you are consenting to our use of cookies.