
super1c
Moderator
- Joined
- Apr 10, 2010
- Messages
- 942
- Age
- 53
- Location
- Freeland - Otsego lake, MI
- Country
- USA
- Snowmobile
- 22 sidewinder LTX-LE
Hey guys found a mountain seat for my LTX LE but it was off a SE so I’m adding the heating element. Is it as easy as it seems? Pull seat cover back, stick pad to foam and staple it back up? I did watch a you tube video Of a guy adding one to a cat seat and he added a piece of foam between seat cover and element? Or should the cover just sit right against the element? Any tips or tricks. Thanks!

jonlafon1
Lifetime Member
- Joined
- Aug 18, 2014
- Messages
- 4,102
- Age
- 50
- Country
- USA
- Snowmobile
- 2022 Sidewinder LTX_SE
2024 Catalyst RXC
2017 Sidewinder LTX-SE. 11750 miles (SOLD)
I have been using the heat demon for years on my sleds. They have a thin foam pad that goes between element and seat cover. ALSO if you decide to go heat demon don't forget inline fuse.
Last edited:
Turboflash
Lifetime Member
- Joined
- Mar 18, 2019
- Messages
- 2,493
- Location
- Southern MN
- Country
- USA
- Snowmobile
- '17 ZR9000 Ltd. 137 - PEFI Stage 4
If you're talking about using stock Yamacat element, I would not put foam between element and seat cover. Factory install has no foam in there. I think if you did, you might not get enough heat out of it especially when really cold out.Hey guys found a mountain seat for my LTX LE but it was off a SE so I’m adding the heating element. Is it as easy as it seems? Pull seat cover back, stick pad to foam and staple it back up? I did watch a you tube video Of a guy adding one to a cat seat and he added a piece of foam between seat cover and element? Or should the cover just sit right against the element? Any tips or tricks. Thanks!
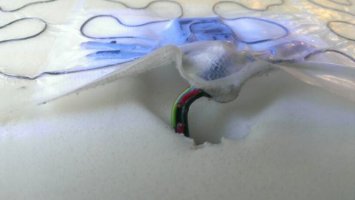
Also, IMO you should make/build/fabricate some kind of plastic support (curved appropriately) to support the wires right where they come out of the control chip. The wires are pretty stiff right there and often it doesn't take long before one or more breaks right there and the heater stops working. I've had to repair quite a few for broken wires. See 1st pic - this is where they all break.
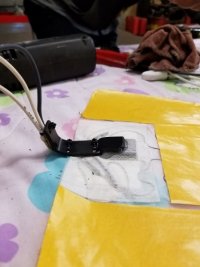
I make a curved plastic support and zip tie it to factory chip/wires to prevent it from flexing right there. Then I change factory wires to ultraflexible lead wires with silicone insulation that will take the flexing millions of times without breaking. I leave some slack in the wires in the foam tunnel to allow the wires to flex up and down without putting any force on stiff part up by the control chip. This is
Attachments
super1c
Moderator
- Joined
- Apr 10, 2010
- Messages
- 942
- Age
- 53
- Location
- Freeland - Otsego lake, MI
- Country
- USA
- Snowmobile
- 22 sidewinder LTX-LE
Thanks for the info! Ive seen your fix in a post and will be doing this. I will be doing a OEM install as my sleds all set up for the heated seat.If you're talking about using stock Yamacat element, I would not put foam between element and seat cover. Factory install has no foam in there. I think if you did, you might not get enough heat out of it especially when really cold out.
Also, IMO you should make/build/fabricate some kind of plastic support (curved appropriately) to support the wires right where they come out of the control chip. The wires are pretty stiff right there and often it doesn't take long before one or more breaks right there and the heater stops working. I've had to repair quite a few for broken wires. See 1st pic - this is where they all break.
I make a curved plastic support and zip tie it to factory chip/wires to prevent it from flexing right there. Then I change factory wires to ultraflexible lead wires with silicone insulation that will take the flexing millions of times without breaking. I leave some slack in the wires in the foam tunnel to allow the wires to flex up and down without putting any force on stiff part up by the control chip. This is
stgdz
TY 4 Stroke Junkie
- Joined
- Mar 27, 2021
- Messages
- 660
- Age
- 46
- Location
- Buffalo MN
- Country
- USA
- Snowmobile
- 19 tcat, 15 4000 RR, 13 800 RR
How hard was it to pull the seat back on and staple without any ripples?
super1c
Moderator
- Joined
- Apr 10, 2010
- Messages
- 942
- Age
- 53
- Location
- Freeland - Otsego lake, MI
- Country
- USA
- Snowmobile
- 22 sidewinder LTX-LE
Don’t know, haven’t done it yet! Haha! We shall see.How hard was it to pull the seat back on and staple without any ripples?
hellflyer
TY 4 Stroke Master
- Joined
- Dec 2, 2008
- Messages
- 1,086
- Location
- Georgtown ONT. Canada
- Country
- Canada
- Snowmobile
- 2020 sidewinder ltx se
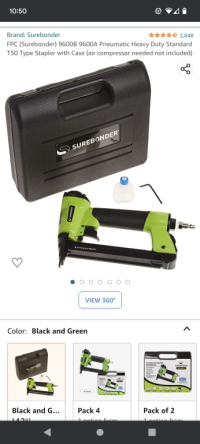
It's a pretty easy job! Just use 1/4" stainless staples when you put it back together. I bought a cheap air stapler for the job.
Turboflash
Lifetime Member
- Joined
- Mar 18, 2019
- Messages
- 2,493
- Location
- Southern MN
- Country
- USA
- Snowmobile
- '17 ZR9000 Ltd. 137 - PEFI Stage 4
Not hard to get it as good as or better than OEM. 1/4" stainless steel staples. Take your time and observe where factory staples were.How hard was it to pull the seat back on and staple without any ripples?
beanie
Extreme
- Joined
- Jun 11, 2005
- Messages
- 114
Turbo,If you're talking about using stock Yamacat element, I would not put foam between element and seat cover. Factory install has no foam in there. I think if you did, you might not get enough heat out of it especially when really cold out.
Also, IMO you should make/build/fabricate some kind of plastic support (curved appropriately) to support the wires right where they come out of the control chip. The wires are pretty stiff right there and often it doesn't take long before one or more breaks right there and the heater stops working. I've had to repair quite a few for broken wires. See 1st pic - this is where they all break.
I make a curved plastic support and zip tie it to factory chip/wires to prevent it from flexing right there. Then I change factory wires to ultraflexible lead wires with silicone insulation that will take the flexing millions of times without breaking. I leave some slack in the wires in the foam tunnel to allow the wires to flex up and down without putting any force on stiff part up by the control chip. This is
My wires that broke have two striped and 3 black and one of the blacks seems a heavier gauge . Do you know if these match up a certain way or any black to black ? My main plug has only 3 pins and Im confused,
thanks Beanie
I've done it and it's a breeze.......but the trick is to have the right stapler. I bought an electric one from Amazon and it took minutes to get the cover back on and looking factory. The purchase was well worth it.How hard was it to pull the seat back on and staple without any ripples?
Attachments
Clintww
VIP Member
- Joined
- Mar 6, 2022
- Messages
- 113
- Age
- 54
- Location
- Central MN
- Country
- USA
- Snowmobile
- 2001 SXR. 2005 RX1. 2017 Sidewinder
- LOCATION
- MN
I did this by pulling the cover back with the staples staying in the cover. I then pushed each staple back into its original hole. Yes it took time, but it made it appear to not have been removed. I did add a few extra staples in the corners.
Turboflash
Lifetime Member
- Joined
- Mar 18, 2019
- Messages
- 2,493
- Location
- Southern MN
- Country
- USA
- Snowmobile
- '17 ZR9000 Ltd. 137 - PEFI Stage 4
3 pins should be one common black for ground, 1 for low, 1 for high.Turbo,
My wires that broke have two striped and 3 black and one of the blacks seems a heavier gauge . Do you know if these match up a certain way or any black to black ? My main plug has only 3 pins and Im confused,
thanks Beanie
beanie
Extreme
- Joined
- Jun 11, 2005
- Messages
- 114
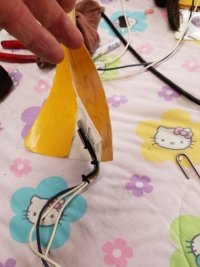
Thanks but I am asking about the extra wires coming out of the seat element itself? Not the 3 pin connector .3 pins should be one common black for ground, 1 for low, 1 for high.
View attachment 172189
Turboflash
Lifetime Member
- Joined
- Mar 18, 2019
- Messages
- 2,493
- Location
- Southern MN
- Country
- USA
- Snowmobile
- '17 ZR9000 Ltd. 137 - PEFI Stage 4
I know all blacks go together. After that. Not sure which one is for high and which one for low. Let me see if I have any pics
beanie
Extreme
- Joined
- Jun 11, 2005
- Messages
- 114
thanks ,before I attach just like to be sure as I only have about an inch of wire coming out of element ,where they broke off .I know all blacks go together. After that. Not sure which one is for high and which one for low. Let me see if I have any pics
Similar threads
- Replies
- 7
- Views
- 2K
- Replies
- 0
- Views
- 2K
-
This site uses cookies to help personalise content, tailor your experience and to keep you logged in if you register.
By continuing to use this site, you are consenting to our use of cookies.