vkrider
Newbie
Ihave 400 kms on my new vkpro so far this season and I also have a hard time changing gears. Yamaha is aware of the problem. This is a quote from the Yamaha sled talk blog Oct. 18,2007
"07 Viking Professionals are known, in some conditions, to be difficult shifting to and from reverse, we are working on a countermeasure and should have some good news to our dealers around mid-November."
I also found the sled to be very tippy, so with the advise of someone on this forum I adjusted the front shocks one notch stiffer from the softest setting. This made a big improvement.
wayne
Extreme
- Joined
- Mar 3, 2005
- Messages
- 67
- Reaction score
- 0
- Points
- 456
I have an 08 and shifting is a pproblem but not nearly as bad as the 07. MY freind has an 07 and the dealer put in a shift kit which has made shifting quite a bit better. If you widen your ski stance by shifting the spacers you will make your sled more stable. tightening your limiter strap will also help
air19
Pro
Wayne,
Maybe dumb question here - Is there a tradeoff when you widen the ski stance? I understand how you could improve on the tippyness, but I wonder if you would hurt the steering ability.
How far can I widen the skis without degrading the steering?
Maybe dumb question here - Is there a tradeoff when you widen the ski stance? I understand how you could improve on the tippyness, but I wonder if you would hurt the steering ability.
How far can I widen the skis without degrading the steering?
wayne
Extreme
- Joined
- Mar 3, 2005
- Messages
- 67
- Reaction score
- 0
- Points
- 456
By shifting the spacers you only widen the ski stance about one and half inches and suprisingly this makes a difference to stability and seems as though it improves the steering as well. This is as far as i have gone .
By tightening the limiter strap and more tension on you shocks you will see a difference in steering. I have full tension on my front shock.
By tightening the limiter strap and more tension on you shocks you will see a difference in steering. I have full tension on my front shock.
Joner
Extreme
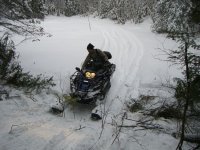
The biggest single difference in making this tank less tippy is the 12 inch skins they came out with last year. I highly recommend them. They also reduce the machine wanting to fall over in powder when you break trail. I would still widen the ski stance as well.
Attachments
wayne
Extreme
- Joined
- Mar 3, 2005
- Messages
- 67
- Reaction score
- 0
- Points
- 456
I have used the wide skins on my 06 and have them on the new one as well and they do make a big difference in deep powder by keeping the nose of the seld up. however when travelling on trails that are broken I find they make the sled harder to control and dart from side to side. I have also added dual carbides which don't seem to make much difference.
Jack_Shaft
TY 4 Stroke Guru
air19 said:For this gooseneck setup, ideally I would like to put it where the passenger seat was. The back rack is already filled with a big box carrying my chainsaw, shovel, and other tools. I was looking at the passenger seat area which is above the exhaust and noticed some weight warnings to not put more than 11 pounds on this. Makes sense since the plastic covering the exhaust doesn't look that strong. But then I started looking at the passenger seat and thought I could create a mount similar to the seat. The four mount points for the passenger seat can probably take 200 lbs of weight, so it's a matter of distributing the gooseneck hitch weight over these same four mounts.
Anyone done anything similar to put something heavy in the passenger seat area? Or am I missing something here?
Aren't those passenger seat mounts a little flimsy? Fine for vertical load, sure, but for a horizontal load I'm not sure the muffler housing will take the pounding.
I know for our 4' snowmobile trail drag, we have to use a sandwich panel in the rear rack area; 3/16" steel plate below the tunnel, 3/16" steel plate above the tunnel, then a vertical 2"x2" HSS is welded to the middle of the plate straight up in the air. The ball is attached to it and there are 45* braces welded to the vertical HSS forward and rearward. The two plates are then bolted together through the top of the tunnel with 6-8 bolts.
This is the only thing that we have seen last.
Jack_Shaft
TY 4 Stroke Guru
Joner said:The biggest single difference in making this tank less tippy is the 12 inch skins they came out with last year. I highly recommend them. They also reduce the machine wanting to fall over in powder when you break trail. I would still widen the ski stance as well.
Great pic Joner, looks like you're enjoying yourself.
air19
Pro
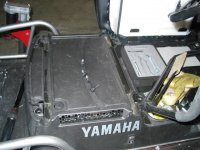
In looking at the best place to mount a gooseneck hitch, I actually thought the attach points in the mid position looked stronger than anything I could find in the rear, without doing the double plate sandwich technique you went to. In this mid area there are four solid bolts that were torqued down pretty solid holding the passenger handle bars and the passenger seat. The plastic in this area is flimsy and there is a warning that they don't want you to put more than 11 lbs. in this area right over the exhaust.
I've attached a picture of that area, look in the four corners for the bolt holes. I'm thinking about creating a couple of brackets, each one will tie into two of these holes and allow me to suspend a plate for the gooseneck hitch about an inch above the middle.
I've attached a picture of that area, look in the four corners for the bolt holes. I'm thinking about creating a couple of brackets, each one will tie into two of these holes and allow me to suspend a plate for the gooseneck hitch about an inch above the middle.
Attachments
air19
Pro
I've also attached picture of the plate I would use for the hitch. I'm not that worried about the downward pressure with this 1/4 plate. The gooseneck hitch and my groomer will only have about 50 lbs of tongue weight. But the side to side pressure when the groomer is constantly swinging around curves will be a lot for those four bolts to deal with. That's the real question, can these four bolts, torqued down to about 40 lbs, deal with a 300lb groomer that will be about 12 feet long swinging behind it all day long?
Attachments

Jack_Shaft
TY 4 Stroke Guru
What size are the bolts? M8?
I would be worried about that mounting points' ability to handle sideload. Your situation sounds like a lot of force applied from the sides and would probably shear the bolts.
However, your sled, your choice. You could always try it and keep a close eye on it.
I would be worried about that mounting points' ability to handle sideload. Your situation sounds like a lot of force applied from the sides and would probably shear the bolts.
However, your sled, your choice. You could always try it and keep a close eye on it.
air19
Pro
The bolts are M10 and they were really torqued down tight from the factory to hold the passenger seat and hand warmer bars down.
Sounds like I should proceed slowly on this and watch things closely.
I just talked to another groomer who is using the same gooseneck hitch and he's only been using rivets to secure it and it's done fine. That gives me the confidence to weld up the plate and try it out.
I'll post pictures in a week or so when I have the time to manufacture the plate.
Kråkan
TY 4 Stroke Junkie
is it possible to use both bolts and rivets? or use bolts and those rivets tat you attach the skidplate with? Those that u attach and there are threads in them so u can use bolts to attach the plate. So you can remove it easily...
air19
Pro
Yes my plan is to build this gooseneck hitch in two parts. First a baseplate that matches up to the four bolt holes in the passenger seat area. This bottom plate will be about 15 inches square filling the entire passenger seat area.
Second a top plate that has a hitch ball welded to it. The top plate will be about 6 inches square and sit roughly in the middle, but I'll have a series of holes going down the middle so I can adjust the ball farther forward or backward in the seat area. I need this flexibility to make sure my gooseneck hitch will clear the back corners of the VK Pro.
The other reason for the two plate design is in case I want to bolt something else down in this area besides the gooseneck hitch. I can use the bottom plate and just bolt something else to it. I hope this bottom plate serves as a good anchoring area for toolboxes or other gear.
Gathering odd materials now, welding in a couple of days.
air19
Pro
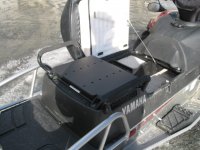
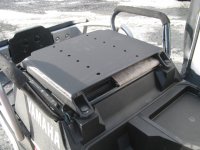
I have the bottom part of my gooseneck hitch setup done. And to give credit where it's due, this was put together by my Yamaha dealer. Another great example of why I purchased a Yamaha sled. I brought my sled back to the dealer to tune it up specifically for my grooming application. I started talking about this gooseneck hitch design and he said let me take a crack at it. He wanted to make sure it was done safely above that exhaust area and strong enough for the stresses that might be put on it.
Here are a couple of pictures of the new baseplate. It is bolted in to the same holes used by the passenger hand rails and the passenger seat. It has spacers under it to raise it up above the plastic housing over the exhaust and it's all 1/4".
The top plate will have a hitch ball welded on it. It will be smaller and I'll be able to move it backward or forward so I can deal with any clearance issues with the swing arm of the gooseneck, while still getting it as far forward as possible.
Attachments

Similar threads
-
This site uses cookies to help personalise content, tailor your experience and to keep you logged in if you register.
By continuing to use this site, you are consenting to our use of cookies.