My last project - secondary clutch servicing

steveg_nh

TY 4 Stroke Junkie
Joined
Jul 23, 2017
Messages
560
Reaction score
82
Points
238
Location
Southern NH
Country
USA
Snowmobile
2007 Attak
I'm on my last (can't believe I just wrote that!) project for my Attak, and this I consider general maintenance. LOL.

Anyway, I want to service the secondary, as I have no idea when it was last touched, if at all. The belt sits low in the sheaves (about 2-2.5mm below top), so clutch sheaves could be binding causing it to sit low, or the shims could be wrong. Measured the belt (it's pretty new) and it's right at the new belt width of about 35mm. I have 3 each of the 0.5 and 1mm shims, as I don't know what is already in there.

Anyway, I will be replacing the buttons (ramps), shimming if I need to, but I also want to clean it all up of any dust and crap causing it possibly to bind, and check the bushings. I found a TY video on updating the spring, so that taught me how to remove the helix to get to the buttons. But I still have a few questions and the service manual didn't really answer them. So hoping you guys could help.

1. Is that the only spring (behind the helix)? Meaning, is that the only place I need to worry about spring pressure causing things to fly apart, when I remove those 3 bolts on the helix front?
2. I will pay attention to the helix spring hole locations but in case it pops out on me and I can't tell, what are the settings for the Attak for the spring, is it 6 on the clutch and 1 on the helix? I found a mention of that, but nothing to confirm it. I did install the soft start primary spring from BOP, but my understanding is that doesn't change anything on the secondary holes.
3. To separate the sheaves for cleaning and bushing inspection, I have to pull the clutch from the sled, correct? My understanding is it is the 3 bolts in the back, where you would also shim it, that need to be removed to separate the two sheaves.
4. When checking the 3 bushings in there, is it obvious if they should be replaced? I didn't order them, and figured I'd check them and order if needed.
5. Should I consider a new spring for the secondary? I'm not an off trail rider, and at 44, I'm not nuts either. Just enjoy a nice day on the trails, but I like to grab a whole lot of throttle when I can. :)

Thanks for the tips!
 

Good video ! You have most of the correct info. I'm not a clutch guy but have installed 2 Ulmer kits . Make sure you take a black marker and mark the clutch and spring pockets so it all goes back together the same. I would replace the spring with a new one. I would replace the 3 buttons with new ones and clean and polish all the ramps on the helix . Then just a good cleaning and make sure you wind it correctly like in the video and you good to go! I have been told that the Yamaha belt should ride basically even with the top of the sheaves. If its to low then add washers to the three 10mm screws on the back of the clutch and then see where it sits.

I'm sure other people will fill in all the blanks !
 
Thanks. Looking to confirm how it all comes apart. I think I have it right, but want to be sure. And the video mentioned the spring settings, but I wasn't sure if they are ALWAYS that way, or it's different for an Attak, or different if you change the spring. And I have no idea about changing the spring. Just buy a new one from Yamaha, or is there a better option, like I did with the primary using the BOP soft start spring.
 
I'm on my last (can't believe I just wrote that!) project for my Attak, and this I consider general maintenance. LOL.

Anyway, I want to service the secondary, as I have no idea when it was last touched, if at all. The belt sits low in the sheaves (about 2-2.5mm below top), so clutch sheaves could be binding causing it to sit low, or the shims could be wrong. Measured the belt (it's pretty new) and it's right at the new belt width of about 35mm. I have 3 each of the 0.5 and 1mm shims, as I don't know what is already in there.

Anyway, I will be replacing the buttons (ramps), shimming if I need to, but I also want to clean it all up of any dust and crap causing it possibly to bind, and check the bushings. I found a TY video on updating the spring, so that taught me how to remove the helix to get to the buttons. But I still have a few questions and the service manual didn't really answer them. So hoping you guys could help.

1. Is that the only spring (behind the helix)? Meaning, is that the only place I need to worry about spring pressure causing things to fly apart, when I remove those 3 bolts on the helix front?
Yes, there is only 1 spring behind the helix. There is spring pressure and you will need to hold the helix towards the clockwise twisting position so it doesn;t pop on you.

2. I will pay attention to the helix spring hole locations but in case it pops out on me and I can't tell, what are the settings for the Attak for the spring, is it 6 on the clutch and 1 on the helix? I found a mention of that, but nothing to confirm it. I did install the soft start primary spring from BOP, but my understanding is that doesn't change anything on the secondary holes.
Yes, 6-1. Primary spring won't change secondary spring pressure.

3. To separate the sheaves for cleaning and bushing inspection, I have to pull the clutch from the sled, correct? My understanding is it is the 3 bolts in the back, where you would also shim it, that need to be removed to separate the two sheaves.
The 3 bolts in the back are to adjust your belt tension. The more washers on the bolts make the belt ride higher in the secondary.
The sheaves will need to come off of the sled and that is just by the main bolt holding the clutch on. (When removing the clutch, make sure the shims behind the clutch on the secondary shaft go back on if they come off with the secondary. That regulates your clutch offset)


4. When checking the 3 bushings in there, is it obvious if they should be replaced? I didn't order them, and figured I'd check them and order if needed.
The ramps should have little wear to some wear. Check to see if they are cracked or really worn. I usually replace if I am working on someone's sled cause they do wear pretty fast.

5. Should I consider a new spring for the secondary? I'm not an off trail rider, and at 44, I'm not nuts either. Just enjoy a nice day on the trails, but I like to grab a whole lot of throttle when I can. :)
No needed if the spring looks good and doesn't appear to have damage.

Thanks for the tips!
 
Thank you so much! NOS-PRO. A couple of clarifications.

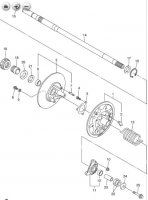
In #4, when I mentioned bushings, I didn't mean the ramps/buttons. Those will definitely get replaced. I'm talking about the metal bushings in the shafts and stuff. I've read there are 3 total that might need replacing. Edit: Clarification. 2 metal bushings in secondary, a 1 in the primary. I'm not opening up the primary...at least I don't plan to...the ones I'm talking about are parts 6 and 12 in the attached diagram.

And lastly, I've had the secondary off before, so no worry there. But how do the actual sheaves separate? What holds them together? It's not the main bolt, and I don't think it's the 3 helix bolts. I think you were saying it's not the shim bolts in the back...

secondary.JPG
 
I'm on my last (can't believe I just wrote that!) project for my Attak, and this I consider general maintenance. LOL.

Anyway, I want to service the secondary, as I have no idea when it was last touched, if at all. The belt sits low in the sheaves (about 2-2.5mm below top), so clutch sheaves could be binding causing it to sit low, or the shims could be wrong. Measured the belt (it's pretty new) and it's right at the new belt width of about 35mm. I have 3 each of the 0.5 and 1mm shims, as I don't know what is already in there.

Anyway, I will be replacing the buttons (ramps), shimming if I need to, but I also want to clean it all up of any dust and crap causing it possibly to bind, and check the bushings. I found a TY video on updating the spring, so that taught me how to remove the helix to get to the buttons. But I still have a few questions and the service manual didn't really answer them. So hoping you guys could help.

1. Is that the only spring (behind the helix)? Meaning, is that the only place I need to worry about spring pressure causing things to fly apart, when I remove those 3 bolts on the helix front?
*Yes, there is only one spring behind the helix, it is a torsion spring, so when you take the 3 nuts off to remove it, the helix will be under torsion but shouldn't fly off, you have to counteract the torsion by hand somewhat and pull the helix out and over the mounting studs. I find it best to do this with the secondary on the sled with the e-brake on, to prevent rotation. Similarly, when putting the helix back on it will take some armstrong torsion to rotate the helix to line up the 3 holes over the studs, do this on the sled.
2. I will pay attention to the helix spring hole locations but in case it pops out on me and I can't tell, what are the settings for the Attak for the spring, is it 6 on the clutch and 1 on the helix? I found a mention of that, but nothing to confirm it. I did install the soft start primary spring from BOP, but my understanding is that doesn't change anything on the secondary holes.
*On the Attak, I believe the stock twist angle is 60 degrees or hole 3+3 combination. Some go with 6+1 (70 degree twist) but would start out at 3+3. The stock spring should have a white paint mark on it if i recall correctly.
3. To separate the sheaves for cleaning and bushing inspection, I have to pull the clutch from the sled, correct? My understanding is it is the 3 bolts in the back, where you would also shim it, that need to be removed to separate the two sheaves.
*Once the helix is off, the clutch can be separated, the bolts on the back are only stops for the sheaves in order to set the belt height in the secondary. The shims or washers for these stops are installed or removed from under the head of these 3 bolts and are adjusting the location of the stops. The ends of the bolts bottom on a metal plate to the back of one of the sheaves, you will see this once separated.
4. When checking the 3 bushings in there, is it obvious if they should be replaced? I didn't order them, and figured I'd check them and order if needed.
*The bushings are fairly robust and do not wear significantly, unless this is and extreme high mileage sled, they should be fine. Check for excessive wobble or slop where the bushing slides, use your best judgment, I think they can be a pain to change out with out.
5. Should I consider a new spring for the secondary? I'm not an off trail rider, and at 44, I'm not nuts either. Just enjoy a nice day on the trails, but I like to grab a whole lot of throttle when I can.
* I would refresh the spring (stock) as well as the ramp buttons so you have a clean point. Do not buy anything but Yamaha secondary ramp buttons, they wear like iron. Simply grab them with vice grips and twist/pull them out, the new ones just tap into the hole/pocket with a soft face hammer or similar.

Edit: Looks like NOS-PRO was replying at the same time and beat me to most of the points, Cheers.
Thanks for the tips!
 
Thank you so much! NOS-PRO. A couple of clarifications.

In #4, when I mentioned bushings, I didn't mean the ramps/buttons. Those will definitely get replaced. I'm talking about the metal bushings in the shafts and stuff. I've read there are 3 total that might need replacing. Edit: Clarification. 2 metal bushings in secondary, a 1 in the primary. I'm not opening up the primary...at least I don't plan to...the ones I'm talking about are parts 6 and 12 in the attached diagram.

And lastly, I've had the secondary off before, so no worry there. But how do the actual sheaves separate? What holds them together? It's not the main bolt, and I don't think it's the 3 helix bolts. I think you were saying it's not the shim bolts in the back...

View attachment 130679

You are very welcome ;)!

The bushings are in the helix and the moveable secondary sheave. The moveable sheave will wobble a lot if the bushing is worn (but assemble the clutch together with the helix, minus spring and see if there is a lot of slop. Replace the moveable sheave bushing if really sloppy.

With the secondary off of the sled..... the secondary will come apart when you remove the helix and spring. I work on clutching all the time (in fact working on a guys secondary today). I try to keep the balancing dimple marks towards each other as close as i can when putting back together.

Oh, when I have a really dusty and dirty clutch....I have the casting areas bead blasted with just enough air pressure to remove the dirt, not material. I don't bead blast the sheave faces, I use scotchbrite on those.
 
the 3 helix nuts hold the sheaves together its not a difficult thing and it don't fly apart in fact when you remove the nuts you will prolly have to still twist and pull to get it helix off. I fin it easies to remove the helix while the clutch is still on the sled. I set the parking brake so it wont move and then I can twist and pull off the helix.
 
Thanks guys! Much appreciated. I'm armed with the knowledge to get this done now. And yes, I have Yamaha OEM ramps. Not sure if I needed to replace them, but figured why not, start fresh. Sled has 7900 miles, so sounds like I should just do the spring as well.

When adding the shims to the bolts on the back of the clutch, I do have to slide it out to get at them correct? Not enough room to do it without removal? Just thinking, trial and error, to add a shim, put it all back together, check, etc., and if not right, remove it all again to add another shim, or thinner one...Or maybe just loosely put the secondary center bolt on, not fully torqued, just to check belt height. I'm shooting for flush with the top of the sheaves.

Last question - for the spring, we have a vote for 6-1, and then 3-3. I looked in service manual and unless I'm missing it, don't see what stock is. But what difference does this make? Always wondered that.
 
3-3= 60 degrees wrap on the spring.
6-1= 70 degrees wrap on the spring.

the more wrap on the spring equals faster backshift. backshift is kind of how you set the sled for how you drive it. most are set at 60 from factory. i prefer more backshift so mine is set at 70 for better deep snow performance and snap for corner to corner in the trails.
 
When adding or removing shims it is easier to pull the secondary off, so pull the belt, take the main bolt out and pull secondary off.
I have found it is best to judge where the belt is riding (high or low) in the secondary is after running under load on the trail rather than on the stand, the belt and secondary do not behave the same freewheeling vs under load.
Ideally the belt should finish about 1.0-1.5mm above the sheaves per my service manual.
 
This is the clutch I am working on right now and want to inform everyone on the flash issues that Yamaha has not addressed on some secondary clutches that are really causing lots of problems.

Notice all of the belt dust and residue from belt slippage in pics 1,2,3

Pics 4,5,6 are after blasting and cleaning.

Pics Flash, Flash1 and flash2 are areas of concern everyone needs to address on their Yamaha clutch if they are having problems with belt slipping and poor top end performance. Notice the flash that is keeping the towers from returning back to the position they are suppose to be, the "mushroomed over" flash that the tower has repeatedly hit and flash inside the clutch which is a personal "finger cut" nuisance to me.
1.jpg
2.jpg
3.jpg
4.jpg
5.jpg
6.jpg
Flash.jpg
Flash1.jpg
Flash2.jpg
 
NOS-PRO: I can see your concerns, so are you filing or grinding off this flash in all areas of the secondary? I would think that in areas that are interfering with the clutch/helix movement would be a must as you mention.
The one pic at first glance appears to be a significant gaping crack in the sheave, however after closer inspection appears to be upstanding aluminum flash from a defect in the casting die, and the molten aluminum getting pushed into the cracks in the die.

Having worked with aluminum casting dies/molds in the past, hairline or spider cracks in die/mold tool steel are fairly common due to constant heat cycling, and this is why we see evidence of flash lines in many areas of the sheaves, but in reality is not a defect, up to a point. That amount of upstanding flash would indicate a fairly serious crack in that die.

In my experience, general practice after a given number of casting shots, the die steels or inserts are repaired or replaced, some areas look pretty mangled. This could be attributed to the quality level of tool steel in Asia, or lack of casting die PM, that in some cases is not up to standard compared with North America. I suspect the casting dies have been around for many years since the Apex clutch design has been pretty much the same, so the casting dies could be getting tired.
Cheers,
Apexallday!


Back
Top