revster
TY 4 Stroke God
- Joined
- Aug 18, 2004
- Messages
- 1,752
- Location
- La Salle MB
- Country
- Canada
- Snowmobile
- 2009 Yamaha Nytro RTX SE
moab11 said:did you press the drivers on yourself? or did you buy the axle from Allen?
Trying to decide which way to go myself here for the back country track on my xtx.
Jeff
I got the entire axel from Allen with the drivers already on it. I liked that idea because I have the stock sitting here which I can sell or put back on the sled. I figured that was the way to go with the price he offers them at.


moab11
Lifetime Member
- Joined
- Feb 4, 2010
- Messages
- 424
- Location
- Thunder Bay, Ontario
- Country
- Canada
- Snowmobile
- 2016 SKS 155
Sounds good, thanks!
revster
TY 4 Stroke God
- Joined
- Aug 18, 2004
- Messages
- 1,752
- Location
- La Salle MB
- Country
- Canada
- Snowmobile
- 2009 Yamaha Nytro RTX SE
I am a little delayed waiting on parts so I though I would turn my attention towards something I could work on...my windshield.
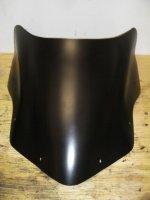
I hit a rock last winter and flipped her. Thanks to my Roest plate the damage was limited to some bar switches and my windshield. The top 3" had some deep gouges in it that made it look like junk.
The pic below will show the steps I took
I sanded it down with 400 grit paper.
Marked my line
Cut it with a dremel
Then 3 light coats with Krylon fusion black satin.
I'm going to sand it down again in a week and put another 3 coats on, then put the trim back on. So this is not a finished product yet.
Attachments
revster
TY 4 Stroke God
- Joined
- Aug 18, 2004
- Messages
- 1,752
- Location
- La Salle MB
- Country
- Canada
- Snowmobile
- 2009 Yamaha Nytro RTX SE
I have several packages on the way! I think all I have left to order is some odds and ends from Port Yamaha and decide on a clutch kit. Boss Performance is not getting back to me, so I'm not sure if they are still operational or not. So I contacted Schmidt Bros and Chris got back to me within hours. I am likely going to buy a Schmidt Bros kit at this point.
I did some work last night and decided to let some of the air out of my Fox Floats to see if there was still oil in the air, and there was. A lot of oil clogged up the pump and there was even a small puddle on the floor. So I'm thinking they will need some new seals installed in them.
While I'm waiting on parts I continued work on the plastic. I sanded down the first coat of black with some 600 grit paper and they are ready to be painted again. I should be able to get to that this weekend.
Dimebag
TY 4 Stroke God
Did you ever turbo that thing? I seem to remember that we had a chat about the mcx180 kit once..
Windscreen looks nice dude, did you use regular spray paint?
Windscreen looks nice dude, did you use regular spray paint?
revster
TY 4 Stroke God
- Joined
- Aug 18, 2004
- Messages
- 1,752
- Location
- La Salle MB
- Country
- Canada
- Snowmobile
- 2009 Yamaha Nytro RTX SE
Dimebag said:Did you ever turbo that thing? I seem to remember that we had a chat about the mcx180 kit once..
Windscreen looks nice dude, did you use regular spray paint?
Nope, no turbo. But I think you are right about the conversation. I plan to have a turbo someday but unfortunately that day won't be this year. I'm still hoping that Yamaha will have a factory turbo in a 144" cross over sled in the next generation.
The spray paint is Krylon Fusion paint for plastic. I've used it in the past with good results. So I'm hoping it sticks to Yamaha Plastic as well as it did to doo.
Dimebag
TY 4 Stroke God
Ok,
After looking at the pics of your windscreen Im considering to paint mine too.. Its silver, (with some scratches) but i think matte black would be better looking.
After looking at the pics of your windscreen Im considering to paint mine too.. Its silver, (with some scratches) but i think matte black would be better looking.
welterracer
TY 4 Stroke God
Sweet sled
revster
TY 4 Stroke God
- Joined
- Aug 18, 2004
- Messages
- 1,752
- Location
- La Salle MB
- Country
- Canada
- Snowmobile
- 2009 Yamaha Nytro RTX SE
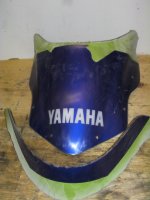
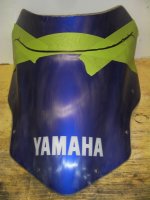
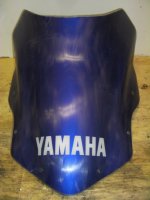
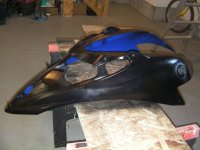
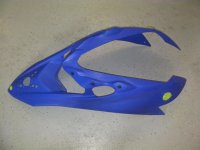
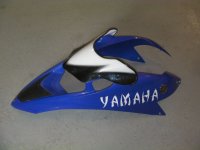
Some pics of painting the hood. I used the same process I did on the windshield...
Sanded with 400 grit
cleaned it
3 light coats of gloss black
let it dry for over a week
sanded it with 600 grit
cleaned it
3 light coats of black satin
I'll probably still clear coat it
I switched to satin from gloss because it was looking so good on the windshield.
Sanded with 400 grit
cleaned it
3 light coats of gloss black
let it dry for over a week
sanded it with 600 grit
cleaned it
3 light coats of black satin
I'll probably still clear coat it
I switched to satin from gloss because it was looking so good on the windshield.
Attachments

revster
TY 4 Stroke God
- Joined
- Aug 18, 2004
- Messages
- 1,752
- Location
- La Salle MB
- Country
- Canada
- Snowmobile
- 2009 Yamaha Nytro RTX SE
revster
TY 4 Stroke God
- Joined
- Aug 18, 2004
- Messages
- 1,752
- Location
- La Salle MB
- Country
- Canada
- Snowmobile
- 2009 Yamaha Nytro RTX SE
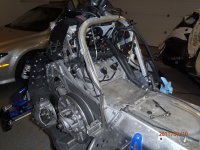
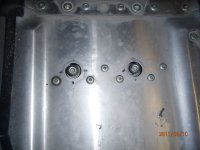
When I popped off the rubber caps that are located under the fuel tank to expose the bolts that hold the header bracket in place I saw my nemesis, the button headed allen bolts! I hate these things they always strip on me. So I fired up the propane torch, got under the machine and heated up the nut on the bottom.... then they came off like nothing.
Attachments
revster
TY 4 Stroke God
- Joined
- Aug 18, 2004
- Messages
- 1,752
- Location
- La Salle MB
- Country
- Canada
- Snowmobile
- 2009 Yamaha Nytro RTX SE
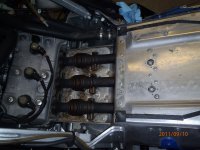
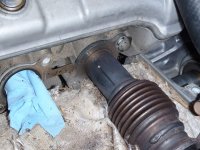
So things were going really well. The flex pipes were coming out very easy. I got right down to the final nut holding them to the engine and I pulled on the wrench and it moved easy. Then I realized the nut hadn't moved 
I stripped the last bolt. I tried a couple of other things and only made it worse. So I decided to walk away and sleep on it to figure out my next move.
I may have to sacrifice the flex pipe by cutting it free, then removing the lower part of the heat shield so I can make some room to work on it.
If anyone has a suggestion please fire away, I'd love to hear some ideas to solve this, thanks.
The lower one.....
Attachments
put some heat to it then use vise grips. or put the heat to it and use a six piont socket.
revster
TY 4 Stroke God
- Joined
- Aug 18, 2004
- Messages
- 1,752
- Location
- La Salle MB
- Country
- Canada
- Snowmobile
- 2009 Yamaha Nytro RTX SE
smoothride said:put some heat to it then use vise grips. or put the heat to it and use a six piont socket.
Thanks
I did try vice grips. I can't really get a good grip on it because of the tight space. I put some heat on it. But I was reluctant to heat the engine up too much. (in one spot)
The six point I will try, but I don't think I can get one in there right now, but maybe after I make some room.
moab11
Lifetime Member
- Joined
- Feb 4, 2010
- Messages
- 424
- Location
- Thunder Bay, Ontario
- Country
- Canada
- Snowmobile
- 2016 SKS 155
have you tried a damaged bolt extractor with some heat? I know Canadian tire has a set that goes on sale constantly and should have a size big enough for the head of that bolt. The nice thing about them is that the harder you crank on the socket, the harder it bites into the bolt.
Just like this: http://www.canadiantire.ca/AST/browse/6 ... ?locale=en
Just like this: http://www.canadiantire.ca/AST/browse/6 ... ?locale=en
Similar threads
- Replies
- 4
- Views
- 5K
- Replies
- 0
- Views
- 929
- Replies
- 9
- Views
- 3K
-
This site uses cookies to help personalise content, tailor your experience and to keep you logged in if you register.
By continuing to use this site, you are consenting to our use of cookies.