revster
TY 4 Stroke God
- Joined
- Aug 18, 2004
- Messages
- 1,752
- Location
- La Salle MB
- Country
- Canada
- Snowmobile
- 2009 Yamaha Nytro RTX SE
MotoPsycho said:revster said:MotoPsycho said:Nice white windscreen... where'd ya get that?
I traded some sucker one of those crappy silver ones for this sweet white one.
Well... that was just mean spirited and hurtful...:D")
revster
TY 4 Stroke God
- Joined
- Aug 18, 2004
- Messages
- 1,752
- Location
- La Salle MB
- Country
- Canada
- Snowmobile
- 2009 Yamaha Nytro RTX SE
Well nothing even worthy of a pic tonight but still important stuff. I peeled the side skirt plastic off as well as front plastic and bumper. Then gave her a good inspection looking for wire rubs and such. Just tied the PCV harness back a bit and that was it.
I also pulled my front shox. I have a ton of oil in the air chamber so they are going in for a rebuild and seal kit. I've heard the seal kit isn't cheap.
I also pulled my front shox. I have a ton of oil in the air chamber so they are going in for a rebuild and seal kit. I've heard the seal kit isn't cheap.


sorenson1610 said:revster said:sorenson1610 said:rlcofmn said:I guess I need to get out more and explore the other Forums more, I just found this thread.
Looks good!!!! For the heat shield what I have done is 2" header wrap with high temp silicone for adhesive. Like 4-5 rows of that and its done, then use the silicone to seal up the edges to keep it from fraying or anything. It held up very well last year. I know Nikolai did something similar but then covered it in foil tape if I remember right.
Keep it up!!! Sick sled as always.!")
Is the fabric heat shield necessary? When I took mine apart it was still in tack but looked pretty ratty.
Yeah I'm not sure. Mine is pretty ratty as well and full of crap. The thing is a fire hazard if you ask me. But I have to think it's there for a reason...hehe
Yeah I'm sure its there for a reason but its back together and I don't think mines that bad. And it will be soon enough it will be back apart for the copper donut treatment.
ummm no comment
use your discretion. But I have seen what they look like after the clamps have came off so you have hot exhaust blowing in there with all the insulation destroyed from the exhaust.revster
TY 4 Stroke God
- Joined
- Aug 18, 2004
- Messages
- 1,752
- Location
- La Salle MB
- Country
- Canada
- Snowmobile
- 2009 Yamaha Nytro RTX SE
I've got 7 new boxes full of sled mod goodness just waiting! So now things will start to pick up for me.
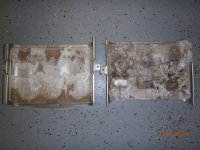
Last night I wanted to deal with the heat shield. The heat insulation in mine was shot and in some places the bare metal was showing, not much heat being shielded.
So now things will start to pick up for me.Last night I wanted to deal with the heat shield. The heat insulation in mine was shot and in some places the bare metal was showing, not much heat being shielded.
Attachments
revster
TY 4 Stroke God
- Joined
- Aug 18, 2004
- Messages
- 1,752
- Location
- La Salle MB
- Country
- Canada
- Snowmobile
- 2009 Yamaha Nytro RTX SE
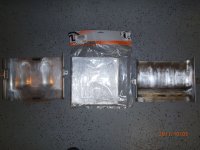
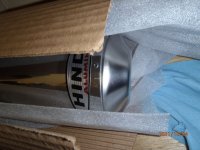
I got my hands on some Moose Racing heat shield with my annual Royal Distributing order, cleaned up the metal then stuck it on like a sticker. I was really impressed with how well it stuck. Hopefully it will continue to stick when it gets hot.
This is the stuff stuck on the bottom of the fuel tank. Not likely as much heat protection as the factory shield when it was new, but more then it has in it's current condition.
This is the stuff stuck on the bottom of the fuel tank. Not likely as much heat protection as the factory shield when it was new, but more then it has in it's current condition.
Attachments

revster
TY 4 Stroke God
- Joined
- Aug 18, 2004
- Messages
- 1,752
- Location
- La Salle MB
- Country
- Canada
- Snowmobile
- 2009 Yamaha Nytro RTX SE
Last night was a good night in the shop and my buddy came over and got some work done on his sled.
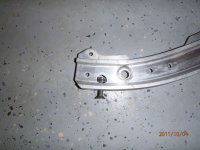
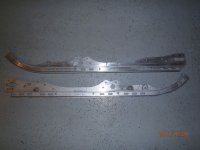
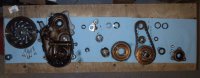
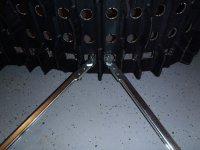
I got a used set of rails from LANEO so I needed to strip them down, fit the OFT extensions to them and then I did one little mod to them.
I drilled a hole sideways thru the rail where the slider screw threads are. This allows me to slide a nut in there. We did this to a buddy's rails last year after his threads were stripped. I did not want to have to drill thru powder coated rails if it happened to mine so I did it now, before coating.
...I would have liked to square the hole up at the bottom but my dremel was not cooperating with that plan, so I had one of those "aw screw it" moments.
Attachments
revster
TY 4 Stroke God
- Joined
- Aug 18, 2004
- Messages
- 1,752
- Location
- La Salle MB
- Country
- Canada
- Snowmobile
- 2009 Yamaha Nytro RTX SE

raginyamaha
TY 4 Stroke Master
doing a full system, eliminating doghnuts??
revster
TY 4 Stroke God
- Joined
- Aug 18, 2004
- Messages
- 1,752
- Location
- La Salle MB
- Country
- Canada
- Snowmobile
- 2009 Yamaha Nytro RTX SE
rxrider
Jan-Ove Pedersen
- Joined
- Apr 25, 2003
- Messages
- 7,355
- Age
- 60
- Location
- Lakselv - 70N & 25E
- Country
- Norway
- Snowmobile
- 2014 Phazer XTX, 2013 Phazer RTX, 2008 Apex RTX, 2007 Warrior, 2006 Attak
Nice build revster ")
revster
TY 4 Stroke God
- Joined
- Aug 18, 2004
- Messages
- 1,752
- Location
- La Salle MB
- Country
- Canada
- Snowmobile
- 2009 Yamaha Nytro RTX SE
revster
TY 4 Stroke God
- Joined
- Aug 18, 2004
- Messages
- 1,752
- Location
- La Salle MB
- Country
- Canada
- Snowmobile
- 2009 Yamaha Nytro RTX SE
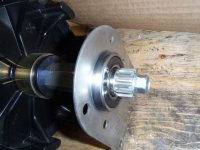
New drive shaft bearing on PTO side.
I'm still not 100% on where this bearing is supposed to sit on the shaft. I moved it in board a couple mms from where it was last year as my track was not perfectly centered. Traditionally what I have done is put the chain case together then tighten the set screw afterwards so the chaincase dictates where the bearing sits. I will likely do that again unless someone can lay some insight on me.
I'm still not 100% on where this bearing is supposed to sit on the shaft. I moved it in board a couple mms from where it was last year as my track was not perfectly centered. Traditionally what I have done is put the chain case together then tighten the set screw afterwards so the chaincase dictates where the bearing sits. I will likely do that again unless someone can lay some insight on me.
Attachments
revster
TY 4 Stroke God
- Joined
- Aug 18, 2004
- Messages
- 1,752
- Location
- La Salle MB
- Country
- Canada
- Snowmobile
- 2009 Yamaha Nytro RTX SE
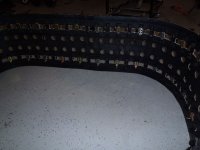
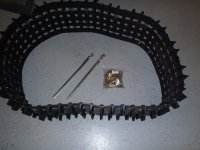
Next I went after my missing track clips. Armed with my new track clips tool and a big bag of clips, I ended up adding 29 clips to keep it clipped every second as it came.
There are still some damaged clips on the track. As of right now I'm leaning towards leaving them on and replacing them as they come off. Just to avoid the PITA job of cutting them off.
There are still some damaged clips on the track. As of right now I'm leaning towards leaving them on and replacing them as they come off. Just to avoid the PITA job of cutting them off.
Attachments
revster
TY 4 Stroke God
- Joined
- Aug 18, 2004
- Messages
- 1,752
- Location
- La Salle MB
- Country
- Canada
- Snowmobile
- 2009 Yamaha Nytro RTX SE
I'm stuck on the jackshaft bearing. I removed the shaft from the sled and the clips that retain it.. However I can't get the bearing and housing off the shaft. I'm thinking it might be a press fit, but not sure. I'd love some help from someone that has done it.
rxrider
Jan-Ove Pedersen
- Joined
- Apr 25, 2003
- Messages
- 7,355
- Age
- 60
- Location
- Lakselv - 70N & 25E
- Country
- Norway
- Snowmobile
- 2014 Phazer XTX, 2013 Phazer RTX, 2008 Apex RTX, 2007 Warrior, 2006 Attak
When installing the driveshaft, this is how I do it.
With the shaft installed into the chaincase. Install the speedo side bearing and bearing cup, but do not tighten the set screws on the bearing. Install the chaincase gears and stuff, tighten down the bolt holding the gears to the shaft. Now, the drive shaft is set and cannot move. Tighten down the set screws. Remember, when you tighten down the bolt holding the gears in place inside the chain case you will pull the shaft over to the right, if the speedo side bearing is already installed you will put a lot of stress on the speedo side bearing. If the set screws don't give way the bearing will prematurely fail because of the pulling force on the bearing. See what I'm saying.
With the shaft installed into the chaincase. Install the speedo side bearing and bearing cup, but do not tighten the set screws on the bearing. Install the chaincase gears and stuff, tighten down the bolt holding the gears to the shaft. Now, the drive shaft is set and cannot move. Tighten down the set screws. Remember, when you tighten down the bolt holding the gears in place inside the chain case you will pull the shaft over to the right, if the speedo side bearing is already installed you will put a lot of stress on the speedo side bearing. If the set screws don't give way the bearing will prematurely fail because of the pulling force on the bearing. See what I'm saying.
Similar threads
- Replies
- 4
- Views
- 5K
- Replies
- 0
- Views
- 929
- Replies
- 9
- Views
- 3K
-
This site uses cookies to help personalise content, tailor your experience and to keep you logged in if you register.
By continuing to use this site, you are consenting to our use of cookies.