customnytromtx69
Pro
So last march I had the opportunity to purchase an insurance wrote off 2018 BTX. This would be my third sidewinder as I currently had a 2017 MTX162" and a 2019 SRX both are td multi map tuned and a LONG list of aftermarket parts on both. To properly premise this post and credit TD both sleds have ran flawlessly and dead reliable but for this one I wanted something different and something that had more capacity to be user tuned . I contacted MCX and decided to go with their stage 4 kit with their new header . The kit made 430hp with the stock exhaust manifold on 110 octane, my plan was to run the kit on straight VP C16 and with the new header should easily make 450hp. Mcx did not have all the required upgraded engine parts in stock at the time so I purchased the kit without and decided to take a slightly different route than mcx did. Heres the good bad and the ugly of the build.
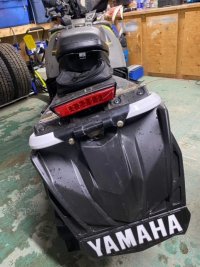
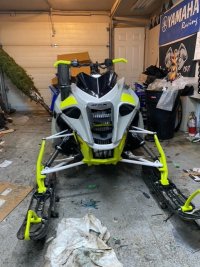
Purchased the sled after a quick glance at the damage, tunnel was bent, buckled and kinked , bumper was bent down , intercooler pierced and intercooler shroud bent, running board braces snapped etc etc etc . The engine started and ran fine with no leaks ,front end and a arms were straight. I knew I had a decent base to start from. I ordered multiple tunnels through partzilla but trying to get full length one shipped was a headache and my local dealers prices were insane so i ended up finally getting a 17 mtx front and rear tunnel halves through partzilla as well as the small braces and few other parts . I ordered BM fab burly boards in polaris lime squeeze as well as Itek bumper in the same color as well as cr racings lightweight hood to start the build . I then ordered Tki drop and roll chaincase kit ,2018 MTX (longer) chaincase, 24/38 gearing, 2019 LTX GT green nosecone,
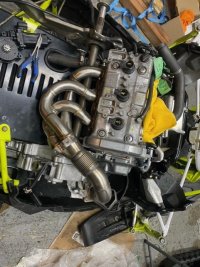
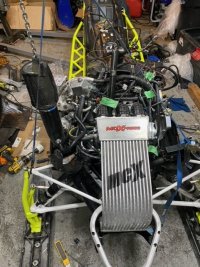
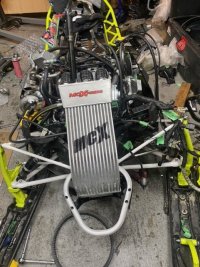
I then ordered the kit from MCX minus the engine internals and with their digital display and datalogging module. The kit consists of a borgwarner efr 7163 turbo , their own intercooler, fuel surge tank and high flow fuel pump, oil tank that now sits under the intercooler, muffler, mcx gen5 efi box, new header, fuel lines, boost tubes, oil lines, heat shields as well as everything else to make this kit work.
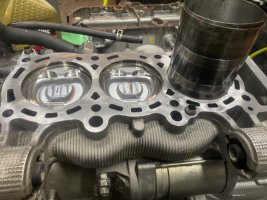
My engine build consisted of CP 8.5 comp pistons, Carillo rods, arp2000 head studs, kibblewhite valve springs and shim in bucket tappets, cometic MLX.035 head gasket , hurricane 500hp timing chain, manual timing chain tensioner, all new main and rod bearings which was a pain because I couldnt find anywhere online what number yamaha standard Carillo machined the big end of the rods to. For anyone else doing this type of build mine where machined to a 6 . I ordered a full set of rods bearings and sized them all from there .
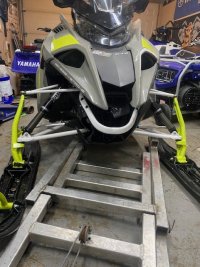
Parts started to arrive and I got to work. I have to say everything was pretty straight forward but the tki drop and roll kit to get the 2018 MTX chaincase to fit the 2017 tunnel removed more material than i would have liked but i did manage to get it all to work ok. I finished the chassis build everything came together straight and well with no hiccups. A large inventory of small head and Large head multi grip rivets and a air rivet gun are essential in doing this amount of chassis work.
With the chassis completed I started on the engine, i had preordered all the required seals and crankcase bolts long before i ordered the engine parts. I built the engine myself and leaned on the looser side of the stock specs with the piston ring end gaps as this engine is going to be running 32+ psi of boost. Regards to the crank and crank rod bearing clearances i went with the stock original size for the crank and right down the middle on the rod to crank clearances. Everything was heavily coated in peratex engine assembly lube and everything was spun by hand at every stage to insure no binding. Arp studs were red locitited and installed to bottom and then backed off 1/2 turn with the stud at the water pump installed to a depth of 82mm from deck height. Studs , washers and nuts all coated in arp assembly lube and torqued in three steps to 35lbs and then brought up in 5ft lbs increments to 60ft lbs, then each one backed off 1/2 a turn and retorqued to 60ftlbs. Timing this engine was a B*tch. I followed the procedure in the manual and would end up off one tooth on the intake side everytime, Yamaha tech academy has a video on youtube watched that and had same results. SXS blog has a video building a Yxz engine and followed their procedure and would end up off one tooth on the exhaust cam everytime SOOOO i sorta used alittle bit of A and little of B as well as zip tieing the chain to the cam gears when i placed them and finally that kept all the slack on the tensioner side so i could tension up the new tensioner without either one skipping before chain was tensioned properly.
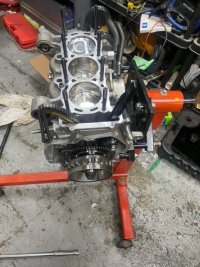
Installed the engine in the chassis an started with the mcx side of the build. it says to install the oil tank before the engine and it was a NO GO it was much easier to install the engine remove the water neck on the head and then install the new oil tank. I also need to mention the new oil nipple for the bottom of the engine requires both the stock o ring to be put on first and then the one mcx supplies if not it will leak. When installing the new fuel surge tank it is very important to ensure you have adequate clearance for the steerings for full lock to lock if not it will hit the tank. I also recommend marking all pressure lines and electrical connections prior to disassembly makes it much easier to reassemble months later.
Turbo install was pretty straight forward , I pre oiled the bearings before assembly and bolted the turbo to the bracket and installed it as per mcx instructions. everything from there fit as it should and it went together quickly again more so because i had everything marked beforehand.
I filled the oil tank and coolant system ( find the bleeding procedures on here and yes its a B*tch) fired up and heat cycled the engine a couple times.
My stm clutch showed up just as it as getting it ready to test so bolted it up and took it out for the first spin, no issues at all varying engine rpm and keeping boost below 20psi which on this turbo happens SOOOOO fast . The next day I took it would again after checking all fluids and for leaks out for about an hour just running it through all its rpm range in very short bursts. The third test was the following week after dialing in the clutching way heavier and trying to figure out an oddball coolant system getting pressurized issue. I'll say this compared to my srx and mtx HOLY this thing goes from 3 psi to 32 psi in a hurry the engine spools up so fast its insane. The turbo is very linear and just pulls like there is no tomorrow , little to no lag and such fast spool up . I would feel 100 percent confident that if i added turbo water cooling i would trail ride this thing everyday if i could afford the fuel LOL . I am goin back into the sled this week to deal with some leaks that have developed and few suspension tweaks and clutching changes as drag racing season is now upon us but i will continue to update as i can.
Purchased the sled after a quick glance at the damage, tunnel was bent, buckled and kinked , bumper was bent down , intercooler pierced and intercooler shroud bent, running board braces snapped etc etc etc . The engine started and ran fine with no leaks ,front end and a arms were straight. I knew I had a decent base to start from. I ordered multiple tunnels through partzilla but trying to get full length one shipped was a headache and my local dealers prices were insane so i ended up finally getting a 17 mtx front and rear tunnel halves through partzilla as well as the small braces and few other parts . I ordered BM fab burly boards in polaris lime squeeze as well as Itek bumper in the same color as well as cr racings lightweight hood to start the build . I then ordered Tki drop and roll chaincase kit ,2018 MTX (longer) chaincase, 24/38 gearing, 2019 LTX GT green nosecone,
I then ordered the kit from MCX minus the engine internals and with their digital display and datalogging module. The kit consists of a borgwarner efr 7163 turbo , their own intercooler, fuel surge tank and high flow fuel pump, oil tank that now sits under the intercooler, muffler, mcx gen5 efi box, new header, fuel lines, boost tubes, oil lines, heat shields as well as everything else to make this kit work.
My engine build consisted of CP 8.5 comp pistons, Carillo rods, arp2000 head studs, kibblewhite valve springs and shim in bucket tappets, cometic MLX.035 head gasket , hurricane 500hp timing chain, manual timing chain tensioner, all new main and rod bearings which was a pain because I couldnt find anywhere online what number yamaha standard Carillo machined the big end of the rods to. For anyone else doing this type of build mine where machined to a 6 . I ordered a full set of rods bearings and sized them all from there .
Parts started to arrive and I got to work. I have to say everything was pretty straight forward but the tki drop and roll kit to get the 2018 MTX chaincase to fit the 2017 tunnel removed more material than i would have liked but i did manage to get it all to work ok. I finished the chassis build everything came together straight and well with no hiccups. A large inventory of small head and Large head multi grip rivets and a air rivet gun are essential in doing this amount of chassis work.
With the chassis completed I started on the engine, i had preordered all the required seals and crankcase bolts long before i ordered the engine parts. I built the engine myself and leaned on the looser side of the stock specs with the piston ring end gaps as this engine is going to be running 32+ psi of boost. Regards to the crank and crank rod bearing clearances i went with the stock original size for the crank and right down the middle on the rod to crank clearances. Everything was heavily coated in peratex engine assembly lube and everything was spun by hand at every stage to insure no binding. Arp studs were red locitited and installed to bottom and then backed off 1/2 turn with the stud at the water pump installed to a depth of 82mm from deck height. Studs , washers and nuts all coated in arp assembly lube and torqued in three steps to 35lbs and then brought up in 5ft lbs increments to 60ft lbs, then each one backed off 1/2 a turn and retorqued to 60ftlbs. Timing this engine was a B*tch. I followed the procedure in the manual and would end up off one tooth on the intake side everytime, Yamaha tech academy has a video on youtube watched that and had same results. SXS blog has a video building a Yxz engine and followed their procedure and would end up off one tooth on the exhaust cam everytime SOOOO i sorta used alittle bit of A and little of B as well as zip tieing the chain to the cam gears when i placed them and finally that kept all the slack on the tensioner side so i could tension up the new tensioner without either one skipping before chain was tensioned properly.
Installed the engine in the chassis an started with the mcx side of the build. it says to install the oil tank before the engine and it was a NO GO it was much easier to install the engine remove the water neck on the head and then install the new oil tank. I also need to mention the new oil nipple for the bottom of the engine requires both the stock o ring to be put on first and then the one mcx supplies if not it will leak. When installing the new fuel surge tank it is very important to ensure you have adequate clearance for the steerings for full lock to lock if not it will hit the tank. I also recommend marking all pressure lines and electrical connections prior to disassembly makes it much easier to reassemble months later.
Turbo install was pretty straight forward , I pre oiled the bearings before assembly and bolted the turbo to the bracket and installed it as per mcx instructions. everything from there fit as it should and it went together quickly again more so because i had everything marked beforehand.
I filled the oil tank and coolant system ( find the bleeding procedures on here and yes its a B*tch) fired up and heat cycled the engine a couple times.
My stm clutch showed up just as it as getting it ready to test so bolted it up and took it out for the first spin, no issues at all varying engine rpm and keeping boost below 20psi which on this turbo happens SOOOOO fast . The next day I took it would again after checking all fluids and for leaks out for about an hour just running it through all its rpm range in very short bursts. The third test was the following week after dialing in the clutching way heavier and trying to figure out an oddball coolant system getting pressurized issue. I'll say this compared to my srx and mtx HOLY this thing goes from 3 psi to 32 psi in a hurry the engine spools up so fast its insane. The turbo is very linear and just pulls like there is no tomorrow , little to no lag and such fast spool up . I would feel 100 percent confident that if i added turbo water cooling i would trail ride this thing everyday if i could afford the fuel LOL . I am goin back into the sled this week to deal with some leaks that have developed and few suspension tweaks and clutching changes as drag racing season is now upon us but i will continue to update as i can.
Attachments
-
 sled 13.jpg92.4 KB · Views: 436
 -
 sled 12.jpg105.6 KB · Views: 394
 -
 sled 10.jpg88.9 KB · Views: 394
 -
 sled 11.jpg92.7 KB · Views: 404
 -
 sled 9.jpg110.3 KB · Views: 394
 -
 sled 8.jpg91.5 KB · Views: 406
 -
 sled 7.jpg71.3 KB · Views: 405
 -
 sled 6.jpg91.4 KB · Views: 420
 -
 sled 5.jpg107.8 KB · Views: 463
 -
 sled 4.jpg109.3 KB · Views: 444
 -
 sled 3.jpg120.3 KB · Views: 437
 -
 sled 2.jpg120.1 KB · Views: 435
 -
 sled 1.jpg105.3 KB · Views: 443


Fleecer
Lifetime Member
- Joined
- Jun 13, 2014
- Messages
- 1,232
- Reaction score
- 1,780
- Points
- 1,328
- Country
- USA
- Snowmobile
- 2019 SRX
Great writeup.....sounds like it's gonna be a rocket!!!
fxnytrortxkid
TY 4 Stroke God
- Joined
- Apr 19, 2007
- Messages
- 1,590
- Reaction score
- 503
- Points
- 1,378
- Location
- Rensselaer, ny
- Country
- USA
- Snowmobile
- 09 nytro rtx
Awesome sled and write up, it will be a beast! I have question on turbo side. For the waste gate (obviously aftermarket) did you keep internal or go external? Also I’m assuming again it uses an electronic boost control solinoid…. 3 or 4 port? And does stock harness have plug for the solinoid or is that something that needs to be added in and written into programming? I ask as I have ms17 from td and their wastegate and solinoid is $750 or I can buy both for much less and deal with figment on my own. Thank you.
customnytromtx69
Pro
I kept the internal wastegate and it’s a three port solenoid . The stock system isn’t really touched everything still plugs into stock locations to keep the ecu happy . There are 2 voltage converters that plug into the stock boost solenoid and the fuel rail pressure solenoid all the new stuff it’s controlled by the mcx gen5 box and it’s wiring harness .Awesome sled and write up, it will be a beast! I have question on turbo side. For the waste gate (obviously aftermarket) did you keep internal or go external? Also I’m assuming again it uses an electronic boost control solinoid…. 3 or 4 port? And does stock harness have plug for the solinoid or is that something that needs to be added in and written into programming? I ask as I have ms17 from td and their wastegate and solinoid is $750 or I can buy both for much less and deal with figment on my own. Thank you.
fxnytrortxkid
TY 4 Stroke God
- Joined
- Apr 19, 2007
- Messages
- 1,590
- Reaction score
- 503
- Points
- 1,378
- Location
- Rensselaer, ny
- Country
- USA
- Snowmobile
- 09 nytro rtx
Got ya. So not a buy solinoid and wastegate and install kinda deal. Was curious about harness and programming for the solinoid. I could get both for $300 which is far cry from the 750-850, but considering programming and wiring I get it.I kept the internal wastegate and it’s a three port solenoid . The stock system isn’t really touched everything still plugs into stock locations to keep the ecu happy . There are 2 voltage converters that plug into the stock boost solenoid and the fuel rail pressure solenoid all the new stuff it’s controlled by the mcx gen5 box and it’s wiring harness .
levtho01
Newbie
- Joined
- Mar 3, 2024
- Messages
- 3
- Reaction score
- 0
- Points
- 11
- Location
- Lda
- Country
- Canada
- Snowmobile
- Nytro
Nice build bud! For the Rod clerance i am on the same trouble... do you have a picture of what Was the number on the side of your Rod ? If its matching i will une 6 for the calculation!So last march I had the opportunity to purchase an insurance wrote off 2018 BTX. This would be my third sidewinder as I currently had a 2017 MTX162" and a 2019 SRX both are td multi map tuned and a LONG list of aftermarket parts on both. To properly premise this post and credit TD both sleds have ran flawlessly and dead reliable but for this one I wanted something different and something that had more capacity to be user tuned . I contacted MCX and decided to go with their stage 4 kit with their new header . The kit made 430hp with the stock exhaust manifold on 110 octane, my plan was to run the kit on straight VP C16 and with the new header should easily make 450hp. Mcx did not have all the required upgraded engine parts in stock at the time so I purchased the kit without and decided to take a slightly different route than mcx did. Heres the good bad and the ugly of the build.
Purchased the sled after a quick glance at the damage, tunnel was bent, buckled and kinked , bumper was bent down , intercooler pierced and intercooler shroud bent, running board braces snapped etc etc etc . The engine started and ran fine with no leaks ,front end and a arms were straight. I knew I had a decent base to start from. I ordered multiple tunnels through partzilla but trying to get full length one shipped was a headache and my local dealers prices were insane so i ended up finally getting a 17 mtx front and rear tunnel halves through partzilla as well as the small braces and few other parts . I ordered BM fab burly boards in polaris lime squeeze as well as Itek bumper in the same color as well as cr racings lightweight hood to start the build . I then ordered Tki drop and roll chaincase kit ,2018 MTX (longer) chaincase, 24/38 gearing, 2019 LTX GT green nosecone,
I then ordered the kit from MCX minus the engine internals and with their digital display and datalogging module. The kit consists of a borgwarner efr 7163 turbo , their own intercooler, fuel surge tank and high flow fuel pump, oil tank that now sits under the intercooler, muffler, mcx gen5 efi box, new header, fuel lines, boost tubes, oil lines, heat shields as well as everything else to make this kit work.
My engine build consisted of CP 8.5 comp pistons, Carillo rods, arp2000 head studs, kibblewhite valve springs and shim in bucket tappets, cometic MLX.035 head gasket , hurricane 500hp timing chain, manual timing chain tensioner, all new main and rod bearings which was a pain because I couldnt find anywhere online what number yamaha standard Carillo machined the big end of the rods to. For anyone else doing this type of build mine where machined to a 6 . I ordered a full set of rods bearings and sized them all from there .
Parts started to arrive and I got to work. I have to say everything was pretty straight forward but the tki drop and roll kit to get the 2018 MTX chaincase to fit the 2017 tunnel removed more material than i would have liked but i did manage to get it all to work ok. I finished the chassis build everything came together straight and well with no hiccups. A large inventory of small head and Large head multi grip rivets and a air rivet gun are essential in doing this amount of chassis work.
With the chassis completed I started on the engine, i had preordered all the required seals and crankcase bolts long before i ordered the engine parts. I built the engine myself and leaned on the looser side of the stock specs with the piston ring end gaps as this engine is going to be running 32+ psi of boost. Regards to the crank and crank rod bearing clearances i went with the stock original size for the crank and right down the middle on the rod to crank clearances. Everything was heavily coated in peratex engine assembly lube and everything was spun by hand at every stage to insure no binding. Arp studs were red locitited and installed to bottom and then backed off 1/2 turn with the stud at the water pump installed to a depth of 82mm from deck height. Studs , washers and nuts all coated in arp assembly lube and torqued in three steps to 35lbs and then brought up in 5ft lbs increments to 60ft lbs, then each one backed off 1/2 a turn and retorqued to 60ftlbs. Timing this engine was a B*tch. I followed the procedure in the manual and would end up off one tooth on the intake side everytime, Yamaha tech academy has a video on youtube watched that and had same results. SXS blog has a video building a Yxz engine and followed their procedure and would end up off one tooth on the exhaust cam everytime SOOOO i sorta used alittle bit of A and little of B as well as zip tieing the chain to the cam gears when i placed them and finally that kept all the slack on the tensioner side so i could tension up the new tensioner without either one skipping before chain was tensioned properly.
Installed the engine in the chassis an started with the mcx side of the build. it says to install the oil tank before the engine and it was a NO GO it was much easier to install the engine remove the water neck on the head and then install the new oil tank. I also need to mention the new oil nipple for the bottom of the engine requires both the stock o ring to be put on first and then the one mcx supplies if not it will leak. When installing the new fuel surge tank it is very important to ensure you have adequate clearance for the steerings for full lock to lock if not it will hit the tank. I also recommend marking all pressure lines and electrical connections prior to disassembly makes it much easier to reassemble months later.
Turbo install was pretty straight forward , I pre oiled the bearings before assembly and bolted the turbo to the bracket and installed it as per mcx instructions. everything from there fit as it should and it went together quickly again more so because i had everything marked beforehand.
I filled the oil tank and coolant system ( find the bleeding procedures on here and yes its a B*tch) fired up and heat cycled the engine a couple times.
My stm clutch showed up just as it as getting it ready to test so bolted it up and took it out for the first spin, no issues at all varying engine rpm and keeping boost below 20psi which on this turbo happens SOOOOO fast . The next day I took it would again after checking all fluids and for leaks out for about an hour just running it through all its rpm range in very short bursts. The third test was the following week after dialing in the clutching way heavier and trying to figure out an oddball coolant system getting pressurized issue. I'll say this compared to my srx and mtx HOLY this thing goes from 3 psi to 32 psi in a hurry the engine spools up so fast its insane. The turbo is very linear and just pulls like there is no tomorrow , little to no lag and such fast spool up . I would feel 100 percent confident that if i added turbo water cooling i would trail ride this thing everyday if i could afford the fuel LOL . I am goin back into the sled this week to deal with some leaks that have developed and few suspension tweaks and clutching changes as drag racing season is now upon us but i will continue to update as i can.
customnytromtx69
Pro
Carillo doesn’t have anything on their rods . I assumed it was machined to a Yamaha 6 and it was so just use the numbers off your crank and 6 and should give you what bearings to use but ALWAYS check your clearances with plastigageNice build bud! For the Rod clerance i am on the same trouble... do you have a picture of what Was the number on the side of your Rod ? If its matching i will une 6 for the calculation!