skark_burmer
Veteran
Anyone installed a set on their Apex?
I am having snow buildup and want a solution and better boards seem like a good fit, but it looks like i'll need to chop up the stock area to fit them.
Im not too keen on taking a saw to my sled just yet.
I checked the f-bomb site and there is no mention of how to install. Anyone have experience?
Jeff
mine will be here tomorrow, hope to install this weekend, and use them next weekend


Turtle
Lifetime Member
- Joined
- Feb 27, 2006
- Messages
- 1,340
- Location
- Marathon, WI
- Country
- USA
- Snowmobile
- '17 Polaris Switchback 800 Pro S LE
'15 Viper RTX SE w/ MPI turbo - sold
'07 FX Phazer GT
How do you guys deal with the heat exchangers under the running boards when do to the better-boards thing?
bdm
Expert
gade-thrasher said:How do you guys deal with the heat exchangers under the running boards when do to the better-boards thing?
I ditched the stock exchangers and went with Fabcraft extruded edge coolers on the RX.
You can leave the coolers in place. I spoke with them and said to just leave the coolers. There is a good write up on snowest about installation on the different model sled. The Apex, Nytro, Phazer ect.
Brett
Brett
niko
TY 4 Stroke Junkie
I like the idea of ditching the stock ones and going to the outer running board style. Would let alot more snow through the holes.
Wonder how easy it would be to do the conversion??
Wonder how easy it would be to do the conversion??
bummerman
Newbie
Put them on mine. Mostly for better traction, but they do eliminate snow better. I justed drilled out all the rivets for the coolers and dropped them down for clearence to get in there with a sawzall and grinder. It was a reall pain, but it was worth it. It would be nice to relocate the coolers, since I still get ice on the running boards. Just not willing to do the work yet.
skark_burmer
Veteran
Can you post some detail pics of the boards and the area you had to cut?
and as long as you are posting pics id like to see your seat (no homo)
Im thinking about a boss as well and want to get a few more ideas on how it will look.
thanks
Jeff
and as long as you are posting pics id like to see your seat (no homo)
Im thinking about a boss as well and want to get a few more ideas on how it will look.
thanks
Jeff
GotJuice
Expert
how hard to convert
I've researched this and I think it won't be that difficult! Remove the current exchangers, add the edge coolers from a Cat M sled or the edge coolers from Fabcraft, add a rear cooler under the tail of the tunnel and Better Boards. I'm going to cut the boards right past the drop brackets adding a support piece going from the outer edge to the side of the tunnel similar to a Cat/RMK or the modified Nytro's. This will lighten up the tunnel and stop the last 18" from dragging on side hills and steep climbs. BDX makes a kit to cut the boards off and add the support I'm referring to on the older M8/M1000, it will then look like an D8 RMK.......hard to explain but certainly doable!
This will stop the edges from freezing up which SUCKS, convert the stock tunnel to a lighter better design and create no snow build up! Then drill out the foot wells with a 1-1/4" uni-bit hole on the foot plates and under neath to stop the build up in the foot wells. Basically end up with the same thing as an aftermarket design for much cheaper!
>>niko said:I like the idea of ditching the stock ones and going to the outer running board style. Would let alot more snow through the holes.
Wonder how easy it would be to do the conversion??
I've researched this and I think it won't be that difficult! Remove the current exchangers, add the edge coolers from a Cat M sled or the edge coolers from Fabcraft, add a rear cooler under the tail of the tunnel and Better Boards. I'm going to cut the boards right past the drop brackets adding a support piece going from the outer edge to the side of the tunnel similar to a Cat/RMK or the modified Nytro's. This will lighten up the tunnel and stop the last 18" from dragging on side hills and steep climbs. BDX makes a kit to cut the boards off and add the support I'm referring to on the older M8/M1000, it will then look like an D8 RMK.......hard to explain but certainly doable!
This will stop the edges from freezing up which SUCKS, convert the stock tunnel to a lighter better design and create no snow build up! Then drill out the foot wells with a 1-1/4" uni-bit hole on the foot plates and under neath to stop the build up in the foot wells. Basically end up with the same thing as an aftermarket design for much cheaper!
Cooter123
Newbie
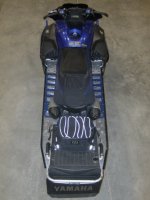
F-Bomb and I did the install on mine and my wife's sled. The first one took us about 2 hours and the second one just under that. Make sure you have a good drill bit, Yamaha uses good rivits. We removed the coolers, traced out the boards, used an air saw and a cut off wheel and then rivited the Better Boards in place. My wife has had a couple rides on hers and I had my first ride on mine this past weekend. All I can say is I wish I would have done it a long time ago. Traction was great and I had no snow on the boards... I use to carve up the fields and side hill all over the place and I'd have a ton of snow on the running boards... not after the install of the boards... no snow what so ever.
One friend did like others mentioned and removed the coolers, ran the fabcraft style on the out side with a u-cooler and the Better Boards. Looks real clean.
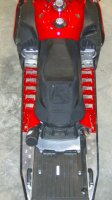
Here is a pic of mine and my wife's sled.
One friend did like others mentioned and removed the coolers, ran the fabcraft style on the out side with a u-cooler and the Better Boards. Looks real clean.
Here is a pic of mine and my wife's sled.
Attachments
niko
TY 4 Stroke Junkie
Great stuff will help out a few people.
I'd like to order a blue set if you can do them??
niko.
I'd like to order a blue set if you can do them??
niko.
The easy way to remove the Yamaha rivets is to first punch out the head, then drill. If you have a good bit, it will cut right thru really easy.


- Joined
- Jun 28, 2004
- Messages
- 2,436
- Age
- 64
- Location
- Clinton, Wi.
- Country
- USA
- Snowmobile
- '11 Apex XTX, '09 Venture GT, '06 Attak, 08 Nytro Hybrid
I REALLY cheated when I did my Attak conversion. Used an air chisel inside the tunnel and had all the stock Mono mounting brackets out in 15 minutes. It was aLITTLE loud LOL, but was WAY easier 

Similar threads
- Replies
- 24
- Views
- 2K
-
This site uses cookies to help personalise content, tailor your experience and to keep you logged in if you register.
By continuing to use this site, you are consenting to our use of cookies.


