
viperwings
VIP Member
- Joined
- Oct 28, 2007
- Messages
- 24
- Location
- Michigan
- Country
- USA
- Snowmobile
- Attack GT & Nytro XTX
- LOCATION
- SE Michigan
I need some help with pictures on how to put the complete Chain case back together. I changed out the track and replaced the secondary bearing. I am having some uncertainty on how it all goes back together.
viperwings
VIP Member
- Joined
- Oct 28, 2007
- Messages
- 24
- Location
- Michigan
- Country
- USA
- Snowmobile
- Attack GT & Nytro XTX
- LOCATION
- SE Michigan
Sled is a 07 Attack GT.I need some help with pictures on how to put the complete Chain case back together. I changed out the track and replaced the secondary bearing. I am having some uncertainty on how it all goes back together.
michdog2011
Extreme
DJ Hennessy
Extreme
- Joined
- Jan 30, 2016
- Messages
- 116
- Age
- 45
- Location
- Barrie, ON
- Country
- Canada
- Snowmobile
- 2016 Yamaha Viper RTX SE
2006 Yamaha Apex RTX
is there a specific spot you have a question about, I just replaced the chain and a couple bearings in mine today... If I would've seen this thread earlier, would've shot a couple pics.
viperwings
VIP Member
- Joined
- Oct 28, 2007
- Messages
- 24
- Location
- Michigan
- Country
- USA
- Snowmobile
- Attack GT & Nytro XTX
- LOCATION
- SE Michigan
Yes, 1.) Looking for instructions on how to get the forks for the reverse in place. 2.) two bushings with O-rings inside Where do these go? One is larger than the other.is there a specific spot you have a question about, I just replaced the chain and a couple bearings in mine today... If I would've seen this thread earlier, would've shot a couple pics.
viperwings
VIP Member
- Joined
- Oct 28, 2007
- Messages
- 24
- Location
- Michigan
- Country
- USA
- Snowmobile
- Attack GT & Nytro XTX
- LOCATION
- SE Michigan
I'm not getting the link to work correctly.
sideswipe77
Expert
- Joined
- Nov 7, 2014
- Messages
- 241
- Age
- 54
- Location
- Michigan
- Country
- USA
- Snowmobile
- 2012 Yamaha apex se
2011 Yamaha apex se
Google parts schematic thats how i did it. It show what goes where and sequence of what goes on one after the other.
DJ Hennessy
Extreme
- Joined
- Jan 30, 2016
- Messages
- 116
- Age
- 45
- Location
- Barrie, ON
- Country
- Canada
- Snowmobile
- 2016 Yamaha Viper RTX SE
2006 Yamaha Apex RTX
The reverse arms you have to hold in the up position and as you slide the case onto the upper (jack) shaft, you look down with a flash light to see that the hooks on the reverse drop into the grooves of the sprocket that has the big spring in front of it. The two bushings should be for the jack shaft, the upper one... Can you post a pick of the two collars you're talking about? The only collars with o rings I can remember go on the outside of the case... I'll look at some microfiches to see

Just go to the tytech section at the top and you can find the whole assembly under the chassis section or go to the Yamaha site and go to the microfiche so you can see the parts assembly.
Zuki1216
Extreme
- Joined
- Dec 9, 2015
- Messages
- 93
- Age
- 51
- Location
- Indiana
- Country
- USA
- Snowmobile
- 08' Apex LTX
07' Attak MPI S/C
Yeah.. Make sure you get it back together correctly. I bought a used 07 that started out with trying to figure out why the brake caliper and parking brake where out of alignment to the rotor. Ended up tearing it completely down because there was hardly any oil in it, and a bushing behind the rotor was wrong.(comparing to my 08) come to find out, the bottom inside bushing with the oring was missing, so oil slowly leaked out. Which in turn got the chain hot. Alot of links were mostly seized together. What a mess. Metal flakes everywhere. Someone had put a pair of no slip drive cogs on and had no idea how to put it back together.
Sent from my SM-N910V using Tapatalk
Sent from my SM-N910V using Tapatalk
DJ Hennessy
Extreme
- Joined
- Jan 30, 2016
- Messages
- 116
- Age
- 45
- Location
- Barrie, ON
- Country
- Canada
- Snowmobile
- 2016 Yamaha Viper RTX SE
2006 Yamaha Apex RTX
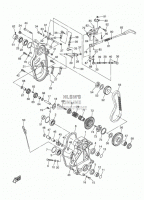
Have a look at the thumb nail, the collar's with o rings do go on before the chain case. Items numbers #11 & 12 and then 13 & 14. PS. don't forget to use thread locker like I did where specified and lose a bolt... Also, torque properly and make sure the tension on your chain is correct! The apex, apposed to what most guys will say on here for the chain, is finger tight with "A FULL TURN BACK" afterwards to allow some free play! Lock down the nut good on the case so you don't lose tension while on the trail, also happened to me!
Attachments
Zuki1216
Extreme
- Joined
- Dec 9, 2015
- Messages
- 93
- Age
- 51
- Location
- Indiana
- Country
- USA
- Snowmobile
- 08' Apex LTX
07' Attak MPI S/C
That will be debated. I read many times finger tight with 1/8 to 1/4 back. I used the 1/8 on both mine.
Sent from my SM-N910V using Tapatalk
Sent from my SM-N910V using Tapatalk
Whenever i disassemble anything i get a photocopy of the microfiche to see how everything goes back together just in case i forget or mix a part up when i'm laying them out.
DJ Hennessy
Extreme
- Joined
- Jan 30, 2016
- Messages
- 116
- Age
- 45
- Location
- Barrie, ON
- Country
- Canada
- Snowmobile
- 2016 Yamaha Viper RTX SE
2006 Yamaha Apex RTX
I knew it would be, but I lost reverse and went through some painful sounds due to too tight on the chain... happen to stop at a very reputable mechanic and right away said one full turn on the tensioner. Mine was at 1/2 turn when I lost reverse and he corrected, now works no issues! I'm gonna stick with full turn for now on.
lnThat will be debated. I read many times finger tight with 1/8 to 1/4 back. I used the 1/8 on both mine.
Sent from my SM-N910V using Tapatalk
Winderallday!
VIP Member
Whenever i disassemble anything i get a photocopy of the microfiche to see how everything goes back together just in case i forget or mix a part up when i'm laying them out.
Great idea, and to help I made up a storage rack, basically a wood base with an upstanding pin, to place each item on in the proper order order as I take them off so they go back on correctly. No yard sale of parts scattered all over the place and trying to figure out wtf.
Similar threads
- Replies
- 16
- Views
- 3K
- Replies
- 9
- Views
- 1K
-
This site uses cookies to help personalise content, tailor your experience and to keep you logged in if you register.
By continuing to use this site, you are consenting to our use of cookies.