YamahaHoss
Extreme
Hi folks--I have looked and searched on how to do this--and up to this point I took apart everything on that side, and it actually is very easy--EXCEPT now I am at that point that I need to figure out how to get the three allen head bolts out on the bottom right side corner that is behind the frame? and then get the Stator cover off? ( i saw where some guys actually cut away the frame there??--yikes--that is extruded aluminum and the frame rail down there is only 2.5 inches wide to begin with?? scary to thin of doing that? Maybe I am looking at the wrong thing? )
--So what actually has to come off yet to get that stator out? I see that some people have said to just remove the front engine mount bolt and loosen the rear one? Isn't that going to put huge pressure on the exhaust header system?
--Also I cannot locate the rear engine mount to loosen that? I see the front one--big and massive--take that out ? It is sure tight in there??
--Do I need to take off that steering rod that is running along the top of the frame? (take off the tipe rod bolt and the two bolts that hold that 20 inch steering rod in place?)
--I read where one fella loosed the engine bolts and then lifted up slightly with a cherry picker on that side of the engine and that was enough?
--Then my friend found where a fells with an RX warrior did not remove or loosen the engine and still got the Stator out? How I just do not see?
---Also--to get the cover off--use a putty knife to cut the seal--then light prying to loosen it slightly? Then I read about the magnet holding on strong?? how strong? do I pry around the exterior and then basically just pull like the dickens and pop it off the rest of the eway? If so--what point do I go for the gusto (the part where the magnet are just holding it on and nothing else attached?
--Use a gasket scraper to scrape off the old gasket or just keep it on if it is still in tact?
--Finally, do I use a gasket permatex to help hold a new gasket on so it does not get messed up?
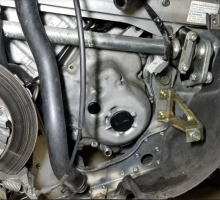
--Here is a pic showing the "Yamaha DIlemma" that folks are haunted by--as I am now also. you can see how those three allen head bolts are way behind those?
Looking for some help--again... Thanks folks
--So what actually has to come off yet to get that stator out? I see that some people have said to just remove the front engine mount bolt and loosen the rear one? Isn't that going to put huge pressure on the exhaust header system?
--Also I cannot locate the rear engine mount to loosen that? I see the front one--big and massive--take that out ? It is sure tight in there??
--Do I need to take off that steering rod that is running along the top of the frame? (take off the tipe rod bolt and the two bolts that hold that 20 inch steering rod in place?)
--I read where one fella loosed the engine bolts and then lifted up slightly with a cherry picker on that side of the engine and that was enough?
--Then my friend found where a fells with an RX warrior did not remove or loosen the engine and still got the Stator out? How I just do not see?
---Also--to get the cover off--use a putty knife to cut the seal--then light prying to loosen it slightly? Then I read about the magnet holding on strong?? how strong? do I pry around the exterior and then basically just pull like the dickens and pop it off the rest of the eway? If so--what point do I go for the gusto (the part where the magnet are just holding it on and nothing else attached?
--Use a gasket scraper to scrape off the old gasket or just keep it on if it is still in tact?
--Finally, do I use a gasket permatex to help hold a new gasket on so it does not get messed up?
--Here is a pic showing the "Yamaha DIlemma" that folks are haunted by--as I am now also. you can see how those three allen head bolts are way behind those?
Looking for some help--again... Thanks folks
Attachments
darren_t_johnson
Newbie
- Joined
- Oct 22, 2020
- Messages
- 17
- Age
- 40
- Location
- Ottawa
- Country
- Canada
- Snowmobile
- 1992 Bravo 250 (my 7 year old now rides this beauty)
2007 Venture XL (passed it on to my dad)
2008 Venture MP
Hi,
I replaced the stator in an 07 Venture MP. From what I recall, my frame looked a bit different than what your picture shows. In my case, i had to pull the whole front end off the sled to get at some of the bolts. That included steering rods and coolant hose. And then I had to bring the cover and stator out through the front, not through the side opening you show in your picture.
I would take out all of the steering components in the picture just to get them out of the way. They are easy to put back in and easy to re-align.
I skimmed a few related threads, and it sounds like you do need to pull the engine, or cut part of the frame. I'm not sure I'd want to start cutting out parts of the frame. If I did cut it out (which i wouldn't), I'd weld it back in place. That section you would out is T shaped for a reason, it gives strength to the frame so that it won't twist or flex.
For me, the magnetic hold was minimal. Not really an issue. I didn't even need to cut the gasket (from what I recall). I was able to pull the cover off with my hands and a bit of force. There were a few lips i could get a good enough grip on. I didn't want to pry, as I didn't want to nick/gouge anything.
I would put a new gasket on. Given the age of that machine, the old gasket will likely be damages when it comes off. And the gasket is cheap, especially compared to a stator. I used one of those plastic scrapers to get the old gasket completely off. it took some time and patience, especially when trying to clean it off the engine block. But I didn't want to damage/scratch anything.
Good luck


- Joined
- Apr 13, 2003
- Messages
- 21,312
- Age
- 54
- Location
- Schofield, WI
- Website
- www.totallyamaha.com
- Country
- USA
- Snowmobile
- 2020 Sidewinder SRX
I have always had to un bolts the motor and lift it slightly with a hoist. I always use a new gasket unless it come off clean.
YamahaHoss
Extreme
What an adventure!! So with the help of so many great people here on this site, we took off the seat and tank to expose the Exhaust Donut areas. Used some real good spray on the exhaust donut bolts--let them sit--used battery impact--spray some more--let them sit----again and again--after about an hour--they finally just came apart like they were new! The two allen head bolts on the top of of the tunnel underneath those two rubber seals--those we could not budge--so we are leaving the penetrating oil to do its trick--hopefully! IF those do not budge--I know for the stator and lifting the motor up--I don't have to move those two bolts and slide the exhaust bask--but I got new exhaust donuts to put back in (no one has the copper ones around here in Green BAy area--so I had to go with OEMs--are they better made then the stock o6 s that were in there? Note--mine were not blown out--) Also: can I install those new exhaust donuts without being able to remove those two bolts above the exhaust for sliding reason, since they are stuck? (will I be able you think to use the motor placement to put the new donuts in and clamp it down after the entire stator job is over?Hi folks--I have looked and searched on how to do this--and up to this point I took apart everything on that side, and it actually is very easy--EXCEPT now I am at that point that I need to figure out how to get the three allen head bolts out on the bottom right side corner that is behind the frame? and then get the Stator cover off? ( i saw where some guys actually cut away the frame there??--yikes--that is extruded aluminum and the frame rail down there is only 2.5 inches wide to begin with?? scary to thin of doing that? Maybe I am looking at the wrong thing? )
--So what actually has to come off yet to get that stator out? I see that some people have said to just remove the front engine mount bolt and loosen the rear one? Isn't that going to put huge pressure on the exhaust header system?
--Also I cannot locate the rear engine mount to loosen that? I see the front one--big and massive--take that out ? It is sure tight in there??
--Do I need to take off that steering rod that is running along the top of the frame? (take off the tipe rod bolt and the two bolts that hold that 20 inch steering rod in place?)
--I read where one fella loosed the engine bolts and then lifted up slightly with a cherry picker on that side of the engine and that was enough?
--Then my friend found where a fells with an RX warrior did not remove or loosen the engine and still got the Stator out? How I just do not see?
---Also--to get the cover off--use a putty knife to cut the seal--then light prying to loosen it slightly? Then I read about the magnet holding on strong?? how strong? do I pry around the exterior and then basically just pull like the dickens and pop it off the rest of the eway? If so--what point do I go for the gusto (the part where the magnet are just holding it on and nothing else attached?
--Use a gasket scraper to scrape off the old gasket or just keep it on if it is still in tact?
--Finally, do I use a gasket permatex to help hold a new gasket on so it does not get messed up?
--Here is a pic showing the "Yamaha DIlemma" that folks are haunted by--as I am now also. you can see how those three allen head bolts are way behind those?
Looking for some help--again... Thanks folks
--- Lets talk about the rear motor mount--so I see I have to fabricate a 13 mm socket to get that spacer threaded pipe like gizmo out of the long rear bolt engine mount bolt. Wondering--do I take that weird looking spacer pipe nut all the way out the end and then Tap on the Long Bolt towards the other side (took Sec CLutch off already) ? Also once I get the long bolt out and then the two front mounts and start to use the cherry picker--go up in the front or the back of the motor first and then up and clear the exhaust system where the clamps were and then work the engine back to clear the stator cover for removal? FInally is there ANY way to tell if previous owner re did the Chain Tensioner without tearing more apart? Damn--something tells me I should put that in--but I just don't know--is an 06--assembled in July of 05 ? (4300 miles and just bought last week and I just don't know?? if I should worry about it?? "Starting to get concerned about a lot of things with this sled right now"---LOL
- Joined
- Apr 13, 2003
- Messages
- 21,312
- Age
- 54
- Location
- Schofield, WI
- Website
- www.totallyamaha.com
- Country
- USA
- Snowmobile
- 2020 Sidewinder SRX
I’ll post when I get a few minutes. Been very busy. Let keep the posts on the forum and not in private messages.
- Joined
- Apr 13, 2003
- Messages
- 21,312
- Age
- 54
- Location
- Schofield, WI
- Website
- www.totallyamaha.com
- Country
- USA
- Snowmobile
- 2020 Sidewinder SRX
You can also use heat on the bolts under the rubber. You will need to pull exhaust back to replace donuts. To bad you didn’t contact me earlier I could have mailed you coppers. I always have them in stock. Those strange spacers should not need to be backed out to lift motor enough to pull mount bolts. You don’t need to go too height just enough to get bolts out of stator cover.
There is no way to know if anyone has changed that tensioner. Unless it was been done at a dealer under warranty. I have seen many of them run over 13000 miles but all it takes is one.
There is no way to know if anyone has changed that tensioner. Unless it was been done at a dealer under warranty. I have seen many of them run over 13000 miles but all it takes is one.
YamahaHoss
Extreme
I tried one more time tonight with the Impact on those two bolts... no luck. So if I heat them..you mentioned to heat "under the rubber". What did you mean by that specifically? The area under the rubber grommet? Or the post of that bolt heating down into the allen head hole? Or dropping the track and skid and heating it from below ? These two damn bolts have screwed the entire project. My Yamaha friend, says we can take out and put back the engine and replace the donuts when we take out the motor for the Stator job? Possible? Or impossible? He figures that it will help us to align the engine back in line also.. What do you think? And Yes..... I wanted Copper... but no one had them here in NE Wisconsin. is it a waste of time using the OEMs I just picked up? Thank for all the help... if the bolts all were nice to take out... I would have been done..You can also use heat on the bolts under the rubber. You will need to pull exhaust back to replace donuts. To bad you didn’t contact me earlier I could have mailed you coppers. I always have them in stock. Those strange spacers should not need to be backed out to lift motor enough to pull mount bolts. You don’t need to go too height just enough to get bolts out of stator cover.
There is no way to know if anyone has changed that tensioner. Unless it was been done at a dealer under warranty. I have seen many of them run over 13000 miles but all it takes is one.
- Joined
- Apr 13, 2003
- Messages
- 21,312
- Age
- 54
- Location
- Schofield, WI
- Website
- www.totallyamaha.com
- Country
- USA
- Snowmobile
- 2020 Sidewinder SRX
you may have to drill out the rivets the hold the bracket to those 2 bolts.. or put some heat on the screw head from top or bottom..

Mooseman
I'm not all knowing. Post your question in forum.
- Joined
- Nov 3, 2009
- Messages
- 3,944
- Location
- Greely, Ontario
- Country
- Canada
- Snowmobile
- '07 Venture MP (gone)
'07 Phazer FX (gone)
'09 Phazer GT (gone)
'10 RS Venture GT (My current ride)
'10 Nytro FX (son's)
- LOCATION
- Greely, ON Canada
Isn't there a particular colour paint mark on the original vs the updated one? Thought I saw that in a bulletin somewhere.There is no way to know if anyone has changed that tensioner. Unless it was been done at a dealer under warranty. I have seen many of them run over 13000 miles but all it takes is one.
Found it. Original had an orange mark. Updated one is blue. The updated tensioner is 8ES-12210-00-00
- Joined
- Apr 13, 2003
- Messages
- 21,312
- Age
- 54
- Location
- Schofield, WI
- Website
- www.totallyamaha.com
- Country
- USA
- Snowmobile
- 2020 Sidewinder SRX
Isn't there a particular colour paint mark on the original vs the updated one? Thought I saw that in a bulletin somewhere.
Found it. Original had an orange mark. Updated one is blue. The updated tensioner is 8ES-12210-00-00
Good info. Thanks for the clarification.
Sorry for late response. First soak with penatrant to loosen the alken bolt. The two bolts that hold the exhaust will come out with some heat from a small torch direct on the Allen bolt. Use a Allen on a socket and hammer the it in tight, then use a impact to take out. If that does not work use a Dremel or small hack saw blade to cut a slit in the across the top of the Allen bolt. Then use a small chisel or solid screw driver on half of the slit hitting in counter clock to loosen.
To remove the stator cover you have to tilt the engine up to get to those two bolts. Remove exhaust manifold, front engine motor mounts. I used a rod in the engine holes and a 4x4 across the top frame with a ratchet to lift the engine.
You need to make the tool socket out of a 13 long socket. Remove long bolt. This will give enough room to get those two Allen bolts. Use a good gasket sealer when you put the cover on. Good luck. There is another good Vector stator thread on this site.
74Nitro
VIP Member
- Joined
- Feb 18, 2013
- Messages
- 5,227
- Age
- 52
- Location
- Dublin Ontario
- Country
- Canada
- Snowmobile
- 2019 Sidewinder LTX
Did one last week without any exhaust removal. I used to remove the exhaust however.
YamahaHoss
Extreme
Thank you, all of the help I received was fantastic!! It was a total success!! Thank you! One note... never got those two allen head bolts out.. so carefully took the engine up and forward slightly, then one ot cleared the donut area we lifted up past it.. did the Stator, then put the new donuts in place lowered the engine back into position and clamped the headers and donuts back together! It actually worked like a charm... but a little lucky too!!Sorry for late response. First soak with penatrant to loosen the alken bolt. The two bolts that hold the exhaust will come out with some heat from a small torch direct on the Allen bolt. Use a Allen on a socket and hammer the it in tight, then use a impact to take out. If that does not work use a Dremel or small hack saw blade to cut a slit in the across the top of the Allen bolt. Then use a small chisel or solid screw driver on half of the slit hitting in counter clock to loosen.
To remove the stator cover you have to tilt the engine up to get to those two bolts. Remove exhaust manifold, front engine motor mounts. I used a rod in the engine holes and a 4x4 across the top frame with a ratchet to lift the engine.
You need to make the tool socket out of a 13 long socket. Remove long bolt. This will give enough room to get those two Allen bolts. Use a good gasket sealer when you put the cover on. Good luck. There is another good Vector stator thread on this site.
YamahaHoss
Extreme
With the fragile likeness of those accordion type header pipesDid one last week without any exhaust removal. I used to remove the exhaust however.
.. my luck, they would have broke. PS. A forum member shared a MUCH better product in place of those accordion header pieces. Wish I would have had those!!
wanderingarrows
Newbie
- Joined
- Jan 13, 2024
- Messages
- 5
- Age
- 42
- Location
- Hudsonville michigan
- Country
- USA
- Snowmobile
- 2012rs venture
2014 xtx phazer
2000 phazer 500
1995 340 ovation
So you left the ,seat , steering and tank in place? Just preparing myself I have to replace starter gear and starter clutch I suspect. My starter went bad and I replaced it from below but didn't like what I seen on the gear so pulling it apart to check it out and would love not to pull everything apart 2012 rs venture 500 miles . Sad dayDid one last week without any exhaust removal. I used to remove the exhaust however.
Similar threads
- Replies
- 2
- Views
- 2K
- Replies
- 0
- Views
- 1K
-
This site uses cookies to help personalise content, tailor your experience and to keep you logged in if you register.
By continuing to use this site, you are consenting to our use of cookies.