
Rockmeister
TY Advertiser
- Joined
- Feb 7, 2007
- Messages
- 2,183
- Reaction score
- 209
- Points
- 1,383
- Location
- NE Indiana
- Website
- www.yamaheater.com
- Country
- USA
- Snowmobile
- 2007 Attak - LOVE my sled!!!
The RX-1 does not have a radiator at all, only the heat exchanger in the front of the tunnel.
This adds the Apex radiator in addition to the factory heat exchanger.
Hope this helps!
Rock
This adds the Apex radiator in addition to the factory heat exchanger.
Hope this helps!
Rock
OK, that is good to know. I haven't really taking too much out from under the hood yet, but based on previous experience with vehicles I know any little tricks you can do to help with cooling can go a long way.
superfan75
TY 4 Stroke Junkie
- Joined
- Sep 12, 2013
- Messages
- 696
- Reaction score
- 189
- Points
- 718
- Location
- West Topsham Vermont
- Country
- USA
- Snowmobile
- RX Warrior
I think I'm going to try this mod this summer on my Warrior since my temp light came on a few times this winter. Rockmeister after doing this mod to yours would you still use the PC fan or would you use the OEM fan. I would think the PC fan might draw less power, but it sounds like the OEM fan will move more air. This is a great write up and it sounds very doable for a reasonable cost with good used parts. Also maybe a little off topic but I was thinking about adding a coolant shutoff for the carbs, what kind of valve did you use? Thank you. TY is the best !!
Rockmeister
TY Advertiser
- Joined
- Feb 7, 2007
- Messages
- 2,183
- Reaction score
- 209
- Points
- 1,383
- Location
- NE Indiana
- Website
- www.yamaheater.com
- Country
- USA
- Snowmobile
- 2007 Attak - LOVE my sled!!!
You can get used factory fans pretty cheap anymore, would use one of them as they move more air.
I purchased a small brass ball valve for the carb coolant shut-off, worked very well.
Found that I left it about 1/4 open most of the time, worked well, warm or cold.
I purchased a small brass ball valve for the carb coolant shut-off, worked very well.
Found that I left it about 1/4 open most of the time, worked well, warm or cold.
superfan75
TY 4 Stroke Junkie
- Joined
- Sep 12, 2013
- Messages
- 696
- Reaction score
- 189
- Points
- 718
- Location
- West Topsham Vermont
- Country
- USA
- Snowmobile
- RX Warrior
You can get used factory fans pretty cheap anymore, would use one of them as they move more air.
I purchased a small brass ball valve for the carb coolant shut-off, worked very well.
Found that I left it about 1/4 open most of the time, worked well, warm or cold.
Hey Thanx Rockmeister for the reply. After I posted this I found a radiator off a 2011 Apex with the fan and the upper radiator hose for $95.00. I figured if you thought the PC fan was better that I could sell the fan and still come out ahead. The brass ball valve I should be able to get at the hardware store. I wasn't sure what type would work best with the heat and antifreeze. I should have plenty to work on this summer with this mod which should really help with the overheating and I got a new front end bushing kit and new heim joints for the front as well. When I get all that done its time to go through the rear suspension. I guess I wont miss ridin' as much if I'm tinkering on it .
!")
chadderbox
Newbie
- Joined
- Jan 4, 2015
- Messages
- 20
- Reaction score
- 2
- Points
- 23
- Country
- USA
- Snowmobile
- 2003 RX 1 LE (Silver)
I have no air box,(k&n s') , was thinking about v-max 4 rads. maybe two of them and eliminate the exchangers .? This engine sits behind cowling in an R1 w/ no exchangers, ???
Jim04RX1
Veteran
- Joined
- Nov 23, 2014
- Messages
- 30
- Reaction score
- 0
- Points
- 26
- Location
- Hastings, MI
- Country
- USA
- Snowmobile
- 2004 Yamaha RX1ER
Thanks for the great idea's! Had overheat issues b4 never thought about packing snow on the running boards. Gonna do this mod too!
Jim04RX1
Veteran
- Joined
- Nov 23, 2014
- Messages
- 30
- Reaction score
- 0
- Points
- 26
- Location
- Hastings, MI
- Country
- USA
- Snowmobile
- 2004 Yamaha RX1ER
Got my rad, & fan off ebay $75. Got to get to work on it!
RX1MurderSled
Newbie
- Joined
- Apr 7, 2015
- Messages
- 1
- Reaction score
- 1
- Points
- 1
- Location
- Sioux Falls, SD
- Country
- USA
- Snowmobile
- RX-1 Mountain
I am working on this mod for my sled (03 Rx1 Mountain). Never really had an overheating issue but a friend with same sled had a problem once. This article led me to the decision to give it a try.
Still working on the electric fan controller and some wiring. Will most likely use a wire off one of the relays in that right kick panel for powering the on/off for the controller - it needs some type of 12v power to signal the controller to turn on. I will be looking into another option someplace under the hood if possible.
Wanted to share this in case anyone else tries to do the mod, or something similar.
Purchased my fan/radiator/hoses on ebay for about $70 as a kit, all used parts from an Apex (not certain what year), in working condition.
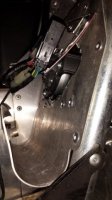
I drained the radiator fluid from the hose that leads down along the engine bay and to the running boards/coolers (stuffed blue rag in the hole in the photos). Removing the seat allowed me easy access to the screws that hold the right side kick panel to the sled. I used some radiator zip ties to secure the factory fan to the radiator and marked where to cut a hole for the fan to vent. It was necessary to remove the bracket holding the relays and relocate them. In order not to cut the bend pipe that somewhat frames this area, I drilled out several rivits and removed the entire plate that your foot normally hooks under. After removing the necessary metal so the fan could poke through, I re-rivited the plate back to the sled and then mounted the radiator and fan to that tubing as it was originally.
My photos are showing the aftermath of the install, and not 100% complete. This is to give an idea of where things go and what could be done better. One thing I am not happy with is the space where the relays are at now. These should be moved over to the tunnel and make sure to leave enough space for the plastic kick plate to go over them. Post modification I had a heck of a time getting the plastic back onto the sled. I will be removing my 'heat shield' over the fan (holding the relays) and move them all over to the left as a previous post has shown. This will allow the plastic parts to fit how they should.
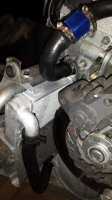
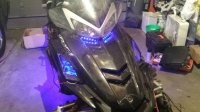
I added a blue NPT adapter tube that I bought from ebay. This is to connect the temp sensor to my electric fan controller. the sensor is on the underside of the tube because it if pointed up it would hit the hood. Perhaps that should have been cut on the bottom part of the bend in the upper tubing, because that metal will be against the foam on the hoot and in my opinion may melt it some - hopefully the foam is somewhat heat resistant. Anyways, if doing electronic fan controller that NPT sensor should be placed before the radiator to get accurate engine temps.
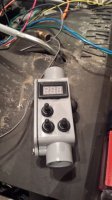
There are a couple of photos showing an electric box that holds the fan controller. Not entirely necessary but I wanted to put the electronics inside something and secure it under my steering wheel off to one side. There is a pretty decent cavity in there for all of this. Another reason is that I did not want to heavily modify my sled and drill holes in the dash for switches in case this doesn't work out.
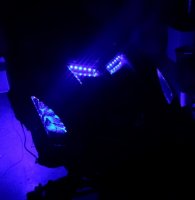
Getting to the electrical box, I wish I had used a bigger electrical box from the beginning. The reason I have 2 boxes is because everything wouldn't fit into the first box so I added on. This will probably get redone at some point in the near future. These switches control the glow lights I mounted under the sides of the tunnel and under the hood. The switches are for different zones of lights. I can turn on the tunnel lights, bottom/top center of hood, and the sides of the hood independently. A 4th switch was added to control the fan controller, and the reason I bring this up. Similar to a car, it has a connection to go to the AC switch in a car, and when that is activated the fan stays on when the controller is on (if wired correctly it will only work when the sled is running). There is a 12-24v multimeter screen that is connected to a push button momentary switch. This can be pressed at any time to test the battery voltage.
Once I am happy with the relay placement, I will test the electric fan controller with a temp gun pointed at the hose/sensor/radiator and determine the operating temp and then adjust the fan controller to come on around 180-190. I may also decide to put an on/off switch for the fan controller so I can turn it on and off as needed, but that is probably unnecessary. Overall this project probably took 40 hours, but half of that was for the lighting project. I don't really expect the tunnel lights to work for long - will probably overheat in that location. So that is my next project to get them in another place if they burn out. The lights are cheap on ebay, about $15 for all of them. The wiring and everything else I had laying around so there was no additional cost there.
Still working on the electric fan controller and some wiring. Will most likely use a wire off one of the relays in that right kick panel for powering the on/off for the controller - it needs some type of 12v power to signal the controller to turn on. I will be looking into another option someplace under the hood if possible.
Wanted to share this in case anyone else tries to do the mod, or something similar.
Purchased my fan/radiator/hoses on ebay for about $70 as a kit, all used parts from an Apex (not certain what year), in working condition.
I drained the radiator fluid from the hose that leads down along the engine bay and to the running boards/coolers (stuffed blue rag in the hole in the photos). Removing the seat allowed me easy access to the screws that hold the right side kick panel to the sled. I used some radiator zip ties to secure the factory fan to the radiator and marked where to cut a hole for the fan to vent. It was necessary to remove the bracket holding the relays and relocate them. In order not to cut the bend pipe that somewhat frames this area, I drilled out several rivits and removed the entire plate that your foot normally hooks under. After removing the necessary metal so the fan could poke through, I re-rivited the plate back to the sled and then mounted the radiator and fan to that tubing as it was originally.
My photos are showing the aftermath of the install, and not 100% complete. This is to give an idea of where things go and what could be done better. One thing I am not happy with is the space where the relays are at now. These should be moved over to the tunnel and make sure to leave enough space for the plastic kick plate to go over them. Post modification I had a heck of a time getting the plastic back onto the sled. I will be removing my 'heat shield' over the fan (holding the relays) and move them all over to the left as a previous post has shown. This will allow the plastic parts to fit how they should.
I added a blue NPT adapter tube that I bought from ebay. This is to connect the temp sensor to my electric fan controller. the sensor is on the underside of the tube because it if pointed up it would hit the hood. Perhaps that should have been cut on the bottom part of the bend in the upper tubing, because that metal will be against the foam on the hoot and in my opinion may melt it some - hopefully the foam is somewhat heat resistant. Anyways, if doing electronic fan controller that NPT sensor should be placed before the radiator to get accurate engine temps.
There are a couple of photos showing an electric box that holds the fan controller. Not entirely necessary but I wanted to put the electronics inside something and secure it under my steering wheel off to one side. There is a pretty decent cavity in there for all of this. Another reason is that I did not want to heavily modify my sled and drill holes in the dash for switches in case this doesn't work out.
Getting to the electrical box, I wish I had used a bigger electrical box from the beginning. The reason I have 2 boxes is because everything wouldn't fit into the first box so I added on. This will probably get redone at some point in the near future. These switches control the glow lights I mounted under the sides of the tunnel and under the hood. The switches are for different zones of lights. I can turn on the tunnel lights, bottom/top center of hood, and the sides of the hood independently. A 4th switch was added to control the fan controller, and the reason I bring this up. Similar to a car, it has a connection to go to the AC switch in a car, and when that is activated the fan stays on when the controller is on (if wired correctly it will only work when the sled is running). There is a 12-24v multimeter screen that is connected to a push button momentary switch. This can be pressed at any time to test the battery voltage.
Once I am happy with the relay placement, I will test the electric fan controller with a temp gun pointed at the hose/sensor/radiator and determine the operating temp and then adjust the fan controller to come on around 180-190. I may also decide to put an on/off switch for the fan controller so I can turn it on and off as needed, but that is probably unnecessary. Overall this project probably took 40 hours, but half of that was for the lighting project. I don't really expect the tunnel lights to work for long - will probably overheat in that location. So that is my next project to get them in another place if they burn out. The lights are cheap on ebay, about $15 for all of them. The wiring and everything else I had laying around so there was no additional cost there.
Attachments
-
 20150315_231334_LLS.jpg30.8 KB · Views: 583
 -
 20150322_192801.jpg26.8 KB · Views: 578
 -
 20150323_203738.jpg34.9 KB · Views: 602
 -
 20150323_203750.jpg29.8 KB · Views: 607
 -
 20150323_203756.jpg25.9 KB · Views: 609
 -
 20150323_203800.jpg27.4 KB · Views: 624
 -
 20150323_203815.jpg28.4 KB · Views: 611
 -
 20150323_205523.jpg30.1 KB · Views: 604
 -
 20150405_010256-1.jpg16.5 KB · Views: 570
 -
 20150405_010314.jpg51.3 KB · Views: 592
Donald E Wiitala
Veteran
- Joined
- Feb 11, 2017
- Messages
- 37
- Reaction score
- 5
- Points
- 28
- Location
- R.I
- Country
- USA
- Snowmobile
- Yamaha 2003 Rx1 mountain
Its Has been a long time since any information has been put out..April of 2015.. i hope Rx1 is still alive, i know mine is and running strong. I did the radiator mod and it is awsome. No overheats on hardpack or minimal snow. Great post.... im glad i did it!
Donald E Wiitala
Veteran
- Joined
- Feb 11, 2017
- Messages
- 37
- Reaction score
- 5
- Points
- 28
- Location
- R.I
- Country
- USA
- Snowmobile
- Yamaha 2003 Rx1 mountain
I will keep the yamaha till it dies. I did put a 13 mm swaybar in and it helped in the corners alot. Amazing how a little change can make a big difference.
Similar threads
- Replies
- 3
- Views
- 1K
-
This site uses cookies to help personalise content, tailor your experience and to keep you logged in if you register.
By continuing to use this site, you are consenting to our use of cookies.