
Redbeard
Lifetime Member
- Joined
- Oct 14, 2011
- Messages
- 1,664
- Reaction score
- 1,156
- Points
- 1,308
- Location
- IN
- Country
- USA
- Snowmobile
- 2012 Apex, 136 M20, PB80
2008 Vector, 136 M20, PB80
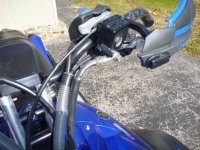
Are you installing your lights and switch on an Apex or a carb Vector? If Apex or EFI Vector, there is an alternative to mounting your switch without having to cut a hole in the dash. There is a thread boss under the left handlebar that is for a choke lever on a carb sled. This is not used on EFI sleds (Apex, Vector) and makes a good mounting point for a switch. All you have to do is move your thumb!I have a lighted led switch i will drill 3/4" hole in a good place on the dash.


Cummins6.7pwr
Lifetime Member
- Joined
- Dec 5, 2008
- Messages
- 157
- Reaction score
- 42
- Points
- 1,003
- Location
- Monticello, Iowa
- Country
- USA
- Snowmobile
- 2011 Yamaha Apex XTX
The Joe Florida kits are very nice, and with nice comes expense. I'm a cheapskate so I buy the 5m rolls for $10-15 in the waterproof sealed with 3m tape backing (basically the same led strip JF is using). A little more trouble to bare the solder pads, solder on the wires, then rtv seal them back closed. Advantage is I can custom length them any way I want and I can tap in the middle of a run if I want/need to. I can also have 15' of every color they make for 1/2 the price of one of those kits. The lights Northern shows are pretty good value too, they're running $2-3 each in amber green or red. You don't have to sell the farm to outfit your sled with leds if your smart about it.
I don't buy the complete kits. I just buy the strips and use what is needed. The best part about JF is his warranty. If they stop working or break, he will replace them free of charge. Usually he sends me extra lights when I have a warranty claim, so I guess you get what you pay for. I bought the lights for my RX-1 many years ago and now they are on the 3rd sled since then.
THKSNOW
Smooth Operator
- Joined
- Aug 11, 2006
- Messages
- 933
- Reaction score
- 127
- Points
- 928
- Location
- Millecoquin Lake, Engadine, MI
- Country
- USA
- Snowmobile
- 2013 RS Venture GT
We never buy kit lights, just individual lights so we get exactly the length, size, color(s) and style needed. Look here: superbrightleds.com -- They have well made lights and stand behind the products if there is a problem.
Run your power (12V) direct to the + battery and buy a 12V wireless remote to turn them on and off (about $20). Use two in-line fuses on the + line, one on each side of the remote box to protect it from a short. Get all the lights you're going to install and then plan the positive single wire routes carefully using disconnects where necessary (in case you have to take the sled apart). Connect all of the ground (black) wires to the sled where each light is installed using existing bolts/nuts or self tapping screws.
Last edited:
THKSNOW
Smooth Operator
- Joined
- Aug 11, 2006
- Messages
- 933
- Reaction score
- 127
- Points
- 928
- Location
- Millecoquin Lake, Engadine, MI
- Country
- USA
- Snowmobile
- 2013 RS Venture GT
One more...

trosell14843
Pro
- Joined
- Nov 17, 2014
- Messages
- 187
- Reaction score
- 31
- Points
- 663
- Country
- USA
- Snowmobile
- 2005 vector
Awesome how do the Yamaha symbol???
Sent from my SM-N900V using Tapatalk
Sent from my SM-N900V using Tapatalk
THKSNOW
Smooth Operator
- Joined
- Aug 11, 2006
- Messages
- 933
- Reaction score
- 127
- Points
- 928
- Location
- Millecoquin Lake, Engadine, MI
- Country
- USA
- Snowmobile
- 2013 RS Venture GT
It was a lot of work. Black windshield painted inside (mine was black from the factory), apply a cutout sticker of the logo to the back side. Scrape away the black paint (with a knife) leaving the logo clear. I put a thin white sticker over the now clear logo to diffuse the LEDs. I used a 38" waterproof flexible strip with 96 LEDs mounted to a piece of "flashing" (thin sheet metal). Then, stuck the whole works to the windshield and connected the wires. Used black duct tape to cover the whole thing on the back side.
It's almost bright enough to shine on the clouds like the Bat Sign- LOL

It's been there for the past 2 seasons and no issues. I leave the blue LEDs on at night at stops on the trail, restaurants, or at the motel (sometimes for 3-4 hours) and
this sled has a total of over 400 LEDs. My wife thinks I've lost it...


It's almost bright enough to shine on the clouds like the Bat Sign- LOL

It's been there for the past 2 seasons and no issues. I leave the blue LEDs on at night at stops on the trail, restaurants, or at the motel (sometimes for 3-4 hours) and
this sled has a total of over 400 LEDs. My wife thinks I've lost it...
Last edited:


Redbeard
Lifetime Member
- Joined
- Oct 14, 2011
- Messages
- 1,664
- Reaction score
- 1,156
- Points
- 1,308
- Location
- IN
- Country
- USA
- Snowmobile
- 2012 Apex, 136 M20, PB80
2008 Vector, 136 M20, PB80
THKSNOW, that is awesome!


Last edited:
trosell14843
Pro
- Joined
- Nov 17, 2014
- Messages
- 187
- Reaction score
- 31
- Points
- 663
- Country
- USA
- Snowmobile
- 2005 vector
Freaking awesome!!! I am going to go something like it. I agree the led draw do little not a worry too long stops
Sent from my SM-N900V using Tapatalk
Sent from my SM-N900V using Tapatalk
trosell14843
Pro
- Joined
- Nov 17, 2014
- Messages
- 187
- Reaction score
- 31
- Points
- 663
- Country
- USA
- Snowmobile
- 2005 vector
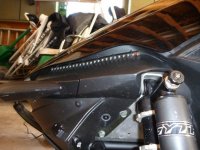
Can you show me the close up of the light facing forward near the front shocks? Without the lights lit. I see a flat spot facing back I think I will use for a small 4 led pod. But didn't think there was a forward facing flat spot.
Sent from my SM-N900V using Tapatalk
Sent from my SM-N900V using Tapatalk
THKSNOW
Smooth Operator
- Joined
- Aug 11, 2006
- Messages
- 933
- Reaction score
- 127
- Points
- 928
- Location
- Millecoquin Lake, Engadine, MI
- Country
- USA
- Snowmobile
- 2013 RS Venture GT
trosell14843
Pro
- Joined
- Nov 17, 2014
- Messages
- 187
- Reaction score
- 31
- Points
- 663
- Country
- USA
- Snowmobile
- 2005 vector
Awesome! ! Just what I was looking for
Sent from my SM-N900V using Tapatalk
Sent from my SM-N900V using Tapatalk
THKSNOW
Smooth Operator
- Joined
- Aug 11, 2006
- Messages
- 933
- Reaction score
- 127
- Points
- 928
- Location
- Millecoquin Lake, Engadine, MI
- Country
- USA
- Snowmobile
- 2013 RS Venture GT
When you get the lights tape them in place where you think they'll look the best. Run temporary positive & negative wires from any battery and connect them all up. After dark, turn them on and make adjustments to achieve the look you want before permanently attaching.
..Now everyone will copy you ! Haha so long for being different ! Looks great by the way , I like it
trosell14843
Pro
- Joined
- Nov 17, 2014
- Messages
- 187
- Reaction score
- 31
- Points
- 663
- Country
- USA
- Snowmobile
- 2005 vector
Okay so here are my mounted leds and lighted switch on the dashboard.
Two pods in the shock area facing forward and one facing backwards.
One strip on the nose that will be covered with the upper cowl.
One strong strip in the electronics area to light up through the cowl.
I did tape them in place to see if I liked them first. I did run a in line fuse 5amp atc.
Bitch was grounding them, I used two bolts that are just below the air box and unscrewed them, tucked the grounds and screwed them down.
Seems to work for now, pretty happy with the front now looking towards the rear or under the sled.
So far no drilled holes except the 3/4" hole for the lighted switch on the dashboard. And the tiny ones at the end of the strips.


Sent from my SM-N900V using Tapatalk
Two pods in the shock area facing forward and one facing backwards.
One strip on the nose that will be covered with the upper cowl.
One strong strip in the electronics area to light up through the cowl.
I did tape them in place to see if I liked them first. I did run a in line fuse 5amp atc.
Bitch was grounding them, I used two bolts that are just below the air box and unscrewed them, tucked the grounds and screwed them down.
Seems to work for now, pretty happy with the front now looking towards the rear or under the sled.
So far no drilled holes except the 3/4" hole for the lighted switch on the dashboard. And the tiny ones at the end of the strips.


Sent from my SM-N900V using Tapatalk
Last edited:
trosell14843
Pro
- Joined
- Nov 17, 2014
- Messages
- 187
- Reaction score
- 31
- Points
- 663
- Country
- USA
- Snowmobile
- 2005 vector

Here's a picture of the 3/4" led "button" switch. It lights up when the switch is on so you will remember to turn it off. Again, the damn things draw so little in amps I am not sure an overnight would even matter but certainly you'll see the leds glowing
Sent from my SM-N900V using Tapatalk
Similar threads
- Replies
- 5
- Views
- 2K
- Replies
- 52
- Views
- 9K
-
This site uses cookies to help personalise content, tailor your experience and to keep you logged in if you register.
By continuing to use this site, you are consenting to our use of cookies.


