steveg_nh
TY 4 Stroke Junkie
I've done a ton of reading on how to do this, and why, as I have never adjusted my own rear suspension before, but since the previous owner had everything maxed out, I need to dial it back. I know I can't get it fine tuned until I can ride, but I at least want to get the mono damping and spring preload back to a baseline.
First, I have the RA dial removed, and no cable hooked up to the monoshock. So my understanding to adjust the damping is I need a #1 Robertson screwdriver, or the tool Travis made at BOP. Clockwise is more damping, and counter is less.
I have already set the control rod to right in the middle as it was also at the max transfer/length.
Looking in the manual, the preload on the spring is standard at setting 4. I don't see any numbers on my adjustment ring. I do know the sled has a big boy spring in it now though so I just selected the middle setting. When deciding how to adjust this, I read about lifting the rear of the sled up, measuring the shock length, then sitting on it and measuring again, and then adjust preload so when sitting on it it's the same as when you are not. Is that correct? If it is, should I do this with the spring set with minimum preload, or does it not matter? If it doesn't squat at all from how it's set, could it be too tight and you should try loosening a step?
Then on damping, without the RA dial, is it still 11 clicks/settings from full soft to full hard (or the other way) if I use a tool or robertson screwdriver in the adjustment port? If so, I assume the middle range is around 5-6. I still don't really understand damping though. How does it relate to the spring preload? How do you know if you have it set the best? I was going to put it in the middle to start.
Last question - what is the stock position for the limiter strap? Which set of holes? If I recall, there are 5 or 6 sets of holes, and again, no idea what the previous owner was doing, so want to get that back to stock as well.
Thanks for any tips.
Last edited:

Winderallday!
VIP Member
Unless you are a big fella yourself, I doubt you will need the big boy spring, I used it for a while but removed it as it was too much, I weigh around 240 with gear. If you are lighter, then I would put the spring clip at position #1 on the shock body and start with the ramp adjust collar for spring tension about 2-3 ramps from max spring compression. (The clip on the shock body is hard to locate since it is buried underneath the shock tension adjustment collar, you need to take the shock out of the sled and remove the spring to adjust the clip position)
The "sit-in" measurement is how much the shock/spring compresses starting with the back end suspended so there is no compression, compared to compression of a loaded sled with rider weight on the floor. You are looking for 40mm-45mm of sit in. I have found that pushing the yellow neoprene bumper on the shock rod all the way up to the shock body while the sled is suspended, then checking how far it moves down the shock rod after you get on the sled is the handiest way of doing this especially if working alone (I even carried a little extra weight with me on the sled to represent gear weight). The neoprene bumper does not retract when you get off the sled, so it is fairly accurate reading vs trying to measure spring length before and after. Adjust spring tension and/or ramp collar clip position until you get the 40-45mm sit in and go from there based on riding the sled.
I would start with transfer rod between middle and max vs in the middle, you need the suspension to transfer to get traction imo. Limiter strap stock position is one set of holes up from maximum strap length I believe. All these individual adjustments make a difference, so after riding it for a few trips, make one adjustment at a time, otherwise you do not know what helped and what didn't.
Rebound adjustment, I have always ran approximately in the middle of it's range, so find out how many clicks clockwise and counter clockwise you have then count back half way. I believe max dampening is counterclockwise rotation of the mechanism.
Rebound controls how fast the suspension/shock rebounds from being compressed when riding, going through rollers or whooped up trails the suspension gets pounded into compression, if the rebound is set to dampen too much it will not recover fast enough to let the shock back into it's proper working range, and usually the suspension bottoms out. Too little rebound dampening, then your back end will buck and slap your arse on the whoops because it lets the shock rebound too fast. I seldom adjust the rebound for the conditions I ride in, so once the cable breaks, won't be in a hurry to replace it.
Cheers
Last edited:

All depends on your siding style, where you like to ride and what you want out of the sled.
I myself run a revalved shocked with the RA setting in the middle. Like you I removed the RA dial a long time ago.
Being close to 200lb geared up. I have BoP's multi rate BigBoy spring set in the middle of the second clip. The stock spring and factory valving is not that great unless you weigh a buck 40.
I also swapped out the front shocks for some GYTR piggyback which have also been worked on by a shock tech and Mtn skis.
Limiter strap in stock holes which is second from all the way out.
Transfer rod set near min.
This setup keeps the sled planted in the twisties and performs well for me on the lakes.
Every one has their own likes and dislikes on setup. You need some time on the snow to figure out what works best for you.
steveg_nh
TY 4 Stroke Junkie
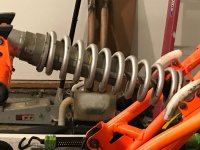
Wow, thanks guys. This is a lot to digest. Here's a few pics of my mono, I thought it would help. I'm told by previous owner, and have a receipt I believe to back it up, that this is a heavier spring, but no idea if it's multi rate, big boy, whatever. And also he said the shock was revalved. I don't have much more in terms of details. Not sure what's meant between the spring clip vs the ramp collar. I assumed they were one in the same. Since I see no numbers on my collar, I just use a visual to determine my setting.
On the limiter strap, steinier, you say second set of holes from all the way out. I assume "all the way out" means making the strap longer, not shorter. Right now it's tight, too tight. The machine is just sitting there and it's under extreme tension, I need to loosen it.
I am reading a ton trying to learn so I don't ask stupid questions...
Attachments
Last edited:
If that is a Big Boy it is from Yamaha.. BoP spring are black or red and have variable gaps between the coils.
Revalve is only good if it is for your weight.
Yes I mean second from all the way out.
If you collapse the spring the ramp and sleeve will expose my clip grooves to add a higher preload.
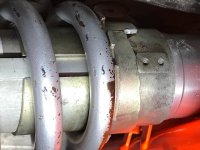
![monofull[1].jpeg](https://ty4stroke.com/attachments/monofull-1-jpeg.130412/ "monofull[1].jpeg")
Revalve is only good if it is for your weight.
Yes I mean second from all the way out.
If you collapse the spring the ramp and sleeve will expose my clip grooves to add a higher preload.
steveg_nh
TY 4 Stroke Junkie
Thanks. I think it is from Yamaha. I'll have to look at the receipts.
Where you are pointing in the pic, with the line, you are saying you can adjust more there? So basically, the ramp allows for say 6 settings, but if you collapse spring and move the clip, you change the scale of the preload, and the 6 settings? I suppose compressing that spring takes a lot of force. I think I'm going to have to wait till there's snow, and see what it tells me. The guy I bought it from was about the same height and build, so I'm sure he's within 20-30 pounds of me. Not enough for me to invest in revalving again. I've spent enough on this sled so far.") Of course when I ride, if I find it crazy, then I'd reconsider.
Of course when I ride, if I find it crazy, then I'd reconsider.
I'm 180 pounds soaking wet.
Where you are pointing in the pic, with the line, you are saying you can adjust more there? So basically, the ramp allows for say 6 settings, but if you collapse spring and move the clip, you change the scale of the preload, and the 6 settings? I suppose compressing that spring takes a lot of force. I think I'm going to have to wait till there's snow, and see what it tells me. The guy I bought it from was about the same height and build, so I'm sure he's within 20-30 pounds of me. Not enough for me to invest in revalving again. I've spent enough on this sled so far.
Of course when I ride, if I find it crazy, then I'd reconsider.I'm 180 pounds soaking wet.
Winderallday!
VIP Member
You have that right, three different clip groove positions on the shock body where a split wire ring seats and sets the position of the stepped/ramped adjustment collar on the shock body. (you can't see the other two because they are buried under the adjustment collar)
It would appear your clip is in the #2 position based on the pic. If collar is adjusted to pre-load the spring in the middle of the steps, that along with the Big Boy spring, I believe you will find it too stiff at 180lbs rider weight. I weigh much more than you and in my Attak/LTX sled, I tried the big boy in the second clip and it was far too harsh riding.
The sit-in test will tell the story, if your weight with gear won't make the spring/shock travel 40-45mm, then it is not going to work well for you imo.
Not sure what the former owner's riding style and territory was with this machine, so he may have had the shock set up by a shock tuner, along with the limiter strap pulled up and transfer minimized, for specific conditions and riding style.
If you are looking for a groomed trail, handling and comfort kind of ride, especially with the heavier spring, I would recommend dropping the adjuster collar down to the first clip position to start off with, way easier to do with the skid out than mid-season when you find it rides like a buckboard.
I McGyver'd a rig to compress the spring in order to change the clip position, some have done it with ratchet straps, but I think it would be a chore with the amount of tension with that spring. A proper shock spring compressor is the right way to go.
You may find down the road that a custom shock re-valve for your riding style will also be required, but riding is believing.
Also, while you have the skid out, change the limiter strap back to one set of holes from fully extended, way harder to do after skid is installed.
steveg_nh
TY 4 Stroke Junkie
Thanks for the great info. I had the skid out, and just put it back in. It's not coming out again. LOL.
For the limiter strap, if I lift the sled, then place a 2x4 under the front rails and lower it, it should take the pressure off the limited strap so I can change that. Not worried about that.
As for compressing the spring while it's in the sled, I assume it's under pressure now, so just removing the bolts to pull the whole assembly is not an option, and you would still need a shock spring compressor to do it properly while on the sled. Or once the limiter strap is off, and the sled suspended, is the shock able to be removed (not under pressure) from skid while skid is still installed?
I am looking for a nice cushy ride that handles well but handles all the stutter bumps of NH trails.
Is there a way to tell, by looking at the spring, that it is in fact the heavier Yamaha spring? Again, much of what I was told I question now.
Would this spring compressor do the job, or is there another style that would be better? https://www.amazon.com/ABN-MacPherson-Strut-Spring-Compressor/dp/B00SX5RSA4
Last edited:
Winderallday!
VIP Member
Those spring compressors for struts do not work, hooks won't fit between the coils, I have one laying in my tool chest collecting dust. The shock needs to come out of the skid and compressed in a jig specific for shocks, unless you are handy and can rig up something on your bench to do it. You can pull the shock out of the skid in the sled by compressing the rear of the suspension slightly to remove one end of the transfer rod, then let it loose. The shock then will not be under tension in it's mounts, so you can get it out.
A sled lift is worth it's weight in gold for this kind of wrenching and acrobatics.
Looking at your pic, the spring wire diameter appears to look oversize compared to the stocker, which I believe is 10mm dia so it could well be the Big Boy which is about 11mm I think, if you had a Yamaha part number on an invoice you could cross check it I suppose. The free length of the Big Boy is 20mm longer than stock. There is a chart somewhere that shows the difference in dimensions, will see if I can find it. Cheers.
Last edited:
steveg_nh
TY 4 Stroke Junkie
Thanks. I'll look at the paperwork tonight. Given my weight, on a C-clip setting of 1, and a cam setting of 1 or 2, whatever I need it to be, I hope I won't find the ride too stiff, given the heavier spring and my weight.
I am still confused on what setting I am currently on. Looking at my pic, where it's circled in yellow and flagged as "lowest clip position", isn't that where my spring is already set to? So it lowest position 3? Must be if you are saying move it to position 1.
I would think if I was at 3, I'd see the other lines (line 2 and line 3). Maybe I'm still not clear. Just not sure what I'm moving, or expecting to see, once I get the spring compressed so I can adjust the c-clip.
Is position 1 closer to the end, or closer to the middle of shock? I read a bunch more threads so my knowledge is improving.
Another question too - is it easier to turn and adjust the preload collar when the skid is suspended in the air on a lift/stand? I had a hell of a time turning it with the skid on the ground.
Last edited:
Winderallday!
VIP Member
The groove is showing, so imo that means the other two groove positions are hidden under the adjustment collar. The grooves in the shock body are about 10mm apart. For sake of discussion, I consider position 1 the least amount of spring pre-load, and 3 the max spring pre-load. The circle clip that sits in the groove is a stopper for the adjust collar, so the further down the shock (towards the mounting eye) you place the collar, the less pre-load you put on the spring, the further you move away from the end mount, the more pre-load you put on the spring. I am sure the clip is in the middle (2) position, so along with the big boy spring, this is why I think you will find the suspension too stiff for your weight and intended riding expectations and why I would recommend going back to less pre-load with the heavier spring to start. If it is NOT a big boy spring, then you may be fine in the second clip position where it is at now.
If the suspension is in the sled now and buttoned up, try the sit-in test to see how much or little you get for travel, (again, looking for 40-45mm) this will give you the answer whether or not you need to remove the shock and make further adjustments.
The adjustment collar is easier to move when there is no weight on the suspension, in your case with the amount of pre-load on the spring, it will be tough to move regardless if using the stock wrench (knuckle buster). I use a pipe wrench or big channel locks to turn mine because the stock wrench is a POC.
PowderFalcon
Pinnin' it!
This guy knows his sh1t! ^^^
Just do what he says! Trust me!
Just do what he says! Trust me!
steveg_nh
TY 4 Stroke Junkie
Agreed! I love it. Just learning.This guy knows his sh1t! ^^^
Just do what he says! Trust me!
steveg_nh
TY 4 Stroke Junkie
The groove is showing, so imo that means the other two groove positions are hidden under the adjustment collar. The grooves in the shock body are about 10mm apart. For sake of discussion, I consider position 1 the least amount of spring pre-load, and 3 the max spring pre-load. The circle clip that sits in the groove is a stopper for the adjust collar, so the further down the shock (towards the mounting eye) you place the collar, the less pre-load you put on the spring, the further you move away from the end mount, the more pre-load you put on the spring. I am sure the clip is in the middle (2) position, so along with the big boy spring, this is why I think you will find the suspension too stiff for your weight and intended riding expectations and why I would recommend going back to less pre-load with the heavier spring to start. If it is NOT a big boy spring, then you may be fine in the second clip position where it is at now.
If the suspension is in the sled now and buttoned up, try the sit-in test to see how much or little you get for travel, (again, looking for 40-45mm) this will give you the answer whether or not you need to remove the shock and make further adjustments.
The adjustment collar is easier to move when there is no weight on the suspension, in your case with the amount of pre-load on the spring, it will be tough to move regardless if using the stock wrench (knuckle buster). I use a pipe wrench or big channel locks to turn mine because the stock wrench is a POC.
Thank you, thank you! So I will measure the sit in test, and report back on that. I did look at all the paperwork and found a receipt from the suspension shop. It was for the revalve, for $150. I didn't see a specific receipt for a heavier spring, but in the comments of that same receipt it just said "Heavier spring" so not sure what that means. Perhaps it was another receipt, I'm reading it all wrong, or it's the original spring. I really don't know for sure, just what I was told. I measured the thickness of the coils and they are 13mm. Anyone know the thickness of the coils on the stock/regular spring?
Edit: My son helped me measure. Only a 10mm difference when suspended in air, vs when I am sitting on it. So certainly too much preload right now, correct? I can back the adjustment collar down to 1, and see where I stand, but that will be tomorrow night, hopefully. If that's not enough, or just enough, then certainly moving to another position on the c clip is in order.
I still have too much tension on the limiter strap right now though, so not sure if that effects the reading I just did.
Last edited:
Use can get a cheap set of strut spring compressors. Long bolt with large casted hooks. You just need to grind down the hooks so they fit into the spring. Its not pretty but it does work.
I have posted a pic of this but can't seem to find it right now.
I have posted a pic of this but can't seem to find it right now.
Similar threads
- Replies
- 7
- Views
- 531
- Replies
- 1
- Views
- 294
-
This site uses cookies to help personalise content, tailor your experience and to keep you logged in if you register.
By continuing to use this site, you are consenting to our use of cookies.