Snowmobileaddict
TY 4 Stroke Junkie
Everything came from the one and only online auction site.
I ordered some patch cables too. Ditching the relay harness sure tidy's things up.
I ordered some patch cables too. Ditching the relay harness sure tidy's things up.
xator
Newbie
- Joined
- Jan 5, 2009
- Messages
- 12
- Reaction score
- 0
- Points
- 681
Nice i did the same mod to my Apex last winter, really liking it.
Now i'd hack the hell out of the stock projectors and put FX-R instead....
The Mini H1 is ok but the FX...
Now i'd hack the hell out of the stock projectors and put FX-R instead....
The Mini H1 is ok but the FX...


**sj**
Lifetime Member
- Joined
- Mar 2, 2004
- Messages
- 6,064
- Reaction score
- 969
- Points
- 1,983
- Location
- southeastern Mich
- Country
- USA
- Snowmobile
- 2019 SRX
starting with nothing
simce some of us will be starting at zero..
what brand kit...or seperate pieces....as in the balasts and relay etc
for those who have expereinced both...how does this compare to sledstarts hid setup low beam and high
simce some of us will be starting at zero..
what brand kit...or seperate pieces....as in the balasts and relay etc
for those who have expereinced both...how does this compare to sledstarts hid setup low beam and high
Snowmobileaddict
TY 4 Stroke Junkie
Most all of your questions are already addressed in the 3 pages this thread has grown to become.
I don't endorse any particular eBay seller or other source for the components of my build.
That said, it all came from eBay. However any 35w ballasts will work and any hi lo relay harness including what sled start sells will work as well. Find a seller in North America with a decent warranty and pick up the components. If you do, you will keep your build very affordable.
The projectors are called mini h1's and are great in my opinion. Specs are included in the first post of this thread. These make clean, even, wide distribution of light with no hot spots or glare. There is no gap between h and lo unlike what stock or drop in hid kits produce.
These projectors are designed for hid bulbs. Not anything like using a drop in kit with a reflector housing designed for halogen equipment.
OEMs (automobiles)have shifted away from HIDs in reflector housings because projecters are better. From the current autos in production today I can only think of the Toyota Prius is one that offers hids from the factory with a reflector housing. The rest are projector/HID applications.
Re: headlights
 you have a nice headlight unit! makes the sled look newer.maybe this is what we will see with the new sleds! they have had it on there motorcycles for a while,why not put it on sleds? :rules
I also have the prism cages around my PIAA hyper white bulbs 135w/125w hi/lo,with 40 brite white leds hidden in front,all you see is light. .people think im a cop when i pull up lol.had two cops just stare at me once ,but they cant do anything.for offroad use and im off the road.pulled the colored glass from one of the prisms,and arranged them to match the other for even color output.>Snowmobileaddictgun nut said:I have the multicolored prism around my bulbs. Really look cool, but go unnoticed to most observers.
you have a nice headlight unit! makes the sled look newer.maybe this is what we will see with the new sleds! they have had it on there motorcycles for a while,why not put it on sleds? :rules Snowmobileaddict
TY 4 Stroke Junkie
Re: headlights
[quote="tomanytoyz">Snowmobileaddict you have a nice headlight unit! makes the sled look newer.maybe this is what we will see with the new sleds! they have had it on there motorcycles for a while,why not put it on sleds? :rules [/quote]
That's another cool thing about this mod. It really gives the machine an updated look.
I have feeling this type of lighting will be on sleds from the factory in a year or two. I have already read sled magazine articles saying this should already be on Yamaha sleds given the higher end machines they have decided to market.
[quote="tomanytoyz">Snowmobileaddict
you have a nice headlight unit! makes the sled look newer.maybe this is what we will see with the new sleds! they have had it on there motorcycles for a while,why not put it on sleds? :rules [/quote]That's another cool thing about this mod. It really gives the machine an updated look.
I have feeling this type of lighting will be on sleds from the factory in a year or two. I have already read sled magazine articles saying this should already be on Yamaha sleds given the higher end machines they have decided to market.
Snowmobileaddict
TY 4 Stroke Junkie
Dreams of Future Sleds part II: Yamaha
May 27, 2011 by Andy Swanson
http://blog.snowgoer.com/2011/05/27/dre ... nd-yamaha/
"Designers could take some cues from its motorcycle department and incorporate projector-type headlight bulbs like its YZF sport bikes."
May 27, 2011 by Andy Swanson
http://blog.snowgoer.com/2011/05/27/dre ... nd-yamaha/
"Designers could take some cues from its motorcycle department and incorporate projector-type headlight bulbs like its YZF sport bikes."
Think the new sleds are going to blow us all away!Snowmobileaddict said:Dreams of Future Sleds part II: Yamaha
May 27, 2011 by Andy Swanson
http://blog.snowgoer.com/2011/05/27/dre ... nd-yamaha/
"Designers could take some cues from its motorcycle department and incorporate projector-type headlight bulbs like its YZF sport bikes."
Snowmobileaddict
TY 4 Stroke Junkie
Just an update/revision to the steps I had posted earlier in the thread.
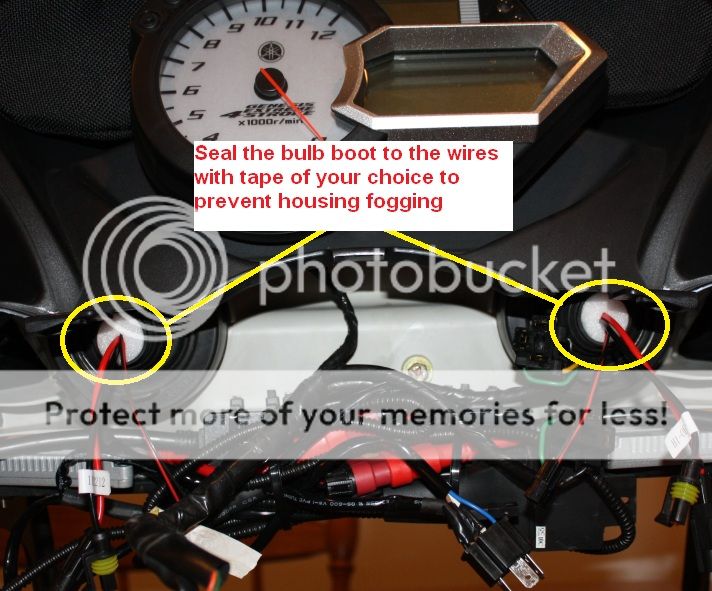
Because the stock bulb boots seal to the halogen bulbs perfectly, when doing this lighting mod you will need to effectively seal the bulb boots to the new bulb wires in order to prevent any housing fogging.
I had initially squeezed foam in and around the boots where the wires exit the housing, however this still leaves a small gap for the housing to "breathe" moist air from around the engine as after you shut down the machine.
A such, I used some UL-181 foil tape to seal the bulb boot to the wires exiting the housing. This tape forms well to irregualr shapes and has a pressure sensitive adhesive backing. Before adding this tape, I did have a small amount of fogging inside the housing that I eliminated by removing the bulb boots and aiming a hairdryer into one side of the housing until the fog had disappeared. Then I replaced the boots and added the tape.
See photo below to understand where I applied this tape.
bigreis
Lifetime Member
- Joined
- Jul 10, 2011
- Messages
- 201
- Reaction score
- 19
- Points
- 818
- Location
- Central Minnesota
- Country
- USA
- Snowmobile
- 2007 Apex RTX
2009 Nytro XTX
Two questions:
1. Do you feel it was necessary to remove the rubber gasket from the bottom of headlight housing for this project? If so, what type of adhesive did you use to reattach it?
2. Did you set the rotation (or alignment) of the projector shutters prior to installation on the sled, or did you need to do some final beam alignment with the pod back on the sled?
Thanks!
Snowmobileaddict
TY 4 Stroke Junkie
bigreis said:Two questions:
1. Do you feel it was necessary to remove the rubber gasket from the bottom of headlight housing for this project? If so, what type of adhesive did you use to reattach it?
2. Did you set the rotation (or alignment) of the projector shutters prior to installation on the sled, or did you need to do some final beam alignment with the pod back on the sled?
Thanks!
As it tuned out, the rubber "head light damper" as it is called out on yamaha parts fiche was kind of hanging by a thread anyway on my pod. I did pull it off before putting the housing into the oven. When it came time to remount the rubber damper, the adhesive that was used at the factory was still kind of sticky, so i tried heating it with a hair dryer on high, then resticking it to the head light housing and it worked and has remained stuck ever since. I think you could use some type of rubber cement or really thin double sided tape to remout it if needed.
As for clocking the projectors before reheating and sealing the housing, yes it has to be done and test lit with the pod on the sled before reattaching the front clear lens.
I tightend the projectors down with the threaded mounting rings and approximated what would produce a horizontal beam pattern, then, with the front clear plastic lens off of the housing(see below), I mounted the headlight onto my sled and connected the wiring and fired up the machine.
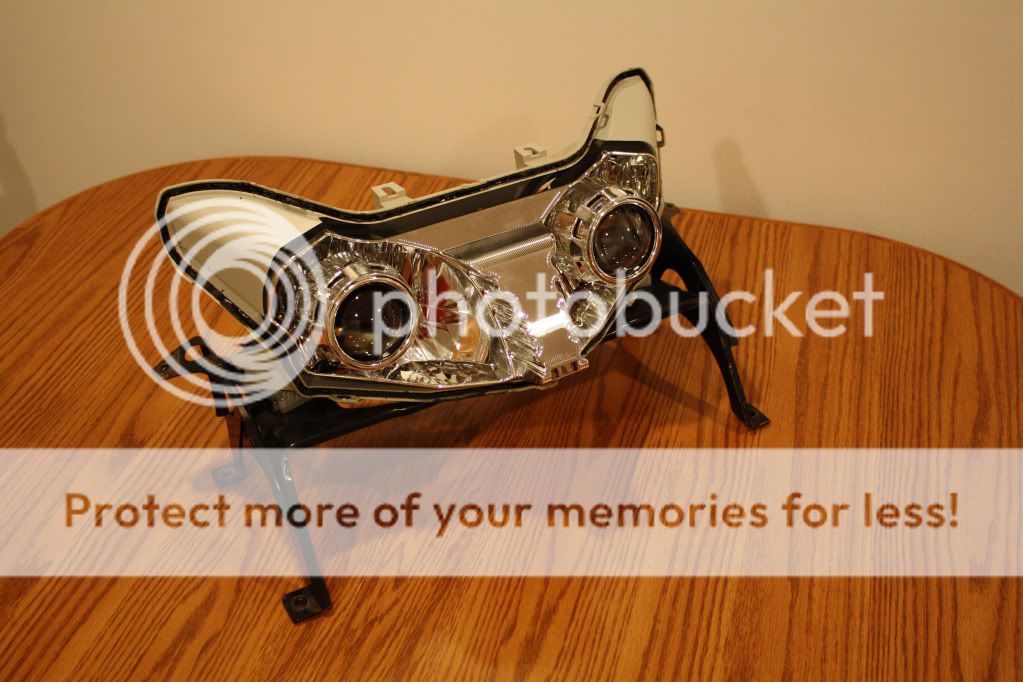
You must double check you have the projectors clocked to horizontal. Mine were pretty close, but had I not test-lit them on the sled they would have been crooked and fugly. With lights on and aimed at my garage door, I simply grasped each projector and adjusted their rotation unitl a satisfactory horizontal pattern was produced. Then I pulled the pod back off, put some alignment dots on the bulbs and housing for future reference, tightened the projector nuts even more and threw the housing back in the oven to remount the front clear lens.
SIKEWARD
Expert
dual angel eye
Think something like this would work or even look cool. My sled is black with silver graphics,
Think something like this would work or even look cool. My sled is black with silver graphics,
just ordered a kit with the cfl outers. cost a 108 shipped for everything.
Snowmobileaddict
TY 4 Stroke Junkie
SIKEWARD said:dual angel eye
Think something like this would work or even look cool. My sled is black with silver graphics,
I'd stick with a mini h1 kit and Gatling shrouds. That is what I went with. You can add led devil eyes or Ccfll angel eyes to those shrouds. The item you posted comes with some pretty large diameter shrouds. Not sure they will fit well.
Snowmobileaddict said:I mounted the headlight onto my sled and connected the wiring and fired up the machine.
You can also use a jumper wire to the Head fuse to activate the lights without firing up the sled.
Pics of that little trick here
http://www.ty4stroke.com/viewtopic.php?t=117565
Similar threads
- Replies
- 29
- Views
- 9K
-
This site uses cookies to help personalise content, tailor your experience and to keep you logged in if you register.
By continuing to use this site, you are consenting to our use of cookies.