Nikolai: When you cleaned up after the oil mess, was it the chain case or the motor oil? If the motor, how much did you add? Liking JR's idea on the crankcase breather.
Nikolai
TY 4 Stroke God
Checked both and it was motor oil and it took 12 oz. to get back to where it was.
Nikolai
TY 4 Stroke God
Started installing the Better Boards tonight and will be finished tomorrow. I'm using solid aircraft rivets and contrary to the instructions started at the bottom of the side of the tunnel. If you follow the instructions and start at the front bottom and rear bottom(and do the sides last) they won't suck up as tight(at least is appears this way). I got the running board cut out on each side and mocked up. They're going to be awesome. IMO, solid rivets are the only way to go, nothing will suck two pieces of metal together as tight. I'll post a few pics tomorrow.
Also ordered up the heavy Apex torsion springs ($326...yikes!). The KMOD skid will have to wait for summer when I actually have money.
Also ordered up the heavy Apex torsion springs ($326...yikes!). The KMOD skid will have to wait for summer when I actually have money.
ya those apex springs are pricey but I cant bottom mine period...even on soft. Did you get a shock too?? Its a must...the stocker wont beable to hold those springs back and it will be a pogo stick effect.
Nikolai
TY 4 Stroke God
No shock yet. Gotta wait for next payday to get the 2-up venture shock.
Nikolai
TY 4 Stroke God
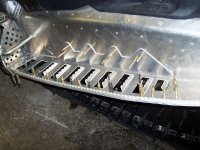
6 hours into the Better Board install and I still have about 2 hours left. Here's a picture of the left one with all the holes drilled. Finished both sides tonight. Just have to clean them up and rivet them tomorrow. I started at the very back and did the lower tunnel holes first. Drilled one hole at a time and then bolted it before drilling the next hole as I worked my way down the tunnel. I added some extra holes and did everything with a #21 bit to start with. after the boards were locked in place and all the holes were drilled, I re-drilled them with a #11 bit to use #6 rivets. Gonna take about 70 rivets(6-7's, 6-8's, and 6-9's). If you hacked it you could do it in a few hours but I take pride in my work.
I also had to remove the rear suspension so I could get my bucking bar on the back which takes a lot longer than just pulling pop rivets.
I also had to remove the rear suspension so I could get my bucking bar on the back which takes a lot longer than just pulling pop rivets.
Attachments
Nikolai
TY 4 Stroke God
I also called MBRP again today and they told me 1 more week. The brackets were getting laser cut tomorrow.
HYFLYR
TY 4 Stroke Guru
Mcxpress is making a 10 gallon fuel cell. I dont know if this has been posted or not but thought i would update for you mountian guys.
http://www.mcx.se/default.htm
http://www.mcx.se/default.htm
DITCHBANGER
Expert
looks good nikolai..that mcxpress says trail tank on it..mc is not making it ..creation composites is
Nikolai
TY 4 Stroke God
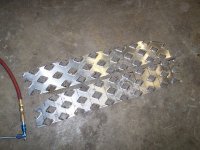
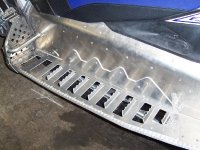
Finally finished! Can't wait to try them out. They are definitely stronger than stock but not by a huge amount.
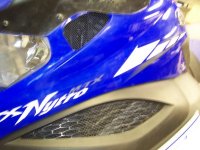
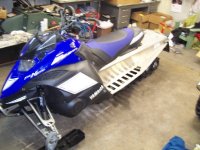
Couple pics of the better boards done, complete sled, board cut-outs, and the screens I put in.
Couple pics of the better boards done, complete sled, board cut-outs, and the screens I put in.
Attachments
How did you attach those screens and is it just normal window screen?
HYFLYR
TY 4 Stroke Guru
Looks good Caleb.
I wasnt sure on the tank thing, i just saw it so i thought i would link it up.
I wasnt sure on the tank thing, i just saw it so i thought i would link it up.
Nikolai
TY 4 Stroke God
spray25 said:How did you attach those screens and is it just normal window screen?
The ones by the windshield are hot glued in, and the ones in the sidepanels are just held on by the two oem clips...I put the screen on, then the oem screen, then the clips.
Nikolai
TY 4 Stroke God
I take back the comment about the riser being the single best change to the MTX. I got to ride today in pretty deep powder with the Better Boards and they rock! Absolutely the best money you can spend on these sleds. I didnt have to dig out my ghetto screwdriver snow remove once today. Just a quick kick to the boards and all the snow falls through(or what snow is even on the boards which isn;t much). Even the footwells stayed clear which is great because it allows you to ride really forward the entire day.
Tookes
Expert
Similar threads
- Replies
- 4
- Views
- 995
-
This site uses cookies to help personalise content, tailor your experience and to keep you logged in if you register.
By continuing to use this site, you are consenting to our use of cookies.

