
Gone Blue
VIP Member
- Joined
- Oct 11, 2006
- Messages
- 1,593
- Age
- 61
- Location
- Howell, Michigan
- Country
- USA
- Snowmobile
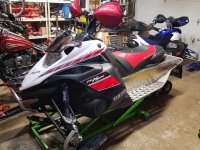
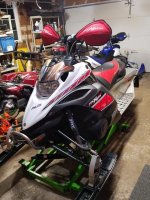
- 08' Nytro RTX 40th Anniversary - Stretched
I recently picked up this 08' RTX 40th for a great deal for my next ride project. I have been riding a stretched 09' Phazer RTX for the past 4 seasons. I love my Phazer especially after all of the mods I have done to it. I have taken it as far as I can shy of putting a turbo on it. There are about 25 - 30% of the riding time I wish I had more power. Hence the Nytro now sitting in my garage.
This sled has already been stretched with Tracks USA tipped rail extensions and a 15" x 1.25" x 144" Ripsaw track. This Nytro seems to have been well kept and is super clean with 5,666 miles on it. Got a great deal on this sled, couldn't pass it up!
The Good:
Super crazy clean
144" stretch
Tracks USA tipped rail extensions
Rox 6-8" adjustable riser
SS extended brake hose
Powermadd Extended throttle cable
Mo-Flow cowl vent
(2) extra sets of wheels in skid
Dumbo ears
Exhaust turn out
The Not So Good:
Steering pivot bracket egged out hole
Tweaked subframe (I think its off 1/8 - 1/4" on one side)
A-arm bushings shot
Spindle bushings shot
My plan is to ride the Phazer the rest of this season and start to tear down the Nytro to get it ready for next year. 1st project is to pull the sub frame and weld up the steering pivot. Then square up the a-arm mounts and then weld in one of grizztracks frame reinforcement bracket kits. A UP Bushman spindle kit and Oil-Light a-arm bushings, and fresh steering mounts will finish up the front end. The rest will be going thru the sled from top to bottom.
I have been collecting new parts and here is what I have right now:
SPI upper and lower ball joints
Ulmer oil-light a-arm bushing kit
Steering column bearing blocks
New mid height windshield with flares
UP Bushman spindle kit
New used front stock bumper (original one has dents)
New Yamaha windshield bag
Nytro MTX tail lamp harness
Grizztracks Sub Frame reinforcement kit and steering column relocate kit
Stock handle bar riser
Stock handle bar 40th anniversary pad
Nytro XTX tail lamp housing cover piece
Still need to purchase:
Tunnel close out kit (thinking Schmidt Brothers)
Copper donuts (if this doesn't already have them?)
Skid plate (not sure which one yet?)
Should be fun. G.B.
Attachments


rayone02
Lifetime Member
- Joined
- Dec 3, 2010
- Messages
- 425
- Location
- adrian, mi
- Country
- USA
- Snowmobile
- 2012 Apex 2012 nytro xtx 2006 attak
Looks like a fun build.
kinger
VIP Member
Awesome will be watching this one!!
Sent from my iPhone using Tapatalk
Sent from my iPhone using Tapatalk
Gone Blue
VIP Member
- Joined
- Oct 11, 2006
- Messages
- 1,593
- Age
- 61
- Location
- Howell, Michigan
- Country
- USA
- Snowmobile
- 08' Nytro RTX 40th Anniversary - Stretched
I received last week a steering post relocation kit and sub frame reinforcement kit from Grizztracks. Grizz has been most helpful discussing how to pull the sub frame back into position. I will post pictures when I get to straightening the sub frame.
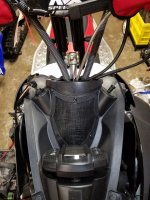
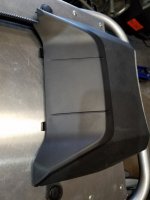
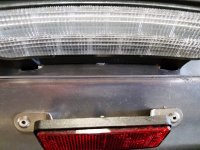
I have already moved the stock RTX tail lamp to the rear or back of the tunnel extension. I had to cut 2 slots at the rear for the tabs on the tail lamp housing and move the nut plate rearward as well. I ordered the XTX tail lamp housing cover from Kevin at Port. Looks like I need to cut 2 more slots for the snap tabs on the lamp cover. I am going to install a Skinz tunnel bag that will sit over the top of the tail lamp and cover the wiring harness. G.B.
I have already moved the stock RTX tail lamp to the rear or back of the tunnel extension. I had to cut 2 slots at the rear for the tabs on the tail lamp housing and move the nut plate rearward as well. I ordered the XTX tail lamp housing cover from Kevin at Port. Looks like I need to cut 2 more slots for the snap tabs on the lamp cover. I am going to install a Skinz tunnel bag that will sit over the top of the tail lamp and cover the wiring harness. G.B.
Attachments

Gone Blue
VIP Member
- Joined
- Oct 11, 2006
- Messages
- 1,593
- Age
- 61
- Location
- Howell, Michigan
- Country
- USA
- Snowmobile
- 08' Nytro RTX 40th Anniversary - Stretched
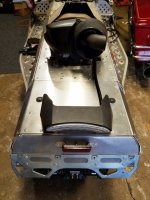
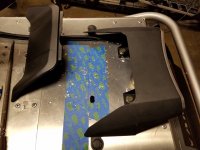
Dang! I measured twice but still cut the front tail lamp cover holes in the tunnel about an 3/16" forward of were they should have been. The hooked tabs on the cover just barely engage the front edge of the holes. Not sure there is an easy fix for this?
G.B.
G.B.
Attachments
kinger
VIP Member
Could you slot the mounting bolts and front tabs to let it slide toward the front more? I think open in the rear under the lens would be impossible to see and it would be better to have the forward tabs fit like they are supposed to.
Gone Blue
VIP Member
- Joined
- Oct 11, 2006
- Messages
- 1,593
- Age
- 61
- Location
- Howell, Michigan
- Country
- USA
- Snowmobile
- 08' Nytro RTX 40th Anniversary - Stretched
kinger, I don't see why that would work. Thanks for the idea. I was thinking about riveting a thin sheet of aluminum under the tunnel to move the front edge of the slot rearward and give the cover hooked tabs something to grab. I will look at both ideas and see which one I want to try. Thanks, G.B.Could you slot the mounting bolts and front tabs to let it slide toward the front more? I think open in the rear under the lens would be impossible to see and it would be better to have the forward tabs fit like they are supposed to.
Gone Blue
VIP Member
- Joined
- Oct 11, 2006
- Messages
- 1,593
- Age
- 61
- Location
- Howell, Michigan
- Country
- USA
- Snowmobile
- 08' Nytro RTX 40th Anniversary - Stretched
So sorry this build has stalled. I have had a crazy year in 2017. I wound up buying a new house with the Girlfriend in the Spring. So with purging and updating my previous house to get it ready to sell and moving into a new one, took a lot of time. I then decided that I needed to have rotator cuff surgery done which happened November 21st. With a torn rotator cuff and a tear in my shoulders cartilage, its going to keep me in PT for a while I am affraid, So the new plan is to miss this riding season because of the shoulder and the fact that the Nytro is unridable unti I go thru it. And on top of all that, while going thru the Phazer to get it ready to sell, it developed a crank sensor failure. I did get the sensor replaced before my surgery but now the sled will not even crank. With my shoulder inop and the cold weather we have been dealing with in MI, I have not been able to resolve the starting issue with the Phazer. So what's one to do when they cant ride, spend more money on the Nytro! I keep thinking I am done buying parts and accessories for the Nytro after my recent purchases but IDK? I hope everyone has a fun and safe riding season this year as I look forward to getting back to this project in the Spring. G.B.
I have been collecting new parts and here is what I have right now:
SPI upper and lower ball joints
Ulmer oil-light a-arm bushing kit
Steering column bearing blocks
New mid height windshield with flares
UP Bushman spindle kit
New used front stock bumper (original one has dents)
New Yamaha windshield bag
Nytro MTX tail lamp harness
Grizztracks Sub Frame reinforcement kit
Grizztracks steering column relocate kit
Powermadd 4" handle bar riser block
Stock handle bar 40th anniversary pad
Nytro XTX tail lamp housing cover piece
Trail Tank
Recent purchases:
Schmidt Bros tunnel close out kit
Yamaha nose bag
BOP skid plate
GYTR skis clicker shocks from BOP
TBD once I start tearing down the sled:
Fresh powder coat on the front subframe
Rebuild and revalve skid shocks
Add reinforcement sleeve to center skid shock body
Skid suspension bushings
Copper donuts
Add Yamaheater controller from my Phazer
Add Rock HID headlamps from my Phazer
Add Powermadd rearview mirrors to stock handguards from Phazer
Mount Skinz rear tunnel bag from Phazer
Gone Blue
VIP Member
- Joined
- Oct 11, 2006
- Messages
- 1,593
- Age
- 61
- Location
- Howell, Michigan
- Country
- USA
- Snowmobile
- 08' Nytro RTX 40th Anniversary - Stretched
Well a year and a half later I am finally getting back to this build. With the sled sitting on my garage floor I started taking measurements of the front end. The best I can gather it may be tweeked on the right side about a 1/4 - 3/8 of an inch? However, once I tried bending it back into position with a pry bar, I realized that I was just moving around the slop that is in the ball joints, A-arm bushings, etc. and was not pulling the subframe back into position. This sled with 5,600 miles on it has the original lower ball joints that must have over a 1/4" vertical slop in them. As you can imagine the plastic A-arm bushings are shot as well.
So the new plan is to tear the front end down and install the Ulmer oilite A-arm bushings, and new upper and lower ball joints. Then re-assembly the front end, then take measurements of the front end and hopefully pull it into position if needed. I thought the A-ams looked pretty clean but once I got them off I found some wear marks and one small rust bubble. So after pressing out the lower ball joints this morning I dropped the A-arms off at my local powder coaters for some fresh satin black PC. It will be a week or so until the A-arms will be back from the powder coater. So not much more will happen until then. G.B.


So the new plan is to tear the front end down and install the Ulmer oilite A-arm bushings, and new upper and lower ball joints. Then re-assembly the front end, then take measurements of the front end and hopefully pull it into position if needed. I thought the A-ams looked pretty clean but once I got them off I found some wear marks and one small rust bubble. So after pressing out the lower ball joints this morning I dropped the A-arms off at my local powder coaters for some fresh satin black PC. It will be a week or so until the A-arms will be back from the powder coater. So not much more will happen until then. G.B.
Gone Blue
VIP Member
- Joined
- Oct 11, 2006
- Messages
- 1,593
- Age
- 61
- Location
- Howell, Michigan
- Country
- USA
- Snowmobile
- 08' Nytro RTX 40th Anniversary - Stretched
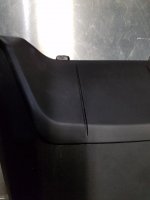
Still waiting for my A-arms to come back from the powder coaters. So I decided to take off the exhaust to install a Schmidt Bros tunnel close out plate and check the donuts. The tunnel close out plate was a pretty straight forward install. After seeing it installed, I am going to make some small aluminum plates to close off the original tail lamp mounting holes.
Donuts, well there wasnt any left after 5,600 miles. I have only ridden this sled on and off a trailer since I bought it last year. I could tell by how it sounded that it was time for donuts.
I struggled with the rear lower muffler mounting bolts. I could not get them out and just rounded out the hex recess in them. I had to remove the mounting bracket bolts from the tunnel with the muffler attached and that was a PIA. I also cannot loosen the head pipe support bracket with the same internal hex drive screws. So I decided to remove the flex couplers from the cylinder head thinking it would be easier to replace the donuts this way and I could inspect them for cracks. However, after taking out all of the bolts, I cant get the flex pipes out. Ugh. I need to take a break from this thing and figure out my next step.
Pstn head
TY 4 Stroke Master
Remove the head pipe support bracket, (drill out the rivets holding it to the tunnel) then the equast should slide out.
Gone Blue
VIP Member
- Joined
- Oct 11, 2006
- Messages
- 1,593
- Age
- 61
- Location
- Howell, Michigan
- Country
- USA
- Snowmobile
- 08' Nytro RTX 40th Anniversary - Stretched
Pressed new style lower ball joints into freshly powdercoated A-arms with a socket and my bench vise.


I was able to get one of the head pipe bracket bolts out with my trusty Harbor Freight impact screw driver, I rounded out the hex recess in the other bolt so I drilled it out. I think if I ever have to do one of these again I would just drill off the heads of the bolts. I was able to just about turn the bolt out of the nut with my fingers after I drilled off the head.


Pressed in new MPI Yamaha A-arm bushings. Used my bench vise for the lower arms and a rubber mallet for the uppers.


I checked the flex pipes for cracks since I had removed them and reinstalled them ready to assemble the exhaust with new copper donuts.

So I have the front end all back together with the new upper and lower balljoints and MPI oilite A-arm bushings. The next thing to do is set the sled back on the ground and measure the front end to see if and how it is tweaked. I think the right side lower A-arm is pushed back about a 1/4"-3/8". Once I figure this out I will try and straighten it with the pry bar again now that all the front end slop is taken out. Once I straighten the front end it will all need to come a part so I can weld in Grizztracks subframe reinforcement kit, weld up the steering pivot hole, and drop the subframe off at my Powdercoaters. G.B.
I was able to get one of the head pipe bracket bolts out with my trusty Harbor Freight impact screw driver, I rounded out the hex recess in the other bolt so I drilled it out. I think if I ever have to do one of these again I would just drill off the heads of the bolts. I was able to just about turn the bolt out of the nut with my fingers after I drilled off the head.
Pressed in new MPI Yamaha A-arm bushings. Used my bench vise for the lower arms and a rubber mallet for the uppers.
I checked the flex pipes for cracks since I had removed them and reinstalled them ready to assemble the exhaust with new copper donuts.
So I have the front end all back together with the new upper and lower balljoints and MPI oilite A-arm bushings. The next thing to do is set the sled back on the ground and measure the front end to see if and how it is tweaked. I think the right side lower A-arm is pushed back about a 1/4"-3/8". Once I figure this out I will try and straighten it with the pry bar again now that all the front end slop is taken out. Once I straighten the front end it will all need to come a part so I can weld in Grizztracks subframe reinforcement kit, weld up the steering pivot hole, and drop the subframe off at my Powdercoaters. G.B.
Gone Blue
VIP Member
- Joined
- Oct 11, 2006
- Messages
- 1,593
- Age
- 61
- Location
- Howell, Michigan
- Country
- USA
- Snowmobile
- 08' Nytro RTX 40th Anniversary - Stretched
I finished up installing new copper exhaust donuts last night along with a set of CR10Ek spark plugs. I also installed a dual fan kit from Travis at BOP. It was an easy install and it seems to fit very well. There is supposed to be enough clearance with this kit to use with the Trail Tank I plan to install. G.B.

Gone Blue
VIP Member
- Joined
- Oct 11, 2006
- Messages
- 1,593
- Age
- 61
- Location
- Howell, Michigan
- Country
- USA
- Snowmobile
- 08' Nytro RTX 40th Anniversary - Stretched
Making progress............
Shimmed the radiator with 3/4" spacers. Realized I didn't let Travis know that I planned to use his duel fan kit with a Trail Tank. If informed him he would have sent me spacers for the radiator to shim it. FYI.....

Swapped fuel sender and fuel pump over to Trail Tank. It seems to fit well once I shimmed the radiator and rerouted the fuel vent line.

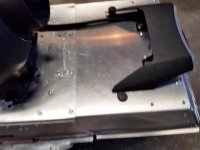
Made small aluminum filler plates for the original square tail mounting holes up under the muffler. There was an 8.0 mm hole on the outboard side of the square hole that I filled with a grey Xmas tree that also holds up that end of the filler plate and then drilled a hole for a 3/16 rivet on the inboard side.

Hopefully this weekend I will get to dump 5 gallons of gas into the tank and check for leaks. I also want to start the sled and hear it run with the new donuts and muffler gasket installed. I have only rode this sled in and out of a trailer since I bought it. It always sounded like it had a hole in the muffler and all rattly which was because the donuts where completely gone. G.B.
Shimmed the radiator with 3/4" spacers. Realized I didn't let Travis know that I planned to use his duel fan kit with a Trail Tank. If informed him he would have sent me spacers for the radiator to shim it. FYI.....
Swapped fuel sender and fuel pump over to Trail Tank. It seems to fit well once I shimmed the radiator and rerouted the fuel vent line.
Made small aluminum filler plates for the original square tail mounting holes up under the muffler. There was an 8.0 mm hole on the outboard side of the square hole that I filled with a grey Xmas tree that also holds up that end of the filler plate and then drilled a hole for a 3/16 rivet on the inboard side.
Hopefully this weekend I will get to dump 5 gallons of gas into the tank and check for leaks. I also want to start the sled and hear it run with the new donuts and muffler gasket installed. I have only rode this sled in and out of a trailer since I bought it. It always sounded like it had a hole in the muffler and all rattly which was because the donuts where completely gone. G.B.
Last edited:
Gone Blue
VIP Member
- Joined
- Oct 11, 2006
- Messages
- 1,593
- Age
- 61
- Location
- Howell, Michigan
- Country
- USA
- Snowmobile
- 08' Nytro RTX 40th Anniversary - Stretched
Making some progress on the front end. I straightened the front end using the pry bar technique after taking measurements of the upper and lower ball joint mounting bolts back to the subframe mounting bolts. I think the right side was only off by about a 1/4". After that I pulled the front subframe and stripped it down.

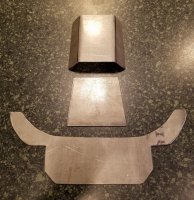
Getting ready to weld Grizztracks subframe reinforcements

Test fitting the Lower plate upper plates


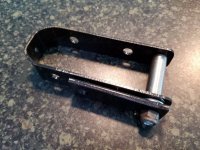
The steering pivot mounting holes were egged out so I welded them up and re- drilled them out

Subframe is all welded up and it is at my local powder coater along with the stock front and rear bumpers getting freshened up. While waiting for the subframe to be done, I pressed in Upbushmans spindle kit. This is the 2nd set I have installed of Upbushmans spindle kit and they are such a well designed and made piece. I last installed one of these kits in my Phazer.

Can't wait to get the subframe back and assemble the front end for good this time. Still have lots to do.
Install HID kit
Install Yamaheater kit
Pull skid and go thru all of the bushings, wheels, etc.
Install HyGear torsion spring bushing
Install Excell X wheels
Make 4th wheel kit
Take skid shocks up to Schmit Bros for valving and rebuild
Think I am going to replace the secondary and speedo drive shaft bearings. (The sled only has 5,600 miles but since I bought it from a dealer I have no history on it.)
Install BOP skid plate
Shim skis
Install tunnel bag
Detail the sled
I am sure I am missing something?????
G.B.
Getting ready to weld Grizztracks subframe reinforcements
Test fitting the Lower plate upper plates
The steering pivot mounting holes were egged out so I welded them up and re- drilled them out
Subframe is all welded up and it is at my local powder coater along with the stock front and rear bumpers getting freshened up. While waiting for the subframe to be done, I pressed in Upbushmans spindle kit. This is the 2nd set I have installed of Upbushmans spindle kit and they are such a well designed and made piece. I last installed one of these kits in my Phazer.
Can't wait to get the subframe back and assemble the front end for good this time. Still have lots to do.
Install HID kit
Install Yamaheater kit
Pull skid and go thru all of the bushings, wheels, etc.
Install HyGear torsion spring bushing
Install Excell X wheels
Make 4th wheel kit
Take skid shocks up to Schmit Bros for valving and rebuild
Think I am going to replace the secondary and speedo drive shaft bearings. (The sled only has 5,600 miles but since I bought it from a dealer I have no history on it.)
Install BOP skid plate
Shim skis
Install tunnel bag
Detail the sled
I am sure I am missing something?????
G.B.
Similar threads
- Replies
- 1
- Views
- 284
- Replies
- 343
- Views
- 113K
-
This site uses cookies to help personalise content, tailor your experience and to keep you logged in if you register.
By continuing to use this site, you are consenting to our use of cookies.