Hooray!
TY 4 Stroke Junkie
- Joined
- Aug 12, 2017
- Messages
- 707
- Location
- Maine USA
- Country
- USA
- Snowmobile
- 2009 Yamaha FX Nytro XTX
1998 Yamaha VMAX 700 XTC
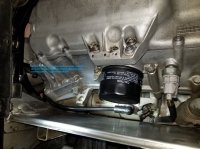
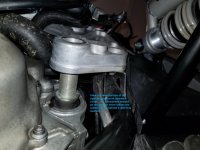
End of the tunnel in sight! Installed the SB Cool Air Intake on my airbox cover as part of my "last" project in this rebuild, cleaning up the electrical wiring behind the headlight in preparation for the HID installation and replacement of the starter relay as part of the battery wiring clean-up. The SB airbox mod was simple and the 3M gasket sealer is an amazing product, I can see other uses for that material already! Also replaced the foam in the airbox while I was at it. These vents align with the air slots under our headlights for a direct injection of cool air into the three carburetors.


Hooray!
TY 4 Stroke Junkie
- Joined
- Aug 12, 2017
- Messages
- 707
- Location
- Maine USA
- Country
- USA
- Snowmobile
- 2009 Yamaha FX Nytro XTX
1998 Yamaha VMAX 700 XTC
HIDs at last! Thanks Rockmeister (www.rocztoyz.com) for such a professional sled specific HID kit. Many other kits have the extra 10' of wire for automotive applications, no auto restart for the bulbs and a higher initial amperage draw. Rock's have a single connection to the stock 3 prong headlight plug, auto restart and a custom low amp draw ballast all wrapped up in about 10" of harness with all the extra control boxes, etc neatly tied together. I wanted to loom the existing YamaHeater installation by the sled's original owner to protect things from rubbing but also to understand what was behind my headlight! Ended up having to extend both the power and ground as they were limiting the removal of the airbox cover. Damn cold last night, -4 F and the garage would not get above mid-20's so did not finish but did get HIDs installed and ready for testing after I complete the battery side of the clean up. On the fence on where to mount the HID ballasts, right now leaning towards through bolting them to the plastic shroud around the radiator where others have posted mounting their HIDs... more to post when I return from Casablanca on the 17th and test these babies out and finally get to ride this Nytro! Happy 2018... Cheers!


Hooray!
TY 4 Stroke Junkie
- Joined
- Aug 12, 2017
- Messages
- 707
- Location
- Maine USA
- Country
- USA
- Snowmobile
- 2009 Yamaha FX Nytro XTX
1998 Yamaha VMAX 700 XTC
Back from Casablanca... Envious of all the cold weather I heard about while I was gone and now most of the snow in Southern Maine has melted. Working tomorrow on sled wrap up projects and then praying for snow. Researching hygear suspension setup now, next step RIDE!
Hooray!
TY 4 Stroke Junkie
- Joined
- Aug 12, 2017
- Messages
- 707
- Location
- Maine USA
- Country
- USA
- Snowmobile
- 2009 Yamaha FX Nytro XTX
1998 Yamaha VMAX 700 XTC
Finished up the HIDs and went to test start prior to tie wrapping up last wires and turned over started ran 8 seconds and stalled (not unexpected after sitting 5 weeks), turned key and "click"... fu@! New battery, new starter solenoid, clean connections so now trying to access the wire to the starter as I hate to have to do the dealer starter replacement : (
Service manuel says remove engine to access starter... Really! Praying for the rubbed wire, will check tomorrow.
Service manuel says remove engine to access starter... Really! Praying for the rubbed wire, will check tomorrow.
Hopefully it’s something simple.
Sent from my iPhone using Tapatalk
Sent from my iPhone using Tapatalk
Hooray!
TY 4 Stroke Junkie
- Joined
- Aug 12, 2017
- Messages
- 707
- Location
- Maine USA
- Country
- USA
- Snowmobile
- 2009 Yamaha FX Nytro XTX
1998 Yamaha VMAX 700 XTC
Thanks Nick... troubleshooting tonight suggests I was correct in starter brushes or starter. Had the Nytro service manual from a link here (now taken down) and they suggest jumping starter relay, I did that and nothing, no spark, nothing. I had already changed the relay (found some corrosion but not a show stopper there)... my friend suggested tap the starter and try it and bingo started right up. Found a 12" metal square ruler was just long enough next to the reverse lever and sure enough, mild tap with a hammer and started; went 8x starts then "click", tap, start. went 11x starts, "click", tap start. Need reliability as heading 100+ miles into the bush so new starter tomorrow. Start tested new Rockmeister HIDs, awesome, zero flicker... SWEET! Also Yamaheater still works (green and red light) after harness loom and all the harness twisting, new fuses, etc. Good news. So tomorrow I attempt the starter "pry method" I have read about. Will post pics and experience but hope this works as removing the front clip (after I just built the damn thing up) is a lot of work... all good, working on sleds! : )


Hooray!
TY 4 Stroke Junkie
- Joined
- Aug 12, 2017
- Messages
- 707
- Location
- Maine USA
- Country
- USA
- Snowmobile
- 2009 Yamaha FX Nytro XTX
1998 Yamaha VMAX 700 XTC
Success last night on starter replacement, this is the post from the starter questions thread but figured worth putting here to keep all together. This is the simplest method I have read about with pics and details what I did:
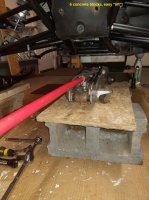
1. Place sled on four cinder blocks, one under each ski, two under track, position two more concrete blocks between skis to set floor jack on (optional put scrap 2x6 under each ski and track, 12"x24" 3/4" Advantec on blocks between skis for jack to sit on).
2. Remove the two airbox bolts, remove battery connections
3. Remove skid plate
4. Remove the oil sensor plug (push release is on top where you cant see it), remove starter wire, remove two 12mm starter mount bolts using ratchet wrench (things are tight so prepare for one click per wrench motion, be patient).
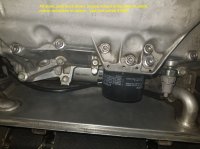
5. Remove oil filter (do not drain), only a 1/4 cup of oil will spill if you are careful, let dry sump drain until drips stop and then plug with small wad of paper towel. My oil was brand new so I did not want to change it.
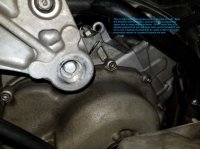
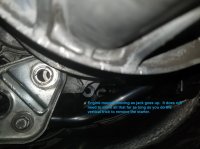
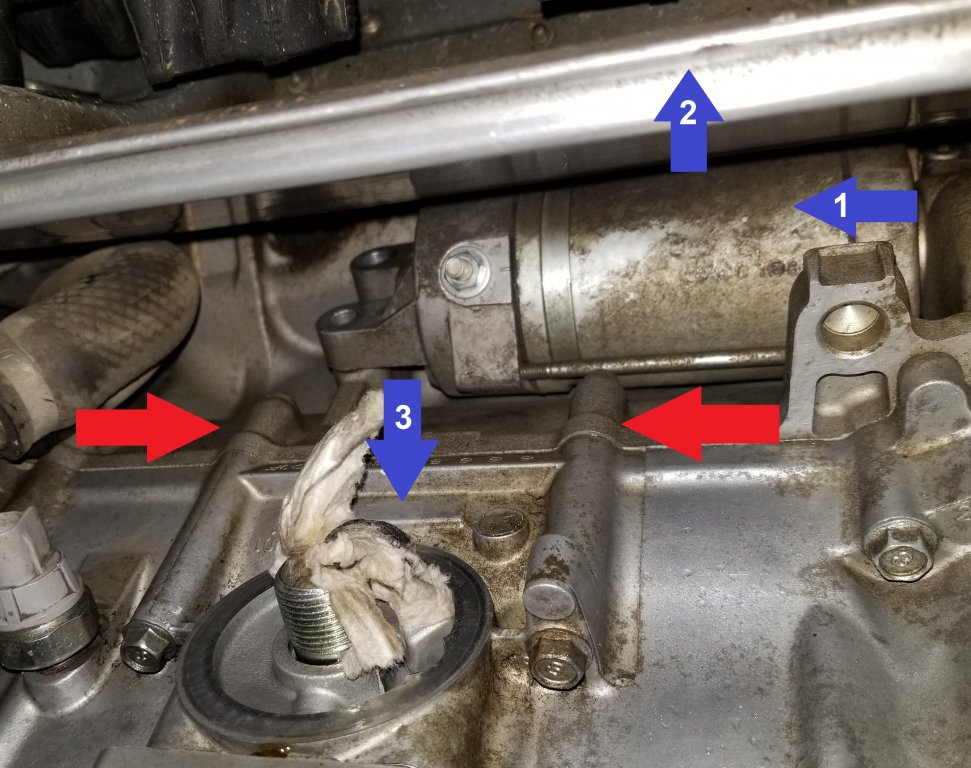
6. Remove nuts on front engine mount bolts (nuts are on the outside), tap bolts in until they just exit the threaded engine mount collars (see pic), DO NOT LET bolts fall out of rubber engine mount on the inside, if you do, you now have to remove the forward plastics (a-arms, etc). They balance inside with just the rubber supporting them ok. Your engine will drop down a 1/4" once both sides are released. You DO NOT need to mess with the threaded engine mount collars, these are used to center the engine in alignment with the rear mounts which you have not touched. The rear mounts will keep the front aligned when you jack up so no need to try and use a flat head inside the collar to unscrew (this requires a special Yamaha tool purpose built - again not required, don't touch these threaded collars).

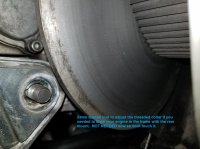
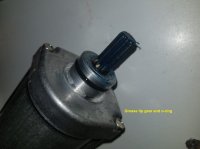
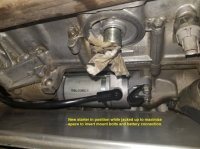
7. Jack up engine by placing a 2x4x8" block just behind oil filter, casting is built up here. You will lift skis off the ground as engine only really moves once suspension travel is lifted off. Some over pry the engine to create enough space for the starter to "drop out", if you go this far, makes sense some have mentioned feels like you are pushing things and the airbox cover may even hit the steering shaft. This is WAY MORE movement than needed if you thread the starter out vs. needed the clearance for "drop out" performance. Technique I used was pry end of starter free from engine, there is an o-ring that seals the gear on the starter so a little nudge is needed. Once free and the starter gear is clear of the engine rotate the starter vertically as there is "headroom" above the starter, this allows you to thread the starter vertically down in alignment with the oil filter mount between the two block castings that would otherwise prevent the starter from "dropping out". Using this technique you don't even come close to the air box hitting the steering shaft which I have not touched.

8. Have new starter ready and orientated exactly like the starter just removed and articulate the starter up vertically, over horizontally and insert gear (pre-greased gear and o-ring). Wiggle the starter and twist a little and the gear will slide into alignment inside the engine smoothly as you press the starter in until the o-ring seals the starter. Mount bolts will now be close to alignment. Inserting mounting bolts is tricky as there is not much room, I found the lower mount bolt could be inserted pinching the bolt as normal and wiggling into the hole and threading to align the starter upper mount bolt. The lower bolt has an oil sensor wire retainer clip so make sure to align it the way it was on removal (note this when you remove it). I spread open the clip so I could remove and re-insert the oil sensor wire easily after I did the upper mount bolt. The upper mount bolt presents an issue as I had to hold the bolt between two fingers like a cigarette and wiggle it into position without the dexterity of a pinch grip. Only option as this method keeps space near starter to an absolute minimum (preventing any removal of anything above the engine). Tighten and guess 19 lb-ft torque. Mount battery cable and tighten, slide oil sensor wire into clip, pinch closed with pliers, plug in the oil sensor wire. Re-install the oil filter (don't let oil in filter drain out). Congratulations, you just installed your starter and saved $1000.
9. Put a 12" and 6" 1/4" extension on a 17mm socket and carefully insert from the opposite side of the engine near the other engine mount bolt and capture the bolt head of the engine mount bolt and guide up re-insertion in the threaded collar, if you have a friend, slowly let the jack down until your pressure on the bolt slips it into the collar. Repeat on the other side again, for me the 18" extension made short work of aligning the opposite bolt and allowed me to put a torque wrench on both. The clutch side only an open end wrench could slip behind the primary sheave so I torqued it from the oil tank side thanks to the 18" extension.
10. Connect battery, test starter, mine turned over greased smooth... I installed a new starter relay as step 1 in the troubleshoot and a new battery so all new starter circuit.
11. Re-install lower engine cover and front plastic rivet to hold in place, insert side plastic tabs into lower engine cover,make sure all are flat interlocked together, place skid plate over assembly and insert four skid plate bolts. I retrofitted my frame with four C-clip nuts and bought 1.5" stainless bolts and fender washers, easy and strong connection once done as the bolts are sandwiching three layers of plastic.
12. Install upper plastics, hood, test starter again. : )
- This method saves not only the insane front clip removal, coolant drain, oil drain, total electrical harness release, brake removal, clutch removal, drive removal, engine removal after exhaust and airbox disconnect, but also from having touch the steering shaft or even removing the airbox cover! Hope this is helpful for the next guy as this project requires patience but only average wrenching skill. Good luck.
1. Place sled on four cinder blocks, one under each ski, two under track, position two more concrete blocks between skis to set floor jack on (optional put scrap 2x6 under each ski and track, 12"x24" 3/4" Advantec on blocks between skis for jack to sit on).
2. Remove the two airbox bolts, remove battery connections
3. Remove skid plate
4. Remove the oil sensor plug (push release is on top where you cant see it), remove starter wire, remove two 12mm starter mount bolts using ratchet wrench (things are tight so prepare for one click per wrench motion, be patient).
5. Remove oil filter (do not drain), only a 1/4 cup of oil will spill if you are careful, let dry sump drain until drips stop and then plug with small wad of paper towel. My oil was brand new so I did not want to change it.
6. Remove nuts on front engine mount bolts (nuts are on the outside), tap bolts in until they just exit the threaded engine mount collars (see pic), DO NOT LET bolts fall out of rubber engine mount on the inside, if you do, you now have to remove the forward plastics (a-arms, etc). They balance inside with just the rubber supporting them ok. Your engine will drop down a 1/4" once both sides are released. You DO NOT need to mess with the threaded engine mount collars, these are used to center the engine in alignment with the rear mounts which you have not touched. The rear mounts will keep the front aligned when you jack up so no need to try and use a flat head inside the collar to unscrew (this requires a special Yamaha tool purpose built - again not required, don't touch these threaded collars).
7. Jack up engine by placing a 2x4x8" block just behind oil filter, casting is built up here. You will lift skis off the ground as engine only really moves once suspension travel is lifted off. Some over pry the engine to create enough space for the starter to "drop out", if you go this far, makes sense some have mentioned feels like you are pushing things and the airbox cover may even hit the steering shaft. This is WAY MORE movement than needed if you thread the starter out vs. needed the clearance for "drop out" performance. Technique I used was pry end of starter free from engine, there is an o-ring that seals the gear on the starter so a little nudge is needed. Once free and the starter gear is clear of the engine rotate the starter vertically as there is "headroom" above the starter, this allows you to thread the starter vertically down in alignment with the oil filter mount between the two block castings that would otherwise prevent the starter from "dropping out". Using this technique you don't even come close to the air box hitting the steering shaft which I have not touched.
8. Have new starter ready and orientated exactly like the starter just removed and articulate the starter up vertically, over horizontally and insert gear (pre-greased gear and o-ring). Wiggle the starter and twist a little and the gear will slide into alignment inside the engine smoothly as you press the starter in until the o-ring seals the starter. Mount bolts will now be close to alignment. Inserting mounting bolts is tricky as there is not much room, I found the lower mount bolt could be inserted pinching the bolt as normal and wiggling into the hole and threading to align the starter upper mount bolt. The lower bolt has an oil sensor wire retainer clip so make sure to align it the way it was on removal (note this when you remove it). I spread open the clip so I could remove and re-insert the oil sensor wire easily after I did the upper mount bolt. The upper mount bolt presents an issue as I had to hold the bolt between two fingers like a cigarette and wiggle it into position without the dexterity of a pinch grip. Only option as this method keeps space near starter to an absolute minimum (preventing any removal of anything above the engine). Tighten and guess 19 lb-ft torque. Mount battery cable and tighten, slide oil sensor wire into clip, pinch closed with pliers, plug in the oil sensor wire. Re-install the oil filter (don't let oil in filter drain out). Congratulations, you just installed your starter and saved $1000.
9. Put a 12" and 6" 1/4" extension on a 17mm socket and carefully insert from the opposite side of the engine near the other engine mount bolt and capture the bolt head of the engine mount bolt and guide up re-insertion in the threaded collar, if you have a friend, slowly let the jack down until your pressure on the bolt slips it into the collar. Repeat on the other side again, for me the 18" extension made short work of aligning the opposite bolt and allowed me to put a torque wrench on both. The clutch side only an open end wrench could slip behind the primary sheave so I torqued it from the oil tank side thanks to the 18" extension.
10. Connect battery, test starter, mine turned over greased smooth... I installed a new starter relay as step 1 in the troubleshoot and a new battery so all new starter circuit.
11. Re-install lower engine cover and front plastic rivet to hold in place, insert side plastic tabs into lower engine cover,make sure all are flat interlocked together, place skid plate over assembly and insert four skid plate bolts. I retrofitted my frame with four C-clip nuts and bought 1.5" stainless bolts and fender washers, easy and strong connection once done as the bolts are sandwiching three layers of plastic.
12. Install upper plastics, hood, test starter again. : )
- This method saves not only the insane front clip removal, coolant drain, oil drain, total electrical harness release, brake removal, clutch removal, drive removal, engine removal after exhaust and airbox disconnect, but also from having touch the steering shaft or even removing the airbox cover! Hope this is helpful for the next guy as this project requires patience but only average wrenching skill. Good luck.
Hooray!
TY 4 Stroke Junkie
- Joined
- Aug 12, 2017
- Messages
- 707
- Location
- Maine USA
- Country
- USA
- Snowmobile
- 2009 Yamaha FX Nytro XTX
1998 Yamaha VMAX 700 XTC
Follow up post today on a question asked about the starter, this provides a little more detail that I found missing on all other starter replacement threads I read here prior to tackling this, a pic is worth a thousand words as they say...
Thanks Sevey, I tried to clear up the ambiguous parts of all the other starter installation threads so a person familiar with a wrench but not a mechanic could follow it step by step. Thanks to those in the past that set the stage for this VERY SIMPLIFIED approach, great work!
You are exactly right, as you ease the motor mount bolts gently inward, there will be a moment when it passes out of the threaded collar and into the rubber mount, at this point the engine will drop down as you see a 1/4" or so. Easy way to know it is clear. Push mount bolts in slowly so they DO NOT drop out of the rubber portion of the mount. If they do, you just added removal of your a-arms and lower front plastics to your project as you can't access the bolts easily to re-insert them. This is where my 18" 1/4" extension worked perfect (wondered when I bought the 12" one when I would use it - added a 6" to it to get 18"). You can slip a 17mm socket on the 18" extension from the opposite side and capture the bolt head and gently put pressure on the bolt as you jack it into alignment and it simply slips back into the threaded collars, amazing again how simple that was.
Back to removal, once the bolts are clear, then you simply jack up the engine, first the suspension will decompress and very little engine up motion, then as the skis come off the concrete blocks (so now your 2x4x8" block on the jack in the only thing holding the sled in the front) the next few jack pulls only moves the engine up rotating easily on the rear engine mount bolt (very long bolt, side to side it appears). You don't need to touch the rear engine mount bolt, it allows rotation as is. Things were surprisingly stable with the three point support and i was comfortable being under it.
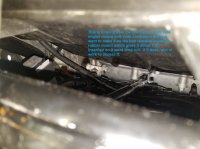
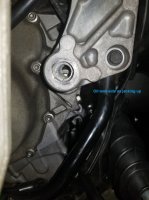
KEY is not to try to remove the starter while it is horizontal, if you do you have to push the engine up even more to clear the two casting bumps (red arrows below) for the bolts. The "drop out" of the starter people have mentioned means you have to go 50% more with the engine up, maybe even remove the steering shaft as the airbox starts to hit is, also stretches all the hoses connected I suspect (oil, coolant) and brings the radiator interference into play. All NOT required, instead of "drop out" the blue arrows show what I did, [1] pull starter out of engine by gently prying flat head screwdriver against engine and starter end, mine slid out easily as well lubricated inside [2] rotate starter vertical with the gear up as plenty of room above, then [3] while vertical slide down between bumps (red arrows). Not having to go that extra 1/2" to clear the bumps is huge, means the airbox does even come close to the steering shaft, the front engine mounts don't even move beyond the alignment threaded collars (which I suspect is why some have to mess with unscrewing these collars). Very simple, very limited engine motion required. I had my starter right there next to me, greases gear and o-ring and as I pulled the old starter out, aligned new one with it exactly and reversed the motion to get back up and in position. Wiggled the starter by rotating it every so slightly and the gear meshed into the engine gear like greased lightning, starter mounts aligned perfectly (lower bolt first, then upper). I was actually shocked how simple as I realized I just saved $1000 and it was not any harder than removing my skid! My old starter spins smoothly so likely only needs a brush kit ($36) and now I have a back up. I may look into the starter saver LED that tells you if the starter remains hot after starting as this can destroy it silently as it will be rotating at engine RPM (yikes!). Good luck, nuts anyone would disconnect anything other then front engine mount bolts to do this project let alone remove engine!
Thanks Sevey, I tried to clear up the ambiguous parts of all the other starter installation threads so a person familiar with a wrench but not a mechanic could follow it step by step. Thanks to those in the past that set the stage for this VERY SIMPLIFIED approach, great work!
You are exactly right, as you ease the motor mount bolts gently inward, there will be a moment when it passes out of the threaded collar and into the rubber mount, at this point the engine will drop down as you see a 1/4" or so. Easy way to know it is clear. Push mount bolts in slowly so they DO NOT drop out of the rubber portion of the mount. If they do, you just added removal of your a-arms and lower front plastics to your project as you can't access the bolts easily to re-insert them. This is where my 18" 1/4" extension worked perfect (wondered when I bought the 12" one when I would use it - added a 6" to it to get 18"). You can slip a 17mm socket on the 18" extension from the opposite side and capture the bolt head and gently put pressure on the bolt as you jack it into alignment and it simply slips back into the threaded collars, amazing again how simple that was.
Back to removal, once the bolts are clear, then you simply jack up the engine, first the suspension will decompress and very little engine up motion, then as the skis come off the concrete blocks (so now your 2x4x8" block on the jack in the only thing holding the sled in the front) the next few jack pulls only moves the engine up rotating easily on the rear engine mount bolt (very long bolt, side to side it appears). You don't need to touch the rear engine mount bolt, it allows rotation as is. Things were surprisingly stable with the three point support and i was comfortable being under it.
KEY is not to try to remove the starter while it is horizontal, if you do you have to push the engine up even more to clear the two casting bumps (red arrows below) for the bolts. The "drop out" of the starter people have mentioned means you have to go 50% more with the engine up, maybe even remove the steering shaft as the airbox starts to hit is, also stretches all the hoses connected I suspect (oil, coolant) and brings the radiator interference into play. All NOT required, instead of "drop out" the blue arrows show what I did, [1] pull starter out of engine by gently prying flat head screwdriver against engine and starter end, mine slid out easily as well lubricated inside [2] rotate starter vertical with the gear up as plenty of room above, then [3] while vertical slide down between bumps (red arrows). Not having to go that extra 1/2" to clear the bumps is huge, means the airbox does even come close to the steering shaft, the front engine mounts don't even move beyond the alignment threaded collars (which I suspect is why some have to mess with unscrewing these collars). Very simple, very limited engine motion required. I had my starter right there next to me, greases gear and o-ring and as I pulled the old starter out, aligned new one with it exactly and reversed the motion to get back up and in position. Wiggled the starter by rotating it every so slightly and the gear meshed into the engine gear like greased lightning, starter mounts aligned perfectly (lower bolt first, then upper). I was actually shocked how simple as I realized I just saved $1000 and it was not any harder than removing my skid! My old starter spins smoothly so likely only needs a brush kit ($36) and now I have a back up. I may look into the starter saver LED that tells you if the starter remains hot after starting as this can destroy it silently as it will be rotating at engine RPM (yikes!). Good luck, nuts anyone would disconnect anything other then front engine mount bolts to do this project let alone remove engine!
Hooray!
TY 4 Stroke Junkie
- Joined
- Aug 12, 2017
- Messages
- 707
- Location
- Maine USA
- Country
- USA
- Snowmobile
- 2009 Yamaha FX Nytro XTX
1998 Yamaha VMAX 700 XTC
Today's project was back to fun stuff, fabricating the HID ballast mounts to mimic how Grizz installed his, plan to install and loom HID wires tomorrow now I know I don't have to mess with the airbox removal or other items for the starter... getting read for the Alligash 09-11FEB, should be awesome, but 100 miles in the middle or nowhere so need all to be reliable.


Hooray!
TY 4 Stroke Junkie
- Joined
- Aug 12, 2017
- Messages
- 707
- Location
- Maine USA
- Country
- USA
- Snowmobile
- 2009 Yamaha FX Nytro XTX
1998 Yamaha VMAX 700 XTC
Wrapping things up now, tonight was HID ballast mounting and looming wires and putting on the hood! For all those that have watched this thread since last summer, here are a few pics (great looking sled design) with the hood on at last! I could not have done this without all the insight and experience on this site and my brother in law, good times... should be a sweet ride for years to come. Thank you. Now that mechanicals are done, getting the four bags (front trunk, windshield, tank, dry bag) organized and the new Mountain Addiction black 1.3 gallon gas jug sorted for an adventure into the Allagash in Maine 09,10FEB. We will be 150 miles out so self sufficiency is required, will detail what I carry and where. If anyone is nearby, rally up, it is sure to be an adventure, crashing at McNally's camps deep in the bush.


Hooray!
TY 4 Stroke Junkie
- Joined
- Aug 12, 2017
- Messages
- 707
- Location
- Maine USA
- Country
- USA
- Snowmobile
- 2009 Yamaha FX Nytro XTX
1998 Yamaha VMAX 700 XTC
Buttoning things up now in preparation for the maiden voyage to the Alligash (Northern Maine) 08-11FEB. Polished the right side aluminum and did a second polish on the left side, the polish noted earlier in this thread is AMAZING... really impressed with it. This time put a small buffer wheel from a headlight restoration kit on a drill for the application (way easier and worked well). Mounted the smaller tank bag, happy with result, ran the attachment webbing down trail tank and then behind the lower plastics and mounted the buckles down by the foot hold bars. Totally out of the way and bag will add valuable storage space for the trip, will post packing plan in the five bags on the sled but thinking tank bag will have beverages (water / other) wrapped in spare clothes. MountainAddiction 1.3 gallon track rack black gas jug arrived, super heavy duty, it fits snugly where the smaller Yamaha bag goes on the stock rack so I can still fit the Yamaha dry bag in its location. The dry bag buckles would have to be removed if I placed the gas jug in that spot (my original plan). Happy as I need the dry bag storage capacity. Almost there...


Gtbensley
Veteran
Looking good!
Hooray!
TY 4 Stroke Junkie
- Joined
- Aug 12, 2017
- Messages
- 707
- Location
- Maine USA
- Country
- USA
- Snowmobile
- 2009 Yamaha FX Nytro XTX
1998 Yamaha VMAX 700 XTC
Thanks... Lots of fun doing this project.Looking good!
Hooray!
TY 4 Stroke Junkie
- Joined
- Aug 12, 2017
- Messages
- 707
- Location
- Maine USA
- Country
- USA
- Snowmobile
- 2009 Yamaha FX Nytro XTX
1998 Yamaha VMAX 700 XTC
Had a blast on the maiden voyage in the Allagash last weekend, over 12" of new snow and very few riders up there as it is all ungroomed, unmarked logging roads in the wilderness. The tuners / Bergstroms worked great, no darting and actually ok in the powder with a little body language and throttle to point things where I wanted to go. Suspension was fantastic, supple, I adjusted the springs to H and went from 3 clicks from all the way out to 6 clicks (12 click range total) for the middle of the road. Tightened things up great, no bottoming except for the worse bumps which is what I was after. Love the Nytro engine, great pull and the Schmidt Brothers primary clutch kit and rollers worked great. Nice smooth low engagement which was required in the tight woods paths we had to traverse between logging roads and the lakes. Also the SB block off plate was a lifesaver in the powder. Eliminated 90% of the snow buildup. Rocs HIDs were amazing, night and day compared to the new ski-doo I was with (will post some comparison pics). Loved the PowerMadd riser, put me in a great position, next is the WRP seat to get 2" taller (this summer). All systems were a go and no issues until I had a hard reverse (forgot to lubricate the reverse linkage) and then had a hard clunk as it went into gear... Now I have a fu@&%ing gear whine... hoping it is only a chipped tooth on one of the cheaper gears (#57, #42) and not the $150+ gears. Damn... you cant miss anything on these sleds or you pay. I lubricated the linkage and now goes into and out of reverse smoothly but too late... Wondering if riding with the gear whine will cause worse damage to other gears or will "wear in" and be fine... ordering the two oil seals (#51, #11) to have on hand so I can pull the cover and inspect things inside, will change the chain case oil and see if there is any metal in there too... oh well, what a great sled, FUN : )


Snowman871
Lifetime Member
- Joined
- Feb 9, 2010
- Messages
- 278
- Location
- Woodville, WI
- Country
- USA
- Snowmobile
- 2024 Polaris Assault 850
Lots of great info/pics, thanks for sharing!
Similar threads
-
This site uses cookies to help personalise content, tailor your experience and to keep you logged in if you register.
By continuing to use this site, you are consenting to our use of cookies.