putz21
TY 4 Stroke Junkie
- Joined
- Apr 15, 2013
- Messages
- 642
- Location
- Tomahawk, WI
- Country
- USA
- Snowmobile
- '23 Sidewinder LTX LE w/EPS
‘19 Sidewinder LTX SE
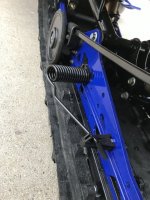
My buddies have been running these tunnel BRP Ice Scratchers on their Poo and Doo's last year with great results and doesn't beat up the paint on the skid like the wire ice scratches seem to do.....at least for me. I thought if these work for Poo and Doo, they must work on Cat and Yamaha.
Very easy install. BRP part #860201516
Only addition to what came in the kit was to purchase two shorter bolts from which came in the brp ice scratcher kit. The bolt that I used to mount the ice scratchers was: M10X1.25X90. This bolt essentially replaces the stock hex bolt that is in the hanger now for the upper idler wheel. I then had to drill one hole for the spring to feed into at 2 o'clock. Then you need to Drill two holes in the inner side of the bumper under the tunnel and use two rivets that came with the kit to hang the ice scratchers when not in use. Very easy install and has great down pressure and won't scratch my rails!
Last edited:


- Joined
- Apr 13, 2003
- Messages
- 21,312
- Age
- 54
- Location
- Schofield, WI
- Website
- www.totallyamaha.com
- Country
- USA
- Snowmobile
- 2020 Sidewinder SRX
My buddies have been running these tunnel BRP Ice Scratchers on their Poo and Doo's last year with great results and doesn't beat up the paint on the skid like the wire ice scratches seem to do.....at least for me. I thought if these work for Poo and Doo, they must work on Cat and Yamaha.
Very easy install. BRP part #860201516
Only addition to what came in the kit was to purchase two shorter bolts from which came in the brp ice scratcher kit. The bolt that I used to mount the ice scratchers was: M10X1.25X90. This bolt essentially replaces the stock hex bolt that is in the hanger now for the upper idler wheel. I then had to drill one hole for the spring to feed into at 2 o'clock. Then you need to Drill two holes in the inner side of the bumper under the tunnel and use two rivets that came with the kit to hang the ice scratchers when not in use. Very easy install and has great down pressure and won't scratch my rails!
View attachment 143344
Whats the price?
putz21
TY 4 Stroke Junkie
- Joined
- Apr 15, 2013
- Messages
- 642
- Location
- Tomahawk, WI
- Country
- USA
- Snowmobile
- '23 Sidewinder LTX LE w/EPS
‘19 Sidewinder LTX SE
Whats the price?
$105 US. Includes replaceable tips as well. Replaceable carbide tips are $35


- Joined
- Apr 13, 2003
- Messages
- 21,312
- Age
- 54
- Location
- Schofield, WI
- Website
- www.totallyamaha.com
- Country
- USA
- Snowmobile
- 2020 Sidewinder SRX
$105 US. Includes replaceable tips as well.
I like these better from BRP but not sure where to get them or what the numbers are. They were at Novi on a show skid for Elka.
putz21
TY 4 Stroke Junkie
- Joined
- Apr 15, 2013
- Messages
- 642
- Location
- Tomahawk, WI
- Country
- USA
- Snowmobile
- '23 Sidewinder LTX LE w/EPS
‘19 Sidewinder LTX SE
I like these better from BRP but not sure where to get them or what the numbers are. They were at Novi on a show skid for Elka.
View attachment 143350
I’ve heard those wires wear down really quick when used a lot as they don’t have the carbide tips the others ones come with.
Crazy Canuk
Expert
My buddies have been running these tunnel BRP Ice Scratchers on their Poo and Doo's last year with great results and doesn't beat up the paint on the skid like the wire ice scratches seem to do.....at least for me. I thought if these work for Poo and Doo, they must work on Cat and Yamaha.
Very easy install. BRP part #860201516
Only addition to what came in the kit was to purchase two shorter bolts from which came in the brp ice scratcher kit. The bolt that I used to mount the ice scratchers was: M10X1.25X90. This bolt essentially replaces the stock hex bolt that is in the hanger now for the upper idler wheel. I then had to drill one hole for the spring to feed into at 2 o'clock. Then you need to Drill two holes in the inner side of the bumper under the tunnel and use two rivets that came with the kit to hang the ice scratchers when not in use. Very easy install and has great down pressure and won't scratch my rails!
View attachment 143344
Have these on the wife's Renegade. They work very well considering how far back they are and if you reverse, it is not the end of the work. I have the Yamaha ones on my Viper. I cut a small piece of 10 gauge wire sheath off, split it and zip-tied it on the rail where the scratchers hang in the up position. You would never know it is there unless you knew it was there and I have zero scratches on the rail. Just a though for those that want to use the Yammi ones.


FrozenTows4
Lifetime Member
- Joined
- Nov 6, 2014
- Messages
- 487
- Age
- 65
- Location
- Brainerd Minnesota
- Country
- USA
- Snowmobile
- 2014 XF7000 Sold
2017 ZR6000RS
2018 ZR6000 El Tigre
- YOUTUBE
- FrozenTows1
Those are mounted Way forward. Which is good, but seems they extend outward a bit far.
Would like to see these actually mounted and not just on a static display.
With the skid at full compression, these appear that they may contact the tunnel?


Turtle
Lifetime Member
- Joined
- Feb 27, 2006
- Messages
- 1,340
- Location
- Marathon, WI
- Country
- USA
- Snowmobile
- '17 Polaris Switchback 800 Pro S LE
'15 Viper RTX SE w/ MPI turbo - sold
'07 FX Phazer GT
I've looked at the tunnel mounted Doo scratchers as an option. Even met a guy on the trail last year that had then (on his Doo) and he really like them. I ended up mounting the Doo rail version (similar to the ones pictured above). I found a great way to mount them far forward on my 129 skid by relocating a set of idlers further back. I'll try to get some pics this weekend.


- Joined
- Apr 13, 2003
- Messages
- 21,312
- Age
- 54
- Location
- Schofield, WI
- Website
- www.totallyamaha.com
- Country
- USA
- Snowmobile
- 2020 Sidewinder SRX
I've looked at the tunnel mounted Doo scratchers as an option. Even met a guy on the trail last year that had then (on his Doo) and he really like them. I ended up mounting the Doo rail version (similar to the ones pictured above). I found a great way to mount them far forward on my 129 skid by relocating a set of idlers further back. I'll try to get some pics this weekend.
That would be awesome, thanks.
IH8CROWS
Expert
Would these work on the shorter 129 Sidewinder or would the carbide be basically next to the rear wheel?My buddies have been running these tunnel BRP Ice Scratchers on their Poo and Doo's last year with great results and doesn't beat up the paint on the skid like the wire ice scratches seem to do.....at least for me. I thought if these work for Poo and Doo, they must work on Cat and Yamaha.
Very easy install. BRP part #860201516
Only addition to what came in the kit was to purchase two shorter bolts from which came in the brp ice scratcher kit. The bolt that I used to mount the ice scratchers was: M10X1.25X90. This bolt essentially replaces the stock hex bolt that is in the hanger now for the upper idler wheel. I then had to drill one hole for the spring to feed into at 2 o'clock. Then you need to Drill two holes in the inner side of the bumper under the tunnel and use two rivets that came with the kit to hang the ice scratchers when not in use. Very easy install and has great down pressure and won't scratch my rails!
View attachment 143344
That BRP stuff will likely slow you down...lol
putz21
TY 4 Stroke Junkie
- Joined
- Apr 15, 2013
- Messages
- 642
- Location
- Tomahawk, WI
- Country
- USA
- Snowmobile
- '23 Sidewinder LTX LE w/EPS
‘19 Sidewinder LTX SE
That BRP stuff will likely slow you down...lol
I've looked at the tunnel mounted Doo scratchers as an option. Even met a guy on the trail last year that had then (on his Doo) and he really like them. I ended up mounting the Doo rail version (similar to the ones pictured above). I found a great way to mount them far forward on my 129 skid by relocating a set of idlers further back. I'll try to get some pics this weekend.
How have these been holding up from an overall wear perspective on the ends since there is no carbide?


Turtle
Lifetime Member
- Joined
- Feb 27, 2006
- Messages
- 1,340
- Location
- Marathon, WI
- Country
- USA
- Snowmobile
- '17 Polaris Switchback 800 Pro S LE
'15 Viper RTX SE w/ MPI turbo - sold
'07 FX Phazer GT
This will be my first season with the doo scratchers. But I've run the standard wire scratchers for the last couple of years without a carbide. For me, they have held up fine. Over the course of about 4000 miles, the wire scratcher has worn down. But probably still has another 4000 miles of life left in them. But even if they do wear down to the point of needing replacement, you can just grab a pliers and bend the tip over again. Wire scratchers are definitely not a one-season and throw them away kind of item.How have these been holding up from an overall wear perspective on the ends since there is no carbide?
putz21
TY 4 Stroke Junkie
- Joined
- Apr 15, 2013
- Messages
- 642
- Location
- Tomahawk, WI
- Country
- USA
- Snowmobile
- '23 Sidewinder LTX LE w/EPS
‘19 Sidewinder LTX SE
Would these work on the shorter 129 Sidewinder or would the carbide be basically next to the rear wheel?
I do not know the answer to whether it would work well or not on a 129. I would think it would work ok, but not 100% on that.


Turtle
Lifetime Member
- Joined
- Feb 27, 2006
- Messages
- 1,340
- Location
- Marathon, WI
- Country
- USA
- Snowmobile
- '17 Polaris Switchback 800 Pro S LE
'15 Viper RTX SE w/ MPI turbo - sold
'07 FX Phazer GT
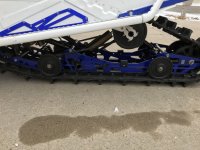
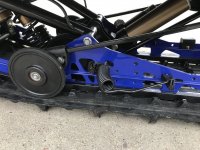
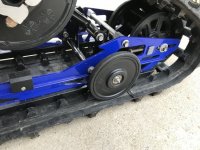
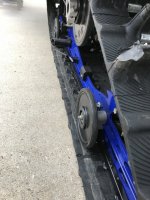
So here are some pics of my Doo rail mounted scratchers on my Turbo Viper (129" skid). I got them mounted pretty far forward on the skid by moving my second set of outer idler wheels towards the back of the skid. The idlers are mounted in some stock holes at the back end of the rails and the scratchers do not come in contact with the upper idlers under full compression of the skid. Normally that second set of idlers are mounted on the inside of the rails. But because of the reservoir on my rear shock, they can't go on the inside. I ran these same scratchers on my son's Phazer last season, and they worked great.
Attachments
Similar threads
- Replies
- 28
- Views
- 8K
-
This site uses cookies to help personalise content, tailor your experience and to keep you logged in if you register.
By continuing to use this site, you are consenting to our use of cookies.

