

lakercr
Tech Advisor
- Joined
- Aug 12, 2003
- Messages
- 2,377
- Reaction score
- 470
- Points
- 1,413
- Location
- Winnipeg, Manitoba
- Country
- Canada
- Snowmobile
- 2025 SRX
I started putting an RX back together today with LC pistons and took some pictures to give you guys an idea what's involved with the job. It isn't by any means a complete step-by-step 'how to' , but I hope it is useful for some of you.
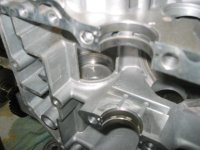
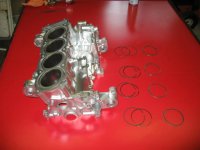
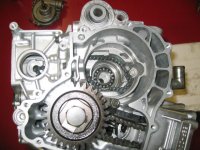
So, to start... for those who haven't seen it like this before, meet the upper case of an RX engine.
So, to start... for those who haven't seen it like this before, meet the upper case of an RX engine.
Attachments

lakercr
Tech Advisor
- Joined
- Aug 12, 2003
- Messages
- 2,377
- Reaction score
- 470
- Points
- 1,413
- Location
- Winnipeg, Manitoba
- Country
- Canada
- Snowmobile
- 2025 SRX
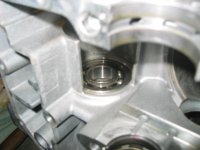
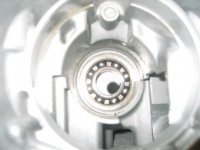
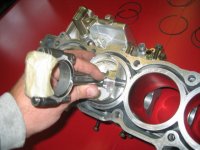
The carrier bearing for the gear reduction was replaced. Heat the case (carefully) with a torch and you should be able to pull it out easily with a pick tool. Put the bearing in the freezer for 20 minutes, and re-heat the case when re-installing.
Attachments


lakercr
Tech Advisor
- Joined
- Aug 12, 2003
- Messages
- 2,377
- Reaction score
- 470
- Points
- 1,413
- Location
- Winnipeg, Manitoba
- Country
- Canada
- Snowmobile
- 2025 SRX
lakercr
Tech Advisor
- Joined
- Aug 12, 2003
- Messages
- 2,377
- Reaction score
- 470
- Points
- 1,413
- Location
- Winnipeg, Manitoba
- Country
- Canada
- Snowmobile
- 2025 SRX


lakercr
Tech Advisor
- Joined
- Aug 12, 2003
- Messages
- 2,377
- Reaction score
- 470
- Points
- 1,413
- Location
- Winnipeg, Manitoba
- Country
- Canada
- Snowmobile
- 2025 SRX
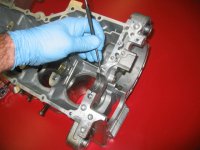
Time to install the pistons. You need to have the cases somehow suspended above the table like I have in these pictures. Otherwise, when you go to tap the piston into the bore the con-rod will hit the table before the piston is fully inside the cylinder.
Attachments


lakercr
Tech Advisor
- Joined
- Aug 12, 2003
- Messages
- 2,377
- Reaction score
- 470
- Points
- 1,413
- Location
- Winnipeg, Manitoba
- Country
- Canada
- Snowmobile
- 2025 SRX
Pistons going in. Don't be shy with the oil on both pistons and cylinders...
Attachments


lakercr
Tech Advisor
- Joined
- Aug 12, 2003
- Messages
- 2,377
- Reaction score
- 470
- Points
- 1,413
- Location
- Winnipeg, Manitoba
- Country
- Canada
- Snowmobile
- 2025 SRX


lakercr
Tech Advisor
- Joined
- Aug 12, 2003
- Messages
- 2,377
- Reaction score
- 470
- Points
- 1,413
- Location
- Winnipeg, Manitoba
- Country
- Canada
- Snowmobile
- 2025 SRX
Con-rod caps can now go on. 1st torque is 14 ft/lbs, second is 14 ft/lbs + 120 degrees. 1st pic shows where the Yamabond has to go.
Attachments


lakercr
Tech Advisor
- Joined
- Aug 12, 2003
- Messages
- 2,377
- Reaction score
- 470
- Points
- 1,413
- Location
- Winnipeg, Manitoba
- Country
- Canada
- Snowmobile
- 2025 SRX
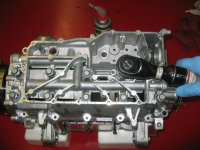
Apply Yamabond to the mating surfaces as per the service manual, and place the lower case onto the upper. The bolt positions are all numbered in the manual, and the cases have the corresponding numbers stamped into them. There are a number of different bolt lengths and sizes, you'll probably find a set of calipers (or a metric ruler) helpful here. Follow the torque specs Yamaha provides.
>
>
>
>
No, I didn't use the air ratchet to tighten those bolts - just to thread them most of the way in.
>
>
>
>
No, I didn't use the air ratchet to tighten those bolts - just to thread them most of the way in.
Attachments

lakercr
Tech Advisor
- Joined
- Aug 12, 2003
- Messages
- 2,377
- Reaction score
- 470
- Points
- 1,413
- Location
- Winnipeg, Manitoba
- Country
- Canada
- Snowmobile
- 2025 SRX

lakercr
Tech Advisor
- Joined
- Aug 12, 2003
- Messages
- 2,377
- Reaction score
- 470
- Points
- 1,413
- Location
- Winnipeg, Manitoba
- Country
- Canada
- Snowmobile
- 2025 SRX


lakercr
Tech Advisor
- Joined
- Aug 12, 2003
- Messages
- 2,377
- Reaction score
- 470
- Points
- 1,413
- Location
- Winnipeg, Manitoba
- Country
- Canada
- Snowmobile
- 2025 SRX

lakercr
Tech Advisor
- Joined
- Aug 12, 2003
- Messages
- 2,377
- Reaction score
- 470
- Points
- 1,413
- Location
- Winnipeg, Manitoba
- Country
- Canada
- Snowmobile
- 2025 SRX


lakercr
Tech Advisor
- Joined
- Aug 12, 2003
- Messages
- 2,377
- Reaction score
- 470
- Points
- 1,413
- Location
- Winnipeg, Manitoba
- Country
- Canada
- Snowmobile
- 2025 SRX


lakercr
Tech Advisor
- Joined
- Aug 12, 2003
- Messages
- 2,377
- Reaction score
- 470
- Points
- 1,413
- Location
- Winnipeg, Manitoba
- Country
- Canada
- Snowmobile
- 2025 SRX

-
This site uses cookies to help personalise content, tailor your experience and to keep you logged in if you register.
By continuing to use this site, you are consenting to our use of cookies.