• We are no longer supporting TapaTalk as a mobile app for our sites. The TapaTalk App has many issues with speed on our server as well as security holes that leave us vulnerable to attacks and spammers.

RX1 Engine re-assembly (with pics)

Going to be waiting on parts for a few days. In the meantime I've added the last few parts that I can.

More plumbing and the starter installed...
 

Attachments

  • RX1 Engine Re-build 071.jpg
    RX1 Engine Re-build 071.jpg
    52.4 KB · Views: 274

For the MC Xpress guys...
 

Attachments

  • RX1 Engine Re-build 075.jpg
    RX1 Engine Re-build 075.jpg
    40.9 KB · Views: 272
  • RX1 Engine Re-build 073.jpg
    RX1 Engine Re-build 073.jpg
    39.9 KB · Views: 280
Remove the (4) #25 torx bolts and lay the parts out...
 

Attachments

  • RX1 Engine Re-build 081.jpg
    RX1 Engine Re-build 081.jpg
    32.7 KB · Views: 261
  • RX1 Engine Re-build 077.jpg
    RX1 Engine Re-build 077.jpg
    31.6 KB · Views: 264
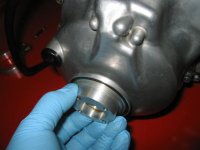
Push the pump shaft into the housing until it is flush - you want to get the locating pin engaged into the crank bolt before you start threading the housing onto the mag cover.

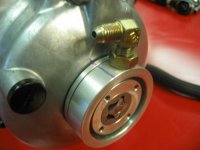
Thread two bolts into the housing and tighten using a screwdriver as shown (you'll need to find two bolts to do this, they aren't supplied)
 

Attachments

  • RX1 Engine Re-build 089.jpg
    RX1 Engine Re-build 089.jpg
    38.2 KB · Views: 266
  • RX1 Engine Re-build 088.jpg
    RX1 Engine Re-build 088.jpg
    37.2 KB · Views: 259
  • RX1 Engine Re-build 087.jpg
    RX1 Engine Re-build 087.jpg
    37.4 KB · Views: 261
  • RX1 Engine Re-build 086.jpg
    RX1 Engine Re-build 086.jpg
    31 KB · Views: 268
  • RX1 Engine Re-build 083.jpg
    RX1 Engine Re-build 083.jpg
    22.3 KB · Views: 271
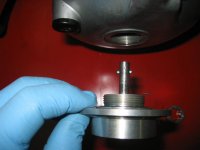
Use a pair of needlenose pliers to install the locating pin into the pump shaft. Re-install the two remaining pieces of the troichoidal pump and align the pump body with the opening in the housing.
 

Attachments

  • RX1 Engine Re-build 097.jpg
    RX1 Engine Re-build 097.jpg
    39.5 KB · Views: 269
  • RX1 Engine Re-build 096.jpg
    RX1 Engine Re-build 096.jpg
    42.7 KB · Views: 254
  • RX1 Engine Re-build 095.jpg
    RX1 Engine Re-build 095.jpg
    32.2 KB · Views: 279
  • RX1 Engine Re-build 094.jpg
    RX1 Engine Re-build 094.jpg
    41.8 KB · Views: 240
  • RX1 Engine Re-build 091.jpg
    RX1 Engine Re-build 091.jpg
    48.7 KB · Views: 283
Tighten the cover plate with the (4) #25 torx head screws to finish the installation.
 

Attachments

  • RX1 Engine Re-build 101.jpg
    RX1 Engine Re-build 101.jpg
    43.6 KB · Views: 242
  • RX1 Engine Re-build 099.jpg
    RX1 Engine Re-build 099.jpg
    40.1 KB · Views: 255
  • RX1 Engine Re-build 098.jpg
    RX1 Engine Re-build 098.jpg
    50.4 KB · Views: 249
OK, the coolant elbow is back in stock & installed on the sled (bottom right in pic).
 

Attachments

  • More RX 091 (Medium).jpg
    More RX 091 (Medium).jpg
    77.4 KB · Views: 288
This engine will be running additional crank venting. 1/4" NPT threads are tapped for fitting.
 

Attachments

  • More RX 089 (Medium).jpg
    More RX 089 (Medium).jpg
    62.4 KB · Views: 284
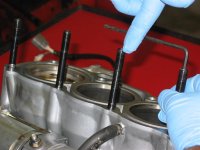
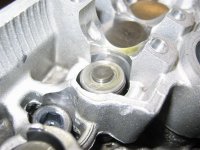
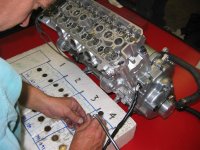
Installing the studs into the head. Allen wrench makes them go in faster, but if you can't put these in easily with your fingers then chase all threads again until they will. Studs are torqued to 14 ft/lbs with green locktite.
 

Attachments

  • More RX 094 (Medium).jpg
    More RX 094 (Medium).jpg
    67.8 KB · Views: 262
  • More RX 093 (Medium).jpg
    More RX 093 (Medium).jpg
    59.6 KB · Views: 258
Head gasket is sprayed with Permatex Copper on both sides. Set in place and lower the head down. Use a piece of rope or a zip-tie to hold the cam chain while you pass it through the head.
 

Attachments

  • More RX 097 (Medium).jpg
    More RX 097 (Medium).jpg
    71.2 KB · Views: 289
  • More RX 096 (Medium).jpg
    More RX 096 (Medium).jpg
    83.5 KB · Views: 310
Installing the head bolts and torquing.
 

Attachments

  • More RX 105 (Medium).jpg
    More RX 105 (Medium).jpg
    79.3 KB · Views: 318
  • More RX 104 (Medium).jpg
    More RX 104 (Medium).jpg
    74.5 KB · Views: 264
  • More RX 102 (Medium).jpg
    More RX 102 (Medium).jpg
    100.4 KB · Views: 310
  • More RX 100 (Medium).jpg
    More RX 100 (Medium).jpg
    80.4 KB · Views: 279
  • More RX 099 (Medium).jpg
    More RX 099 (Medium).jpg
    74 KB · Views: 274
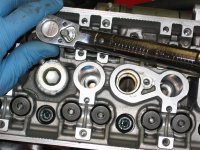
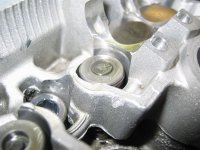
Adding the valve shims and lfters. The numbers for the shims are marked with ink on one side. The number represents the shims thickness in mm (shim in the caliper would have 192 marked on it).
 

Attachments

  • More RX 120 (Medium).jpg
    More RX 120 (Medium).jpg
    76 KB · Views: 266
  • More RX 119 (Medium).jpg
    More RX 119 (Medium).jpg
    39 KB · Views: 292
  • More RX 113 (Medium).jpg
    More RX 113 (Medium).jpg
    82.4 KB · Views: 310
  • More RX 111 (Medium).jpg
    More RX 111 (Medium).jpg
    77.5 KB · Views: 280
Notice how the shim sits in picture 120 - it isn't insalled correctly. Make sure the shim is all the way down into the pocket, or you will never get your valves set right.

The shim is correct in this pic...
 

Attachments

  • More RX 121 (Medium).jpg
    More RX 121 (Medium).jpg
    75.7 KB · Views: 279
Finish installing the valve shims and lifters.
 

Attachments

  • More RX 125 (Medium).jpg
    More RX 125 (Medium).jpg
    89.8 KB · Views: 297
  • More RX 124 (Medium).jpg
    More RX 124 (Medium).jpg
    66.6 KB · Views: 246


Back
Top