Off Trail Mike
Gone Riding!
- Joined
- Dec 26, 2009
- Messages
- 703
- Reaction score
- 39
- Points
- 838
- Location
- Bathurst, NB, Canada
- Country
- Canada
- Snowmobile
- MTX
Ebay. The foam I used was Minicell which is a stiff closed cell foam, but there are lots of choices, even look for a soft yoga block at Walmart!
Minicell is easy to find. I did a quick Google search and found 12 x 12 x 4 for $25
http://www.kayakproshop.com/minicell.html
Anyone selling boating supplies or upholstery should have access to closed cell foam as well. Doesn't really matter what it is so long as it can't absorb water.
Great pic and sled is really looking good. Who's spindles are you using?
Mike
edge_232
Expert
- Joined
- Jan 15, 2014
- Messages
- 254
- Reaction score
- 25
- Points
- 388
- Location
- Madison WI
- Country
- USA
- Snowmobile
- 2011 Nytro MTX slowly being modded
2005 IQR Trail Converted
edge_232
Expert
- Joined
- Jan 15, 2014
- Messages
- 254
- Reaction score
- 25
- Points
- 388
- Location
- Madison WI
- Country
- USA
- Snowmobile
- 2011 Nytro MTX slowly being modded
2005 IQR Trail Converted
The spindles are part of the Z-Broz kit. I had an extra seat form one of my bow stands which should be fine since it does hold water. The sleds coming together nicely but now this fuel tank issue. Looks like I'll need to get another trail tank...not cheap by any means. I tried to fix it twice with JB weld but it just seeps still & I'm not sure what else to try.
directjess
Newbie
- Joined
- Jan 15, 2011
- Messages
- 14
- Reaction score
- 4
- Points
- 703
- Location
- Esko MN
- Country
- USA
- Snowmobile
- Nytro mtx stage 1
Perhaps plastic weld it might be worth a try. A plastic welder kit come with different types of plastic welding sticks for different type of plastic.
zx4ever
Expert
- Joined
- Apr 14, 2011
- Messages
- 339
- Reaction score
- 246
- Points
- 1,028
- Location
- Northern BC canada
- Country
- Canada
- Snowmobile
- 08 nytro ty4stroke customized
The spindles are part of the Z-Broz kit. I had an extra seat form one of my bow stands which should be fine since it does hold water. The sleds coming together nicely but now this fuel tank issue. Looks like I'll need to get another trail tank...not cheap by any means. I tried to fix it twice with JB weld but it just seeps still & I'm not sure what else to try.
Use a soldering gun to weld it and razor blade off some of the plastic off the edges of the tank under the seat for the filler. Works really well
Sportsterdanne
TY 4 Stroke Guru
+1 on the soldering iron, i fixed a small leak on my Rev gas tank that way. Use a high power one and try to get the base material to melt before adding new plastic so it will fuse together and not just melt on top (like tig or gas welding).
edge_232
Expert
- Joined
- Jan 15, 2014
- Messages
- 254
- Reaction score
- 25
- Points
- 388
- Location
- Madison WI
- Country
- USA
- Snowmobile
- 2011 Nytro MTX slowly being modded
2005 IQR Trail Converted
Great idea guys! I just watched a couple you tube videos of guys using a soldering iron and think I got it.
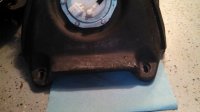
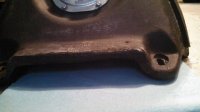
I used my 100 watt soldering gun and some oil bottle plastic as fill. I only have about 3 gallons of water in the tank right now to see if it works (yes I removed the fuel pump and filter before I added the water) No leaks yet.

I heated the base tank first to get it gooy and semi liquefied then added the filler material. Did one small pass over the two leaks and tested them. NO LEAKAGE! Then I continued to build the thinner area up to give it more strength and stability. Now it's sitting in my garage until I get home after work to see if everything is still dry, I hope those dam tank are expensive.
It seems just as solid as the stock tank. In this case better than the stock tank LOL.
I think I still might get some JB Weld and smear over the area it to give it some more strength and protection.
All this because the revision 1 of the Trail Tank is a PITA to fit and some modifications are need in some cases (it fit great on the Nytro it came off of). The new ones are suppose to fit and take care of all the issues the rev 1 had. I worked with Seth before so I'm sure the new ones are much better but If I can make this one work and save some coin I'm all for it!


I used my 100 watt soldering gun and some oil bottle plastic as fill. I only have about 3 gallons of water in the tank right now to see if it works (yes I removed the fuel pump and filter before I added the water) No leaks yet.
I heated the base tank first to get it gooy and semi liquefied then added the filler material. Did one small pass over the two leaks and tested them. NO LEAKAGE! Then I continued to build the thinner area up to give it more strength and stability. Now it's sitting in my garage until I get home after work to see if everything is still dry, I hope those dam tank are expensive.
It seems just as solid as the stock tank. In this case better than the stock tank LOL.
I think I still might get some JB Weld and smear over the area it to give it some more strength and protection.
All this because the revision 1 of the Trail Tank is a PITA to fit and some modifications are need in some cases (it fit great on the Nytro it came off of). The new ones are suppose to fit and take care of all the issues the rev 1 had. I worked with Seth before so I'm sure the new ones are much better but If I can make this one work and save some coin I'm all for it!
Last edited:
edge_232
Expert
- Joined
- Jan 15, 2014
- Messages
- 254
- Reaction score
- 25
- Points
- 388
- Location
- Madison WI
- Country
- USA
- Snowmobile
- 2011 Nytro MTX slowly being modded
2005 IQR Trail Converted
Well no leaks when I got home from work! I'm fricking excited, now to fill it with fuel & check it in the morning. It should be fine.
Do I put some expoxy over it for more protection or just leave it?
Do I put some expoxy over it for more protection or just leave it?
edge_232
Expert
- Joined
- Jan 15, 2014
- Messages
- 254
- Reaction score
- 25
- Points
- 388
- Location
- Madison WI
- Country
- USA
- Snowmobile
- 2011 Nytro MTX slowly being modded
2005 IQR Trail Converted
I checked it this morning and no leaks!

I can't believe that Redneck plastic welding thing worked, I love it and it's right up my alley in the way of doing this.
Now to put the tank back on and we all know how much of a PITA that is.
I can't believe that Redneck plastic welding thing worked, I love it and it's right up my alley in the way of doing this.
Now to put the tank back on and we all know how much of a PITA that is.
Attachments
zx4ever
Expert
- Joined
- Apr 14, 2011
- Messages
- 339
- Reaction score
- 246
- Points
- 1,028
- Location
- Northern BC canada
- Country
- Canada
- Snowmobile
- 08 nytro ty4stroke customized
I checked it this morning and no leaks!
View attachment 98314
I can't believe that Redneck plastic welding thing worked, I love it and it's right up my alley in the way of doing this.
Now to put the tank back on and we all know how much of a PITA that is.
Are you calling me redneck? Ha ha I guess I am. Glad you got it figured I wouldn't use epoxy over it cause it probably won't be compatable with the tank plastic.
edge_232
Expert
- Joined
- Jan 15, 2014
- Messages
- 254
- Reaction score
- 25
- Points
- 388
- Location
- Madison WI
- Country
- USA
- Snowmobile
- 2011 Nytro MTX slowly being modded
2005 IQR Trail Converted
No sir, just myself and thanks again for the info.
Just got my last goody for the sled for this year, maybe LOL

The skid plate fits like a dream and is a very high quality piece. You make great products Peter! Now to get it mounted and fine the the gaps with some better foam.
I'll get some pictures of the areas I'm filling in once my black yoga blocks show up LOL. They were the right price (2) blocks 9x6x4 for $12 shipped
Just got my last goody for the sled for this year, maybe LOL
The skid plate fits like a dream and is a very high quality piece. You make great products Peter! Now to get it mounted and fine the the gaps with some better foam.
I'll get some pictures of the areas I'm filling in once my black yoga blocks show up LOL. They were the right price (2) blocks 9x6x4 for $12 shipped
edge_232
Expert
- Joined
- Jan 15, 2014
- Messages
- 254
- Reaction score
- 25
- Points
- 388
- Location
- Madison WI
- Country
- USA
- Snowmobile
- 2011 Nytro MTX slowly being modded
2005 IQR Trail Converted
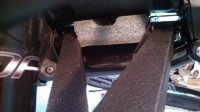
I got my sexy yoga block, isn't she pretty
 she won't stay this shape for long

I also filled the gaps below the A-arms with the block as well to avoid excess snow build up.
I also filled the gaps below the A-arms with the block as well to avoid excess snow build up.
Off Trail Mike
Gone Riding!
- Joined
- Dec 26, 2009
- Messages
- 703
- Reaction score
- 39
- Points
- 838
- Location
- Bathurst, NB, Canada
- Country
- Canada
- Snowmobile
- MTX
Edge:
One thing I forgot to mention is using 3M Scotch Linerless Rubber Splicing Tape to seal all the panel gaps in the front of your sled. It's available in 1" wide and 2" wide and is great stuff. It kinda like thicker and stretchier electrical tape, but it has some great applications. I use it around the upper shock mount plastic panels and in the gaps around where the Upper A-Arms protrude thru the the panels. Lots of other places it can be used.
It is also great stuff to use like a gasket to stop rubbing or eliminate a vibration. If you squeeze it, it becomes very sticky over time, but still easily removable if need be.
I put some on around the edge of my brake disk cover on my XM because it was rattling. It holds my fuel controller to my rad mount for the same reasons, so it won't move.
http://www.shop3m.com/scotch-linerl...id=AtoZ-Scotch-Linerless-Rubber-Splicing-Tape
When you first put it on, you will think "this stuff doesn't stick" and if you wait a while and ride it, you'll be surprised!
OTM
edge_232
Expert
- Joined
- Jan 15, 2014
- Messages
- 254
- Reaction score
- 25
- Points
- 388
- Location
- Madison WI
- Country
- USA
- Snowmobile
- 2011 Nytro MTX slowly being modded
2005 IQR Trail Converted
OTM
If you could send me a few pics of yours to my email or here. It sounds like a great thing to do & need to. Also what did you end up running your track tension at? I just set mine up at 1-3/4 with 20lbs. Its looser than what the manual states but I'm pretty sure that's what I ran at the end of last year & had no issues.
Also you need to fill be in on how the direct steer is going, you really got me thinking for next year.
edge_232
Expert
- Joined
- Jan 15, 2014
- Messages
- 254
- Reaction score
- 25
- Points
- 388
- Location
- Madison WI
- Country
- USA
- Snowmobile
- 2011 Nytro MTX slowly being modded
2005 IQR Trail Converted
One of my buddies is hooking me up with a brand new 2.6 PC track from his 15 Viper MTZ since he is instantly going to a 3" track once it shows up. Getting for dirt cheap.
Now do I change the drives out when I change the track? If so what 3" drives do I go with?
Now do I change the drives out when I change the track? If so what 3" drives do I go with?
Similar threads
- Replies
- 25
- Views
- 6K
- Replies
- 58
- Views
- 7K
-
This site uses cookies to help personalise content, tailor your experience and to keep you logged in if you register.
By continuing to use this site, you are consenting to our use of cookies.


